Dr. Mach MACH M2 Directions For Use Manual
Hide thumbs
Also See for MACH M2:
- Mounting instructions, directions for use (25 pages) ,
- Mounting instructions (19 pages)
Table of Contents
Advertisement
Quick Links
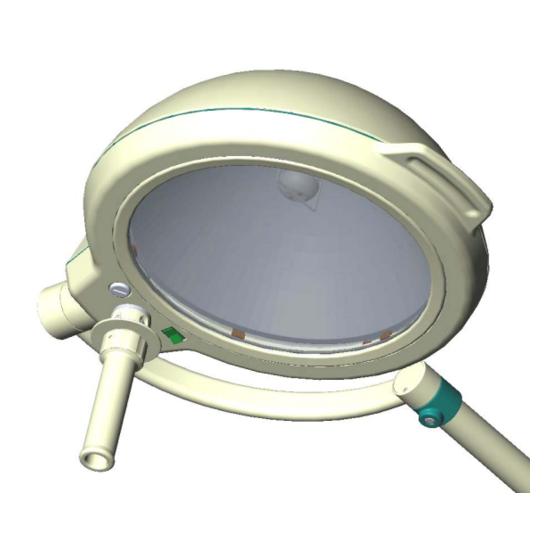
Mach M2
Mach M2 ceiling-, wall- and stand model
Mach M2 F ceiling-, wall- and stand model
Dr. Mach
59120001
Directions for use
MACH M2
GmbH u. Co., Floßmannstrasse 28, D-85560 Ebersberg
Tel.: +49 (0)8092 2093 0, Fax +49 (0)8092 2093 50
Internet: www.dr-mach.com, E-Mail:
Edition 04
Dr. Mach
Lamps and Engineering
info@dr-mach.de
07.03.2005 / Bak page 1/22
Advertisement
Table of Contents

Related Manuals for Dr. Mach MACH M2


Summary of Contents for Dr. Mach MACH M2
- Page 1 Lamps and Engineering Directions for use MACH M2 Mach M2 ceiling-, wall- and stand model Mach M2 F ceiling-, wall- and stand model Dr. Mach GmbH u. Co., Floßmannstrasse 28, D-85560 Ebersberg Tel.: +49 (0)8092 2093 0, Fax +49 (0)8092 2093 50 Internet: www.dr-mach.com, E-Mail:...
-
Page 2: Table Of Contents
Mach M2 Lamps and Engineering List of contents 1. Safety instructions ..................page 4 2. Operating the lamp MACH M2..............page 5 2.1 Brief description of the lamp ...............page 5 2.2 Turning the lamp ON/OFF ..............page 5 2.3 Positioning..................page 5 2.4 Adjusting the light field ...............page 6 3. - Page 3 Lamps and Engineering Dear customer! Congratulations for acquiring our new lamp MACH M2. With this lighting system you profit from a whole range of new developments, based on 50 years of experience in the production of operating and doctor lights.
-
Page 4: Safety Instructions
Attention, external transformer! The lamp works only with an external transformer. The external transformer must be tested and validated according to IEC 60601-1, otherwise it is not allowed to use it with Dr. Mach lamps. 59120001 Edition 04 07.03.2005 / Bak page 4/22... -
Page 5: Operating The Lamp Mach M2
The lamp MACH M2 is available in following versions: Mach M2, examination and small surgery lamp with fix-focus; Mach M2 F, examination and small surgery lamp with focusable light field. 2.2 Turning the lamp ON/OFF The lamp is turned ON and OFF by the rocker switch 1. -
Page 6: Adjusting The Light Field
Lamps and Engineering 2.4 Adjusting the light field (only Mach M2 F) The lamps Mach M2 F have a focusing function. That means, the diameter of the light field can ei- ther be enlarged or bundled to a smaller area, de- pending on the circumstances. - Page 7 Dr. Mach Mach M2 Lamps and Engineering Cleaning / disinfection and sterilisation Basics Efficient cleaning / disinfection is an essential requirement for effective sterilisation of the handle. Within the scope of responsibility for the sterility of the products it should be noted that only sufficiently validated equipment and product specific processes are used for cleaning / disinfection and that the vali- dated parameters are complied with in every cycle.
-
Page 8: Lamp Housing And Splinter Protection Disk
Dr. Mach Mach M2 Lamps and Engineering Sterilisation Only previously cleaned and disinfected handles may be sterilised. The handles are placed in a suitable sterilisation pack (one-way sterilisation pack, e.g. foil / paper sterili- sation bags, single or double pack) in accordance with DIN EN 868 / ISO 11607 for steam sterilisation and then sterilised. -
Page 9: Maintenance
Lamps and Engineering 4. Maintenance 4.1 Adjusting the mobility The lamp MACH M2 is supplied with brakes on the suspension fixture and on the lamp housing. Adjust these brakes, if necessary, after installation. If it is difficult to move the lamp, or if it does not keep its set position, the brake forces should be adjusted. - Page 10 Dr. Mach Mach M2 Lamps and Engineering • By turning the screw 9 anticlockwise, the re- taining ring 10 turns clockwise off the lower housing part. • Turn the screw 9 until the two marking arrows on the ring of the light and the lower housing part of the lamp match as shown in the figure.
- Page 11 Dr. Mach Mach M2 Lamps and Engineering • Tilt the shadower 12 off-center as shown in the figure on the left, until it snaps in in the provided groove. • Pull the halogen bulb 13 carefully off its socket. ATTENTION: Never touch new halogen bulbs with your fingers.
-
Page 12: Changing The Filter Disk
Dr. Mach Mach M2 Lamps and Engineering 4.2.2 Changing the filter disk The filter disk mounted between reflector and splin- ter protection disk prevents a damaging heating of the illuminated area. ATTENTION! It is not allowed to use the lamp without this filter. - Page 13 Dr. Mach Mach M2 Lamps and Engineering • Then remove the retaining ring 10 by pulling it upwards. • The filter disk 16 is held by six retainers 17, which are fixed with six recessed head screws. • Loosen the screws at three adjacent retainers •...
-
Page 14: Changing The Splinter Protection Disk
Dr. Mach Mach M2 Lamps and Engineering • Mount the retaining ring 10 in reverse order (anticlockwise rotation). For mounting position the retaining ring 10 so that the toothed wheel segment 14 of the ring and the toothed wheel 7 in the lower housing part work into each other. - Page 15 Dr. Mach Mach M2 Lamps and Engineering • By turning the screw 9 anticlockwise, the re- taining ring 10 turns clockwise off the lower housing part. • Turn the screw 9 until the two marking arrows on the ring of the light and the lower housing part of the lamp match as shown in the figure.
- Page 16 Dr. Mach Mach M2 Lamps and Engineering • Loosen the six screws 18 and remove them. • Lift the filter disk 17 off the six retainers 16. Always place the filter disk on a soft, non- scratching base to preserve its surface.
-
Page 17: Data
Dr. Mach Mach M2 Lamps and Engineering 5. Data 5.1 Technical data Mach M2 F Mach M2 Central light intensity 40.000 – 80.000 Lux 60.000 Lux at a distance of 1 meter Light field diameter d 160 mm 170 mm... -
Page 18: Electrical Data
Protective conductor 6. CE-mark The products Mach M2 comply with the standards 93/42/EEC for medical products of the European Community’s Council. Dr. Mach applies the standard EN 60601-2-41. Dr. Mach GmbH is certified according to DIN EN 46001:1996 and DIN EN ISO 13485:2001. -
Page 19: Disposal
Dr. Mach Mach M2 Lamps and Engineering 7. Disposal The lamp doesn’t contain any dangerous goods. The components of the OT-lamp should be properly disposed at the end of its shelf-life. Make sure, that the materials are carefully separated. The components should be disposed according to the contained materials. -
Page 20: Spare Parts
Dr. Mach Mach M2 Lamps and Engineering 8. Spare parts 8.1 Mach M2 F 59120001 Edition 04 07.03.2005 / Bak page 20/22... -
Page 21: Mach M2
Dr. Mach Mach M2 Lamps and Engineering 8.2 Mach M2 59120001 Edition 04 07.03.2005 / Bak page 21/22... -
Page 22: Spare Parts List
Dr. Mach Mach M2 Lamps and Engineering 9. Spare parts list Item Qty. Name EDVNO Remark Upper housing part 12011001 with sealing cord Sterilisable handle 21150002 Screw DIN7985-HM3x12-Ni 65152037 Conversion filter D284 Califlex Eco 67390204 Retainer 27021206 Ring 27021205 Splinter protection disk...
Need help?
Do you have a question about the MACH M2 and is the answer not in the manual?
Questions and answers