Table of Contents
Advertisement
Advertisement
Table of Contents

Subscribe to Our Youtube Channel
Related Manuals for Advantech FWA-5070


Summary of Contents for Advantech FWA-5070
- Page 1 User Manual FWA-5070 1U RACKMOUNT NETWORK APPLIANCE...
- Page 2 No part of this manual may be reproduced, copied, translated or transmitted in any form or by any means without the prior written permission of Advantech Co., Ltd. Information provided in this manual is intended to be accurate and reliable. How- ever, Advantech Co., Ltd.
- Page 3 Le marquage CE sur ce produit indique qu'il est conforme à la Directive européenne sur la compatibilité électromagnétique 2014/30 / UE, Directive sur la sécurité 2014/ 35 / UE. Note! The equipment is operated and maintained only by professionals Remarque! L'équipement est exploité et entretenu uniquement par des profession- nels FWA-5070 User Manual...
- Page 4 Technical Support and Assistance Visit the Advantech website at http://support.advantech.com where you can find the latest information about the product. Contact your distributor, sales representative, or Advantech's customer service center for technical support if you need additional assistance. Please have the following information ready before you call: –...
- Page 5 RESTRICTED ACCESS AREA: The equipment should only be installed in a Restricted Access Area. DISCLAIMER: This set of instructions is given according to IEC 704-1. Advan- tech disclaims all responsibility for the accuracy of any statements contained herein. FWA-5070 User Manual...
- Page 6 ZONE D'ACCES RESTREINTE: L'équipement ne doit être installé que dans une zone d'accès restreint. AVERTISSEMENT: Cet ensemble d'instructions est donné conformément à la CEI 704-1. Advantech décline toute responsabilité quant à l'exactitude des déclarations contenues dans ce document. FWA-5070 User Manual...
- Page 7 请注意设备上的所有警告和注意标语。 如果长时间不使用设备,请将设备与电源插座间的电线断开,避免设备被超目标 电压波动损坏。 请不要让任何液体流入通风口,以免引起火灾或者电路短路。 请不要自行打开设备。为了确保您的安全,请由经过认证的工程师来打开设备。 如遇下列情况,请由专业人员来维修: 电源线或者插头损坏; 设备内部有液体流入; 设备曾暴露在于于潮湿的环境中使用; 设备无法正常工作,或您无法通过用户手册来使其正常工作; 设备跌落或者损坏; 设备有明显的外观破损。 请不要把设备放置在超出我们建议的温度范围的环境,即不要低于 0°C(- 20°C;-4°F) 或高于 40°C(60°C;140°F),否则可能会损坏设备。 注意:如果电池放置不正确,将有爆炸的危险,因此,只可以使用制造商推荐的 同一种或者同等型号的电池进行替换。请按照制造商的指示处理已使用过的电 池。 根据 IEC 704‐1:1982 规定,设备产生的音量不高于 70 分贝。 免责声明:请安全训示符合 IEC 704‐1 要求。研华公司对其内容之准确性不承 担任何法律责任。 警告使用者:这是甲类资讯产品,在居住的环境中使用,可能会造成射频干扰,在这 种情况下,使用者会被要求采取某些适当的对抗。 声明:此为 A 级产品,在生活环境中,可能会造成无线干扰,在这种情况下,可能需 要用户对其干扰采取切实可行的措施。 FWA-5070 User Manual...
- Page 8 FWA-5070 User Manual viii...
-
Page 9: Table Of Contents
Figure 3.6 NMC installation ............19 Install/remove Power Supply component..........19 Figure 3.7 PSU installation ............19 Chapter Operation..........21 Powering up/down the system ..............22 Booting from network via PXE ..............22 Table 4.1: PXE BIOS Options ........... 22 Chapter BIOS Settings........27 FWA-5070 User Manual... - Page 10 Table 5.7: Virtualization Menu........... 40 Figure 5.12Platform Setup: Platform Management ....41 Table 5.8: Platform Management Menu ........42 Figure 5.13Lan Bypass settings ..........43 Table 5.9: Advantech Lan Bypass Menu........43 5.2.3 Hardware setup menu ..............45 Figure 5.14Hardware Configuration Menu ......... 45 Figure 5.15Chipset: Processor Configuration Menu....
- Page 11 Figure 5.29CSM16 Configuration ..........65 5.2.6 Security Setup................66 Figure 5.30Administrator Setup ..........66 5.2.7 Save & Exit Menu ............... 67 Figure 5.31Save & Exit Menu ............. 67 Table 5.22: Save & Exit Menu Options........67 FWA-5070 User Manual...
- Page 12 FWA-5070 User Manual...
-
Page 13: Chapter 1 Specifications
Chapter Specifications... -
Page 14: Overview
0 ~ 40 °C (32 ~ 104 °F) (air flow 0.7 m/sec) Environment Non-operating -20 ~ 80° C (-4 ~ 167° F) and 40° C @ 95% RH Non- Temperature Condensing Cooling 3 x 40cm Fan module FWA-5070 User Manual... -
Page 15: System Outlook
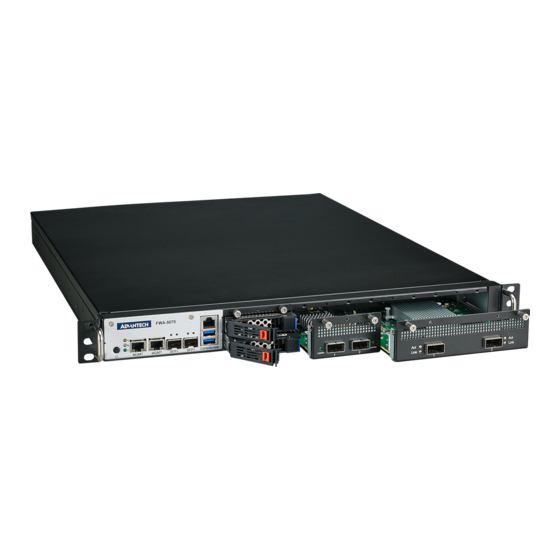
15 KG OS Support Linux (CentOS, Red Hat, Ubuntu) Advantech S/W Packages System diagnostic tool and quick start image IPMI v2.0 compliant, with web interface, iKVM on IPMI request (Advantech IPMI Core) Certification CE/FCC/CB/UL/CCC System Outlook 1.2.1 FRONT VIEW 1.2.1.1 I/O and NMC Figure 1.1 I/O and NMC... -
Page 16: Rear View
1.2.1.2 LED & Button Figure 1.2 LED & Button 1.2.2 REAR VIEW Figure 1.3 Rear view System layout System layout as below: Figure 1.4 System Layout FWA-5070 User Manual... -
Page 17: Block Diagram
Block Diagram Figure 1.5 Block Diagram FWA-5070 User Manual... - Page 18 FWA-5070 User Manual...
-
Page 19: Chapter 2 Connector List And Jumper And
Chapter Connector List and Jumper and Switch Setting... -
Page 20: Connector, Jumper And Switch Placement
CN86 Power Connector 6070HDD4BP CN48 Board to Board Connector For NAMB-6070MGT CN22 PCIE * 8 Connector For Advantech NMC module CN23 PCIE * 8 Connector For Advantech NMC module CN24 PCIE * 8 Connector For Advantech NMC module CN25 PCIE * 8 Connector... -
Page 21: Jumper Setting
Location Function 1-2 (Default) Normal ME Force Update 1-2 (Default) Normal Password Clear 1-2 (Default) Flash Security Override Disable Flash Security Override Enable 1-2 (Default) Normal RTC Reset Clear RTC Registers Open (Default) Normal Short PSU enable FWA-5070 User Manual... -
Page 22: Switch Setting
1 (OFF) (Default) Normal 1 (ON) BMC is not present 2 (OFF) Unused 2 (ON) Unused 1 (OFF) and 2(OFF) (Default) Normal SW10 1 (ON) and 2(OFF) CPLD JTAG Mode Enable 2 (ON) and 1(OFF) BMC JTAG Mode Enable FWA-5070 User Manual... -
Page 23: Chapter 3 Installation Guide
Chapter Installation Guide... -
Page 24: Cpu & Heatsink
Step 2.Tighten screws on heatsink sticker as shown below: Figure 3.1 CPU installation Memory FWA-5070 supports up to 12 DIMMs with 2666 MHz memory ECC RDIMM. Insert DRAM on slots(1) as shown in picture below: FWA-5070 User Manual... -
Page 25: Sata Hdd/Ssd
A DRAM channel is separated for one black and one blue slot. Notice the black slot must be inserted first. SATA HDD/SSD FWA-5020 supports 2*2.5” SATA HDD/SSD, 1* M.2 2280 SSD and 1* mSATA HDD/SSD Installation: Remove HDD bracket and install HDD/SSD on the bracket. FWA-5070 User Manual... -
Page 26: Pcie
Figure 3.4 M.2 and mSATA installation PCIe FWA-5070 reserves 1 x PCIe slot for support different kinds of PCIe add-on cards like low-profile and full-high/half-length cards running on PCIe Gen3 x8/16 Step 1.Remove the PCIe riser holder via thumb screws and put attach PCIe add-on card/s. -
Page 27: Slide Rail Installation Guide
Figure 3.5 PCIe installation Slide Rail Installation Guide 3.5.1 Overview This guide is for FWA-5070’s slide rail (Advantech PN: 9680016905), it’s an optional kit, so please contact Advantech. 3.5.2 Installation steps Step 1: FWA-5070 User Manual... - Page 28 Step 2: Step 3: FWA-5070 User Manual...
- Page 29 Step 4: Step 5: FWA-5070 User Manual...
- Page 30 Step 6 Step 7 FWA-5070 User Manual...
-
Page 31: Install/Remove Nmc Component
Install/remove NMC component FWA-5070 supports 4 x Network Mezzanine Cards (NMCs) in the front panel. Insert NMC alone with guiding rail and fasten with thumb screws. Figure 3.6 NMC installation Install/remove Power Supply component Power supply unit is a modularized design for FWA-5070, which can be removed from FWA-5070 at the back. - Page 32 FWA-5070 User Manual...
-
Page 33: Chapter 4 Operation
Chapter Operation... -
Page 34: Powering Up/Down The System
Enabled if PXE booting in an IPv4 network; IPv4 PXE Support Disabled disabled otherwise Below are the steps to enable PXE boot. It needs to set BIOS/ Advanced-> Network Stack Configuration-> Network Stack as enabled (default setting is disabled) FWA-5070 User Manual... - Page 35 CSM Parameters -> Network” to enable PXE ROM function, set it as “Legacy” (IPV4 PXE) function . Save BIOS and reboot system. The BIOS will show “Checking Media Pres- ence.”, if system is not connected to the PXE server, it will show “No Media Present.” FWA-5070 User Manual...
- Page 36 RAM disk. The detailed process and required configuration of such a network install will heavily depend on the target OS and boot loader / miniOS used. Please refer to the related documentation available. FWA-5070 User Manual...
- Page 37 How to guides for setting up Linux as PXE boot server are available on the internet: https://www.debianadministration.org/article/478/ Setting_up_a_server_for_PXE_network_booting. Note! It is recommended to setup a separate network / subnet for network booting as the DHCP required for PXE booting may conflict with existing DHCP servers in your network. FWA-5070 User Manual...
- Page 38 FWA-5070 User Manual...
-
Page 39: Chapter 5 Bios Settings
Chapter BIOS Settings... -
Page 40: Figure 5.1 Bios Post Screen (Example)
BIOS Defaults The BIOS comes with a set of configuration parameters when shipped by Advantech referred to as “Optimized Defaults” or “factory defaults”. The user can change BIOS settings via the setup menu either temporarily or permanently by saving the changes as “User defaults”. -
Page 41: Figure 5.2 Bios Setup Screen Organization
Auxiliary text providing information about the selected setup item is displayed in the top right corner. Figure 5.2 BIOS Setup Screen Organization FWA-5070 User Manual... -
Page 42: Main Setup Menu
Current AMI BIOS core version in Core Version Display only UEFI Spec revision that the BIOS Compliancy Display only complies to BIOS Advantech BIOS Version info Information EX: mmmm Vx.yz Project Version Display only mmmm : model name X: major version Yz: minor version Build Date &... - Page 43 Please not that system time and date are set during manufacturing process accord- ing to factory’s local time zone. You may need to update system time to reflect the desired time zone when you receive the unit. FWA-5070 User Manual...
-
Page 44: Platform Setup Menu
Platform BIOS Setup screen is shown below. The sub menus are described on the following pages. Figure 5.4 Platform Setup Main screen Note! If BMC is present in the system the Hardware Monitor page will be hid- den. FWA-5070 User Manual... -
Page 45: Figure 5.5 Platform Setup: Console Redirection Menu
7 / 8 Defines number of data bits in a character. None / Even / Odd / Parity Defines the parity scheme used. Mark / Space Stop Bits 1 / 2 Defines number of stop bits in a character. FWA-5070 User Manual... -
Page 46: Figure 5.6 Platform Setup: Usb Configuration Menu
5.2.2.2 USB Configuration This sub menu allows you to change the settings used for USB and to get an over- view of the USB devices detected by the BIOS. Figure 5.6 Platform Setup: USB Configuration Menu FWA-5070 User Manual... -
Page 47: Table 5.3: Usb Configuration Menu
Please note that Trusted Computing support is disabled by default in the factory defaults to save system boot time. If disabled, the Trusted Computing Menu will not display any status information. Figure 5.7 Platform Setup: Trusted Computing FWA-5070 User Manual... -
Page 48: Table 5.4: Trusted Computing Menu
Trusted Computing with TPM module installed When system with TPM2.0 module installed, and the BIOS will auto detect it and the related setting will be shown in the BIOS setup menu as below. Figure 5.8 Platform Setup: Trusted Computing with TPM2.0 FWA-5070 User Manual... -
Page 49: Table 5.5: Trusted Computing Menu With Tpm2.0
4.4 and to use PNP0C31 for Linux kernel with previous version from When system with TPM1.2 module installed, and the BIOS will auto detect it and the related setting will be shown in the BIOS setup menu as below. FWA-5070 User Manual... -
Page 50: Figure 5.9 Platform Setup: Trusted Computing With Tpm1.2
Device. NOTE: Your Computer Pending operation None will reboot during restart in order to change State of Security Device. Auto will support both or set the sup- Device Select Auto port for the TPM 1.2 or TPM2.0. FWA-5070 User Manual... -
Page 51: Figure 5.10Platform Setup: H/W Monitor
5.2.2.5 H/W Monitor This sub menu allows you to see all the H/W monitor items detected by the BIOS (without BMC) to know all current system health status. Figure 5.10 Platform Setup: H/W monitor FWA-5070 User Manual... -
Page 52: Figure 5.11Platform Setup: Virtualization
Enable Intel VT-d Technology for Directed I/O (VT-d) by Disable None reporting the I/O device If system has SR-IOV capable PCIe Enable Devices, this option Enables or Dis- SR-IOV Support Disable ables Single Root IO Virtualization Support FWA-5070 User Manual... -
Page 53: Figure 5.12Platform Setup: Platform Management
This sub menu allows you to change the settings used for related CPU utilization set- ting. The default configuration for CPU was optimized setting for getting better perfor- mance for networking, so it is not recommend to change it. Figure 5.12 Platform Setup: Platform Management FWA-5070 User Manual... -
Page 54: Table 5.8: Platform Management Menu
Choose options for reactions to a When SEL is Full Erase Immediately full SEL. Disable Disable the logging of EFI Status Log EFI Status Both Codes or log only error code or Codes Error code only progress code or both Progress code FWA-5070 User Manual... -
Page 55: Figure 5.13Lan Bypass Settings
5.2.2.8 Advantech Lan Bypass configuration This sub menu allows you to change the settings used for related Advantech LAN Bypass settings of NMC modules. Figure 5.13 Lan Bypass settings Table 5.9: Advantech Lan Bypass Menu Group Setup item Access / Options... - Page 56 Table 5.9: Advantech Lan Bypass Menu Watch Dog Start The current Status of Lan Bypass Display only Status in watch dog start Connect Select the action of Lan Bypass Watch Dog Start Disconnect for NMC Bypass When watch dog start...
-
Page 57: Hardware Setup Menu
However, those terms are kept consistent with previous products to allow users to navigate more eas- ily. The sub menus are described on the following pages. Figure 5.14 Hardware Configuration Menu FWA-5070 User Manual... -
Page 58: Figure 5.15Chipset: Processor Configuration Menu
Access / Group Setup item Description Options CPU signature Microcode Patch CPU Frequency Processor Cores Socket0 CPU Displays information on the pro- Display only information cessor installed Intel VT-x Technology L1 code Cache L2 Cache L3 Cache FWA-5070 User Manual... - Page 59 DCU streamer prefetcher is an L1 Disable data cache prefetcher (MSR 1A4h [2]). Enable or disable DCU IP Enable Prefetcher feature. DCU IP Prefetcher Disable DCU IP prefetcher is an L1 data cache prefetcher (MSR 1A4h [3]). FWA-5070 User Manual...
-
Page 60: Figure 5.16North Bridge Configuration Menu
5.2.3.2 Hardware Setup: North Bridge Configuration This menu allows the configuration of the memory controller and related features of the SoC. Figure 5.16 North Bridge Configuration Menu FWA-5070 User Manual... -
Page 61: Table 5.11: Northbridge Configuration Menu
Select Rank Interleaving set- Rank Interleaving 2-way Interleave ting 4-way Interleave 8-way Interleave Enable Select to enable / disable Patrol Scrub Disable Patrol Scrub Support Auto Select to auto to enable the Data Scrambling Enable Scrambler Disable FWA-5070 User Manual... -
Page 62: Figure 5.17Hardware Setup: Pci Subsystem
Select PCIe port bifurcation port control Auto Enable/Disable Intel® Volume Enabled IOU0 - Intel VMD Management Device Technology in Disable this IOU. IOU0 VMD Hot Plug Enabled Enable/Disable Hot Plug for PCIe Capable Disable Root Ports FWA-5070 User Manual... - Page 63 Change PCI Express Devices Set- PORT 2C Link Speed Gen 3 (8 GT/s) tings. Auto Gen 1 (2.5 GT/s) Change PCI Express Devices Set- PORT 2D Link Speed Gen 2 (5 GT/s) tings. Gen 3 (8 GT/s) FWA-5070 User Manual...
- Page 64 IOU0 - PCIe Port Select PCIe port bifurcation x8x8 Auto Enable/Disable Intel® Volume Enabled IOU0 - Intel VMD Management Device Technology in Disable this IOU. IOU0 VMD Hot Plug Enabled Enable/Disable Hot Plug for PCIe Capable Disable Root Ports FWA-5070 User Manual...
-
Page 65: Figure 5.18Hardware Setup: Upi Configuration
(Fast) or default speed (slow) Auto 10.4 GB/s Link Frequency None 9.6 GB/s Allows for Selecting the UPI link frequency Select Use Per Link Setting Enabled Link0p Enable Enable/disable Link0 Disabled Enabled Link1p Enable Enable/disable Link1 Disabled FWA-5070 User Manual... -
Page 66: Figure 5.19Hardware Setup: South Bridge Configuration
Runtime Error Logging Select sub-menu. PCH Compatibility RID Enable/Disable Enable or Disable PCH’s CCRID Enable or Disable SMBus CDe- SMBus Controller Enable/Disable vice Select S0/S5 for ACPI state PCH state after G3 Power on after a G3 FWA-5070 User Manual... -
Page 67: Figure 5.20Hardware Setup: Sata Configuration
(1) AHCI Mode. (2) RAID Mode. RAID Enabled sSATA Controller To enable the sSATA controller Disabled Enabled SATA Hot Plug #Port 0 Designates this port as Hot Pluggable Disabled Enabled SATA Hot Plug #Port 1 Designates this port as Hot Pluggable Disabled FWA-5070 User Manual... - Page 68 SATA Hot Plug #Port 7 Designates this port as Hot Pluggable Disabled Enabled sSATA Hot Plug #Port 1 Designates this port as Hot Pluggable Disabled Enabled sSATA Hot Plug #Port 5 Designates this port as Hot Pluggable Disabled FWA-5070 User Manual...
-
Page 69: Figure 5.21Hardware Setup: Usb Configuration
Enable/Disable this USB Physical USB Port #5 Disable Disabled Connector (physical port) Enabled Enable/Disable this USB Physical USB 3.0 Port #0 Disable Disabled Connector (physical port) Enabled Enable/Disable this USB Physical USB 3.0 Port #1 Disable Disabled Connector (physical port) FWA-5070 User Manual... -
Page 70: Figure 5.22Hardware Setup: Acpi Configuration
O.S None Select the highest ACPI sleep Suspend DisabledS1 ACPI Sleep State state the system will enter when (CPU Stop Clock) the SUSPEND button is pressed. Lock Legacy Enabled Enable lock of legacy resources Resources Disabled FWA-5070 User Manual... -
Page 71: Table 5.18: Hardware Setup: Runtime Error Logging Menu Items
Figure 5.23 Hardware Setup: Runtime Error logging configuration Table 5.18: Hardware Setup: Runtime Error logging Menu Items Group Setup item Access / Options Description Enabled System error enabling and log- None System Errors Disabled ging setup option Auto FWA-5070 User Manual... -
Page 72: Figure 5.24Nvme Configuration
5.2.3.9 NVMe configuration This menu contains settings for NVMe controller and Drive information Figure 5.24 NVMe configuration FWA-5070 User Manual... -
Page 73: Figure 5.25Vroc Configuration
5.2.3.10 Intel® VROC for Volume Management Device Configuration This menu contains settings for Intel® VMD for Volume Management Device Config- uration Figure 5.25 VROC configuration FWA-5070 User Manual... -
Page 74: Server Mgmt Setup Menu
Boot Watchdog Timer is disabled. 20 minutes Configure how the system should Do Nothing OS Wtd Timer respond if the OS Boot Watchdog Reset Policy Timer expires. Not available if OS Power Down Boot Watchdog Timer is disabled. FWA-5070 User Manual... -
Page 75: Setup Post & Boot Menu
Enables or disables boot via Network Network Stack Disabled (PXE) Boot Option Priority User Defined Sets the system boot order. Force BIOS CSM16 Parameters Option ROM Messages Keep Current CSM Parameters CSM Support Enable the CSM support FWA-5070 User Manual... -
Page 76: Figure 5.28Post & Boot Setup: Csm Configuration Menu
UEFI compliant None UEFI Only Option ROMs Network This item allows a more Do not launch granular control of Option- Storage UEFI ROM execution depending Video Legacy of the type of extension Other PCI device ROM device. FWA-5070 User Manual... -
Page 77: Figure 5.29Csm16 Configuration
"UPON RQUEST", GA20 can be dis- None GateA20 Active Always abled using BIOS services. When it's set as "Always", it does not allow dis- abling GA20. Option ROM Force BIOS Set display mode for Option ROM Messages Keep Current FWA-5070 User Manual... -
Page 78: Security Setup
If set the “Password Check” is [Always], then this is a power on password and must be entered to boot or enter Setup. In Setup the User will have Administrator rights. The password length must be in the following range: – Minimum length: 3 – Maximum length: 20 FWA-5070 User Manual... -
Page 79: Save & Exit Menu
Restores the User defaults to all the setup Restore User Defaults options. This option allows you to override the specified Boot UEFI: < boot device> boot order and use a different boot device for Override the next boot. FWA-5070 User Manual... - Page 80 No part of this publication may be reproduced in any form or by any means, electronic, photocopying, recording or otherwise, without prior written permis- sion of the publisher. All brand and product names are trademarks or registered trademarks of their respective companies. © Advantech Co., Ltd. 2019...
Need help?
Do you have a question about the FWA-5070 and is the answer not in the manual?
Questions and answers