Advertisement
Model No. 21905.1
Serial No.
Write the serial number in the space
above for reference.
Serial
Number
Decal
ACTIVATE YOUR
WARRANTY
To register your product and
activate your warranty today,
go to www.iconsupport.eu/
CUSTOMER CARE
For service at any time, go to
www.iconsupport.eu/
Or call 0330 1231045
Mon.–Fri. 9 a.m.–7 p.m.
Sat. 9 a.m.–13 p.m.
Please do not contact the store.
CAUTION
Read all precautions and
instructions in this manual before
using this equipment. Keep this
manual for future reference.
USER'S MANUAL
Advertisement
Table of Contents

Subscribe to Our Youtube Channel
Related Manuals for Pro-Form 405 SPX


Summary of Contents for Pro-Form 405 SPX
-
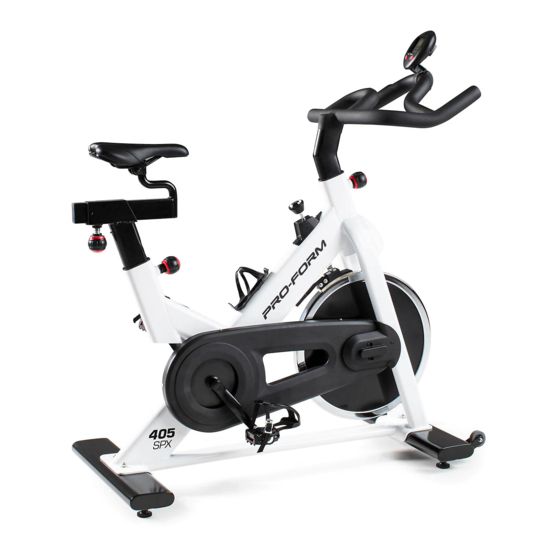
Page 1: Warning Decal Placement
Model No. 21905.1 Serial No. USER’S MANUAL Write the serial number in the space above for reference. Serial Number Decal ACTIVATE YOUR WARRANTY To register your product and activate your warranty today, go to www.iconsupport.eu/ CUSTOMER CARE For service at any time, go to www.iconsupport.eu/ Or call 0330 1231045 Mon.–Fri. -
Page 2: Table Of Contents
TABLE OF CONTENTS WARNING DECAL PLACEMENT ............. . .2 IMPORTANT PRECAUTIONS . -
Page 3: Important Precautions
IMPORTANT PRECAUTIONS WARNING: To reduce the risk of serious injury, read all important precautions and instructions in this manual and all warnings on your exercise bike before using your exercise bike. ICON assumes no responsibility for personal injury or property damage sustained by or through the use of this product. -
Page 4: Before You Begin
The and toning the body. The 405 SPX exercise bike model number and the location of the serial number provides a selection of features designed to make your decal are shown on the front cover of this manual. -
Page 5: Assembly
ASSEMBLY • Assembly requires two persons. • In addition to the included tool(s), assembly requires the following tool(s): • Place all parts in a cleared area and remove the one adjustable wrench packing materials. Do not dispose of the packing materials until you inish all assembly steps. - Page 6 3. Attach the Rear Stabilizer (5) to the Frame (1) with two M8 x 55mm Carriage Bolts (9), two M8 Washers (3), and two M8 Flange Nuts (2). 4. Orient the Saddle (31) as shown. Slide the Saddle (31) onto the Saddle Carriage (32);...
- Page 7 5. Orient the Handlebar (7) as shown. Locate the Adjustment Knob (15) on the front of the Frame (1). Loosen the Adjustment Knob and pull it outward. Then, insert the Handlebar (7) into the Frame. Move the Handlebar (7) upward or downward to the desired position, release the Adjustment Knob (15) into an adjustment hole in the Handlebar, and then tighten the Adjustment...
- Page 8 7. The Console (58) can use two AAA batteries (not included); alkaline batteries are recommended. Do not use old and new batteries together or alkaline, standard, and rechargeable batter- ies together. IMPORTANT: If the Console has been exposed to cold temperatures, allow it to warm to room temperature before you insert batteries.
- Page 9 9. Hold the wire (C) on the Reed Switch (59) on the left side of the exercise bike as shown. Connect the wire (C) on the Reed Switch (59) to the wire on the Console (58). 10. Insert the wire (C) on the Reed Switch (59) into the Clip (64) on the left side of the Frame (1).
-
Page 10: How To Use The Exercise Bike
HOW TO USE THE EXERCISE BIKE HOW TO ADJUST THE ANGLE OF THE SADDLE HOW TO ADJUST THE SADDLE POST You can adjust the angle of the saddle to the position For effective exercise, the saddle should be at the that is most comfortable. - Page 11 HOW TO ADJUST THE PEDALING RESISTANCE To clean the exercise bike, use a damp cloth and a small amount of mild detergent. IMPORTANT: To To increase the avoid damage to the console, keep liquids away from the console and keep the console out of resistance of the direct sunlight.
- Page 12 FEATURES OF THE CONSOLE 2. Set a workout goal if desired. The easy-to-use console features six modes that To set a time, distance, or calorie-burning goal for provide instant exercise feedback during your your workout, press the Mode button repeatedly workouts.
-
Page 13: Fcc Information
ORDERING REPLACEMENT PARTS To order replacement parts, please see the front cover of this manual. To help us assist you, be prepared to provide the following information when contacting us: • the model number and serial number of the product (see the front cover of this manual) •... -
Page 14: Exercise Guidelines
EXERCISE GUIDELINES Aerobic Exercise—If your goal is to strengthen your WARNING: cardiovascular system, you must perform aerobic Before beginning this exercise, which is activity that requires large amounts or any exercise program, consult your physi- of oxygen for prolonged periods of time. For aerobic cian. - Page 15 SUGGESTED STRETCHES The correct form for several basic stretches is shown at the right. Move slowly as you stretch; never bounce. 1. Toe Touch Stretch Stand with your knees bent slightly and slowly bend forward from your hips. Allow your back and shoulders to relax as you reach down toward your toes as far as possible.
- Page 16 NOTES...
-
Page 17: Part List
PART LIST Model No. 21905.1 R1118A Key No. Qty. Description Key No. Qty. Description Frame Lock Ring M8 Flange Nut Sprocket M8 Washer Hub Set Front Stabilizer Flywheel Rear Stabilizer #10 x 12mm Screw Saddle Post Outer Chain Guard Handlebar Chain Water Bottle Holder Chain Guard Cover... -
Page 18: Exploded Drawing
EXPLODED DRAWING Model No. 21905.1 R1118A... -
Page 19: Ordering Replacement Parts
ORDERING REPLACEMENT PARTS To order replacement parts, please see the front cover of this manual. To help us assist you, be prepared to provide the following information when contacting us: • the model number and serial number of the product (see the front cover of this manual) •...
Need help?
Do you have a question about the 405 SPX and is the answer not in the manual?
Questions and answers
what is the price for the bottom bracket (#48 in parts list for 405 spx) Model #21905.1 ?