AVANT A21245 Operator's Manual
4 in 1 loader bucket
Hide thumbs
Also See for A21245:
- Operator's manual for attachment (26 pages) ,
- Operator's manual (26 pages)

Related Manuals for AVANT A21245


Summary of Contents for AVANT A21245
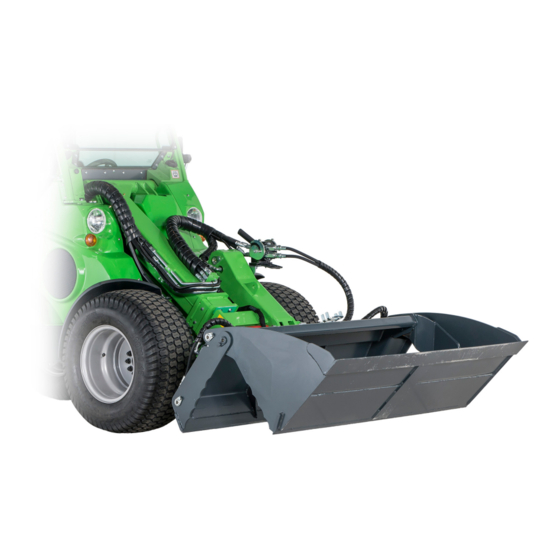
- Page 1 English 4 in 1 Bucket 2016 2 Operator's Manual for Attachment 4 in 1 Bucket Product number Straight edge With teeth 1100 mm A21245 A21249 1280 mm A21156 A21184 1400 mm A21266 A21269 www.avanttecno.com...
- Page 2 4 in 1 Bucket 2016 2...
-
Page 3: Table Of Contents
4 in 1 Bucket 2016 2 CONTENTS 1. FOREWORD ............................4 2. DESIGNED PURPOSE OF USE......................5 3. SAFETY INSTRUCTIONS FOR USING THE ATTACHMENT ............6 4. TECHNICAL SPECIFICATIONS ....................... 9 Safety labels and main components of the attachment ..................9 5. -
Page 4: Foreword
If you sell or transfer the equipment, be sure to hand over this manual to the new owner. If the manual is lost or damaged, you can request a new one from your Avant dealer or from the manufacturer. -
Page 5: Designed Purpose Of Use
Table 1. If the loader is fitted with other than standard tyres, or differs from original specifications, consult your Avant dealer to choose the best bucket. -
Page 6: Safety Instructions For Using The Attachment
6 (22) 3. Safety instructions for using the attachment Please bear in mind that safety is the result of several factors. The loader-attachment combination is highly powerful and improper or careless use or maintenance may cause serious personal injury or property damage. - Page 7 7 (22) Always lower the bucket firmly on the ground before leaving the driver’s seat to avoid any unexpected movements of the loader. The stability of the loader may change when leaving the driver’s seat, leading to tipping over of the machine. Always remember that the boom may lower unexpectedly due to loss of stability, mechanical fault, or if another person operates the controls of the loader, leading to crushing hazard.
- Page 8 8 (22) Avoid overturning of the machine. Do not extend the telescopic boom, when the load approaches the lifting capacity of the loader, or when the loader boom is in horizontal position. If the load indicator of the loader (if fitted) signals, lower the load calmly and retract the telescopic boom.
-
Page 9: Technical Specifications
9 (22) 4. Technical specifications Table 2 - 4 in 1 Bucket - Technical specifications A21245 A21249 A21156 A21184 A21266 A21269 Product number 1100 mm 1280 mm 1400 mm Working width: Straight edge With teeth Straight edge With teeth Straight edge... - Page 10 10 (22) Table 3 - Decal locations and warning messages Decal Warning message 1 A36771 Read instructions before use. Crushing hazard - Do not go under a 2 A36772 raised attachment; stay away from raised equipment. Pinching and crushing hazard, keep clear of moving parts, do not leave the 3 A36803 equipment running.
-
Page 11: Attaching The Attachment
Mount the attachment only on level surface. Never move or lift an attachment that has not been locked. Avant quick coupling system: Step 1: Lift the quick attach plate locking pins up and turn them backwards into the slot so that they are locked in the upper position. -
Page 12: Connecting And Disconnecting The Hydraulic Hoses
On the 200 series 2 and 400-700 series loaders the hydraulic hoses are connected using the multi connector system. If you have an Avant 300-700 series loader with the conventional quick couplers and wish to change to the multi connector system, contact your Avant dealer or service point for instructions or installation services. - Page 13 13 (22) The lever should move easily all the way to its locking position. If the lever does not slide smoothly, check the alignment and position of the connector and clean the connectors. Also shut down the loader and release the residual hydraulic pressure.
-
Page 14: Instructions For Use
14 (22) 6. Instructions for use Practise the use of the attachment and the controls of the loader in a safe area. If you are unfamiliar with the particular loader model, it is recommended to practice its use without any attachments. Avoid overturning of the machine. -
Page 15: Using A Bucket
15 (22) 6.2 Using a bucket Correct working method is important when lifting material from a pile, as lifting material from a pile requires the most power from the loader. Use high engine rpm and read the instructions how to operate the loader correctly from the operator’s manual of the loader. - Page 16 16 (22) Move auxiliary hydraulics control lever towards locking position electric buttons of the optional electric joystick) to open the bucket. The lever should not be left locking position. Move the lever away from the locking position to close the bucket. Always transport the bucket as low and close to the ground as possible.
-
Page 17: Material Handling
17 (22) If the load is too heavy when lifting load from a high level, the loader could tip forward when reversing with the loader. Never reverse and drag with the loader before making sure that the loader can handle the load that is being lifted. 6.3 Material handling Use maximum load indicated in the diagram of the operator’s manual of the loader as a guideline. -
Page 18: Operating On Inclined Terrain
The adapter allows the attachment to be tilted ±12.5 degrees sideways. Read the instructions provided with the tilt adapter. More information about the tilt adapter is available from your AVANT retailer or from the AVANT web pages at www.avanttecno.com. -
Page 19: Maintenance And Service
Finding any fault means that the hydraulic hose or component must be replaced and the equipment must not be used until it is repaired. Spare parts are available from your nearest AVANT retailer or authorised service point. Leave the repair work to professional service technicians, if you don’t have adequate knowledge and experience about hydraulic assemblies and how to perform the repairing safely. -
Page 20: Checking Metal Structures
R1/8" nipples. Replace any damaged nipples. 8. Warranty terms Avant Tecno Oy grants a warranty of one year (12 months) from the date of purchase for the attachment it manufactures. The warranty covers repair costs as follows: ... - Page 21 1400 mm A21266 Hydraulische Schaufel; Anbaugerät für Avant Radlader A21269 Godet à commande hydraulique destinée à être utilisée avec les chargeuses Avant 11.3.2016 Ylöjärvi, Finland Risto Käkelä, Toimitusjohtaja / Verkställande direktör / Administrerende direktør / Managing Director / Geschäftsführer / Directeur général...
Need help?
Do you have a question about the A21245 and is the answer not in the manual?
Questions and answers