
Related Manuals for Erbauer ER2100


Summary of Contents for Erbauer ER2100
- Page 1 EAN: 3663602796299 ER2100 ORIGINAL INSTRUCTIONS V20518 2100W router MNL_ER2100_TPS_GB_V02_20180608.indd 1 6/8/18 19:22...
- Page 2 Safety instructions Product description Assembly Care & maintenance Guarantee Declaration of conformity 2100W router MNL_ER2100_TPS_GB_V02_20180608.indd 2 6/8/18 19:22...
- Page 3 WARNING! Please read all safety warnings carefully and be sure that they are fully understood before handling the tool. 2100W router MNL_ER2100_TPS_GB_V02_20180608.indd 3 6/8/18 19:22...
- Page 4 Product description 22b 22c 2100W router MNL_ER2100_TPS_GB_V02_20180608.indd 4 6/8/18 19:22...
- Page 5 25/26 2100W router MNL_ER2100_TPS_GB_V02_20180608.indd 5 6/8/18 19:22...
- Page 6 2100W router MNL_ER2100_TPS_GB_V02_20180608.indd 6 6/8/18 19:22...
- Page 7 25/26 2100W router MNL_ER2100_TPS_GB_V02_20180608.indd 7 6/8/18 19:22...
- Page 8 Safety instructions GENERAL POWER TOOL SAFETY WARNING WARNING Read all safety warnings, instructions, illustrations and specifications provided with this power tool. Failure to follow all instructions listed below may result in electric shock, fire and/or serious injury. Save all warnings and instructions for future reference.
- Page 9 b) Avoid body contact with earthed or grounded surfaces, such as pipes, radiators, ranges and refrigerators. There is an increased risk of electric shock if your body is earthed or grounded. c) Do not expose power tools to rain or wet conditions. Water entering a power tool will increase the risk of electric shock.
- Page 10 d) Remove any adjusting key or wrench before turning the power tool on. A wrench or a key left attached to a rotating part of the power tool may result in personal injury. e) Do not overreach. Keep proper footing and balance at all times.
- Page 11 Maintain power tools. Check for misalignment or binding of moving parts, breakage of parts and any other condition that may affect the power tool’s operation. If damaged, have the power tool repaired before use. Many accidents are caused by poorly maintained power tools. Keep cutting tools sharp and clean.
- Page 12 e) Beware of concealed live wires, cable conduits, gas and water pipes. When routing a workpiece that potentially contains any of the above, use a detector to first determine their locations. Be especially careful when making plunge cuts. Always hold the router by the insulated plastic handles and never by the metal parts.
- Page 13 The following information applies to professional users only but is good practice for all users: ADDITIONAL SAFETY WARNINGS FOR CONSTRUCTION DUST The updated Control of Substances Hazardous to Health Regulations 1st October 2012 now also targets to reduce the risks associated with silica, wood and gypsum dusts. Construction workers are one of the at-risk groups within this because of the dust that they breathe: silica dust is not just a nuisance;...
- Page 14 How to reduce the amount of dust? 1. Reduce the amount of cutting by using the best sizes of building products. 2. Use a less powerful tool e.g. a block cutter instead of angle grinder. 3. Using a different method of work altogether – e.g. using a nail gun to direct fasten cable trays instead of drilling holes first.
- Page 15 VIBRATION The European Physical Agents (Vibration) Directive has been brought in to help reduce hand arm vibration syndrome injuries to power tool users. The directive requires power tool manufacturers and suppliers to provide indicative vibration test results to enable users to make informed decisions as to the period of time a power tool can be used safely on a daily basis and the choice of tool.
- Page 16 WARNING! Identify safety measures to protect the operator that are based on an estimation of exposure in the actual conditions of use (taking account of all parts of the operating cycle such as the times when the tool is switched off and when it is running idle in addition to the trigger time).
- Page 17 3. Use correct attachments for the product and ensure they are in good condition. 4. Keep tight grip on the handles/grip surface. 5. Maintain this product in accordance with these instructions and keep it well lubricated (where appropriate). 6. Plan your work schedule to spread any high vibration tool use across a longer period of time.
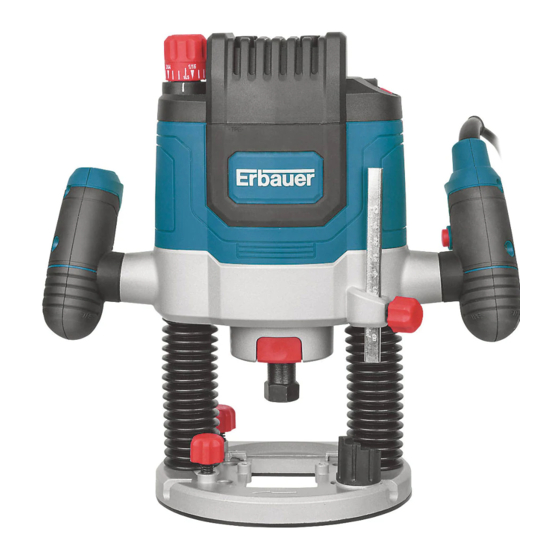
- Page 18 Product description Part index The index below refers to Fig. 1 on page 4. 1. Main handles 15. On/off switch 2. Scale wheel 16. Lock-off button 17. Scale 3. Adjustment knob 18. Indicator 4. Standing feet 5. Air vents 19. Fixing lever 6.
- Page 19 Symbols On the product, the rating label and within these instructions you will find among others the following symbols and abbreviations. Familiarize yourself with them to reduce hazards like personal injuries and damage to property. Always wear eye protection. Always wear ear protection. Wear a dust mask.
- Page 20 The sound emission values have been obtained according to the noise test code given in EN 60745-1 and EN 60745-2-17. The noise for the operator may exceed 80 dB(A) and ear protection measures are necessary. Rating label explanation ER2100 = Model number E = Erbauer R = Router 2100 = Power (Watts) 2100W router MNL_ER2100_TPS_GB_V02_20180608.indd 20...
- Page 21 Assembly Unpacking 1. Unpack all parts and lay them on a flat, stable surface. 2. Remove all packing materials and shipping devices, if applicable. 3. Make sure the delivery contents are complete and free of any damage. If you find that parts are missing or show damage do not use the product but contact your dealer.
- Page 22 Router bits WARNING! Always use router bits according to the intended use! Observe the technical specifications of this product when purchasing and using router bits! Ensure that the maximum rated speed of the router bits is at least equal to, or higher than, the router’s no-load speed. Any router bits used must fit exactly in the collet.
- Page 23 Inserting (Fig. A) 1. Put the router upside down with its standing feet (4) on a stable work bench. 2. Press the spindle lock (14) and turn the clamp nut with collet (20) slowly until the spindle lock (14) engages. Hold the spindle lock (14) in position (Fig. A, step 1). 3.
- Page 24 3. Tighten the fine adjustment knob (9f) clockwise until stop. 4. Fix the guide rods (9h x2) in the guide base assembly (9a) by tightening the guide base fixing knobs (9b x2) clockwise. 5. Loosen the parallel guide fixing knobs (13) anticlockwise (Fig. C, step 1). 6.
- Page 25 Centre pin (Fig. B, C, D, E) Use the centre pin (21) to cut circles, arcs or circular pattern into the workpiece. 1. Loosen the adjustment guide fixing knobs (9d x2) anticlockwise (Fig. B, step 1). 2. Loosen the guide base fixing knobs (9b x2) anticlockwise (Fig. B, step 2). 3.
- Page 26 WARNING! Only use the template guide for template routing applications! Always remove the template guide when using the product for other applications!. Attaching 1. Put the router upside down with its standing feet (4) on a stable work bench. 2. Place the template guide (25 or 26) on the base plate (11) and secure it with two screws for template guide (24) with a screw driver.
- Page 27 Intended use This product is intended for routing grooves, edges, profiles and elongated hole cuts in wood, plastic and light building materials, while resting firmly on the workpiece. The product must be used in an upright position. Never use for working overhead or on vertical surfaces. Before you start Protection Controls...
- Page 28 Recommended rotational speed Material Speed stages Hardwood (e.g. Beech) 4 – 6 Softwood (e.g. Pine) 5 – 6 Chipboard 3 – 5 Plastic 2 – 3 Aluminium 1 – 4 NOTE: Above values are for guidance only and may vary according to the actual workpiece.
- Page 29 6. Lower the motor housing slowly by applying pressure on both main handles (1) until the router bit touches the surface of the workpiece. Hold both main handles (1) in position and lock the fixing lever (19) with the finger of the left hand. 7.
- Page 30 Step buffer The step buffer (10) is particularly useful when cutting a very deep cut is required and it is necessary to remove material in several steps. With this product you can divide one deep cut into up to 8 steps. NOTE: Proceeding in several steps is useful when making very deep cuts.
- Page 31 Operation General routing (Fig. M) WARNING! Always wear a dust mask to protect yourself against hazards resulting Since excessive cutting may cause overload of the motor or difficulty in controlling the tool, the depth of cut should not be more than 15 mm at a pass when cutting grooves with an 8 mm diameter bit.
- Page 32 WARNING! Danger of kickback! Apply the product to the workpiece only when switched on! WARNING! Always ensure the base plate lays flat on the workpiece during operation! Do not try to make cuts with the product only held by one hand! Direction of feeding (Fig.
- Page 33 Pre-drilling of a hole which has same diameter of the tip of the centre pin (21) will be helpful to keep the centre pin (21) in position. Template cuts (Fig. P) 1. Attach the suitable template guide (25 or 26) to the product. 2.
- Page 34 Care & maintenance WARNING! Always switch the product off, disconnect the product from the power supply and let the product cool down before performing inspection, maintenance and cleaning work! Only perform care and maintenance work according to these instructions! All further works must be performed by a qualified specialist! Clean •...
- Page 35 Power cord If the replacement of the supply cord is necessary, this has to be done by the manufacturer or his agent in order to avoid a safety hazard. UK plug (only for UK market) Replacement of the plug shall always be carried out by the manufacturer of the tool or his service organization and follow the instructions below.
- Page 36 Transportation WARNING! Always carry the product by its main handle. Never use the cord for carrying the product. 1. Switch the product off and disconnect it from the power supply. Remove router bit if nece ssary. 2. Protect the product from any heavy impact or strong vibrations which may occur during transportation in vehicles.
- Page 37 Guarantee At Erbauer we take special care to select high quality materials and use manufacturing techniques that allow us to create ranges of products incorporating design and durability. We carry out stringent testing procedures on all our tools and are confident that they can provide regular, sustained daily use during the period covered.
- Page 38 London W2 6PX United Kingdom Declare that the product 2100W Router ER2100 Serial number: from 000001 to 999999 Complies with the essential health and safety requirements of the following directives: 2006/42/EC The Machinery Directive References to the following harmonized standard were made:...
- Page 39 2100W router MNL_ER2100_TPS_GB_V02_20180608.indd 40 6/8/18 19:22...
- Page 40 Manufacturer • Fabricant • Producent • Hersteller • Producator • Fabricante: Kingfisher International Products Limited, 3 Sheldon Square, London, W2 6PX, United Kingdom www.kingfisher.com/products Distributor: B&Q plc, Chandlers Ford, Hants, SO53 3LE United Kingdom www.diy.com Screwfix Direct Limited, Trade House, Mead Avenue, Yeovil, BA22 8RT, United Kingdom www.screwfix.com To view instruction manuals online,...
Need help?
Do you have a question about the ER2100 and is the answer not in the manual?
Questions and answers
Can I purchase a 1/4 inch collect which I have mislaid from my router 2100W
No, you do not need to purchase a 1/4 inch collet separately, as the Erbauer ER2100 router already includes a 1/4 inch collet in the accessories supplied.
This answer is automatically generated