Table of Contents
Advertisement
Advertisement
Table of Contents

Related Manuals for Hubsan ZINO PRO


Summary of Contents for Hubsan ZINO PRO
- Page 1 ® Z I N O P RO 《 U s er M a nu al》 Version 2.0...
- Page 3 All users must read product operating instructions as well as this liability disclaimer before using any Hubsan product. By using a Hubsan product(s), users are accepting the terms and conditions of Hubsan liability and opera- tional guidelines. This product is not suitable for minors under 14 years of age.
- Page 4 / liquid. To avoid any injuries, do not use the aircraft with broken or damaged components. MAINTENANCE Do not try to open or repair the units by yourself. Please contact Hubsan or Hubsan authorized dealers for service. For more information, please visit the official website at www.hubsan.com.
- Page 5 Hubsan Safety Advisory Notice for Lithium-Polymer (LIPO) Batteries LiPo batteries are different from conventional batteries in that their chemical contents are encased in a relatively lightweight foil packaging. This has the advantage of significantly reducing their weight but it does make them more susceptible to damage if roughly or inappropriately handled.
-
Page 6: Table Of Contents
4.6 Camera and Gimbal 2.5 Remote Controller Antenna 4.6.1 Camera Angle 4.6.2 Camera TF Slot 3 Flight 4.6.3 Gimbal Pitching Axis 3.1 Download the X-Hubsan App Adjustment 3.2 Main Interface Guide 4.7 Intelligent Protection 3.3 Pairing the Aircraft Function 3.4 Calibration 4.7.1 Low Power Failsafe... -
Page 7: Aircraft
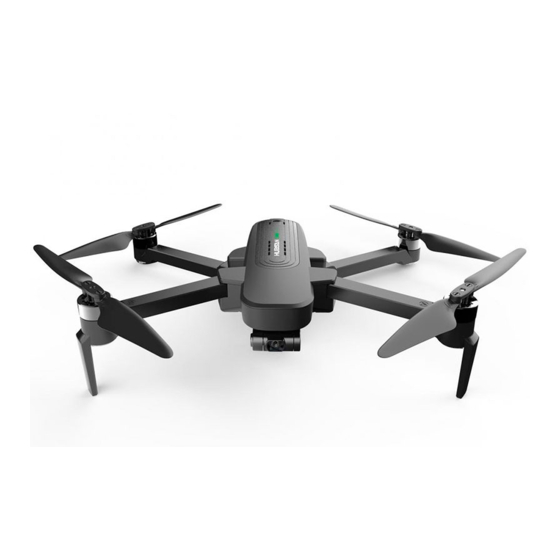
1 Ai rcraft 1.1 Aircraft Diagram 1. Propeller A 2. Propeller B 3. LED indicator 4. Motor 5. Body shell 6. 4K HD Camera 7. Micro-SD/TF Slot 8. Gimbal 9. Power 10. Gimbal Protection Guard 1.2 Aircraft battery charging Balance Charger LED Status: :... -
Page 8: Propeller Installation And
1.4 Propeller installation and disassembly Before installing propellers for the first time, please check that each Propeller A is matched with motor A and each Propeller B is matched with motor B. Then use the provided screws to secure each propeller. Tighten the screws clockwise to install them. When the propellers need to be replaced, unscrew the propellers by loosening the screws counterclockwise and then removing the damaged propellers. - Page 9 2.2 Remote Controller Features S/N Key / Switch Function Push the stick forward or backward and the Throttle / Rudder quadcopter will ascend or descend (respectively). Stick Push the stick left or right and the quadcopter will fly left or right (respectively). Push the stick forward or backward and the quadcopter will fly forwards or backwards (respec- Elevator / Aileron...
-
Page 10: Connecting Your Mobile Device
Key / Switch Function Low battery warning for the aircraft or remote Low Battery control: Remote control "Beep...Beep..." prompt (one time Warning per second) The remote control has no operation for 10 m i n u t e s a f t e r s t a n d b y , t h e r e m o t e c o n t r o l "Beep...Beep..."... -
Page 11: Angle
3 Fl i ght 3.1 Download the X-Hubsan App Before flying, users must download the X-Hubsan APP. Download the APP for free by scanning the code on the right or by downloading it via the App Store (iOS) and Google Play... -
Page 12: Main Interface Guide
3.2 Main Interface Guide Home Flight Motor Remote Aircraft Aircraft Settings Status Status (Video) Control Power / Page signal Signal Signal Battery Level Not connected T : 0 % R : 0 % Flight Mode E : 0 % A : 0 % View Aircraft Location Headless On / Off... - Page 13 4. Open the binding mode (this step is only needed when bind- ing for the first time or switching to a different transmitter. Must be done manually). 1) Go to APP settings - transmitter, transmitter connection method: Leas Transmitter model Transmitter connection Leas Bluetooth...
-
Page 14: Calibration
3.4 Calibration 3.4.1 Horizontal Calibration If during takeoff or flight the aircraft drifts, lifts off unevenly, perform a horizontal calibration. First, land the aircraft if it is flying and make sure all motors come to a complete stop. The aircraft must also be on a completely flat and horizontal surface for the calibration to work properly. -
Page 15: Gps Accuracy Test
3.4.3 GPS Accuracy Test After entering the APP interface, tap on "Aircraft", select "GPS Accuracy Test" then tap on "Enable / Restart GPS Accuracy Test". The aircraft will automatically proceed to test. A i r c r a f t A i r c r a f t N a m e Waypoint Parameter G P S A c c u r a c y T e s t... -
Page 16: Staring/Stopping The Motors
3.5 Staring/Stopping the Motors Motor starting condition 1. The aircraft, remote control and mobile phone have been connected; 2. The aircraft has been calibrated by the compass (four Orienta- tion lights are always on); 3. The aircraft must be placed horizontally. 4. -
Page 17: Flight Controller
4 Fl i gh t Con trolle r 4.1 Flight Control Mode Hover mode works best when the GPS signal Hover mode is strong. When the GPS signal is week or the compass is Attitude disturbed, the aircraft will enter the attitude m o d e . -
Page 18: Return-To-Home(Rth)
The front Orientation light flashes slowly in blue, and the rear Orientation light is steady Loss Of Flight red. Control Indicator (When there is a conflict with low battery, priority is displayed.) Headless Fore / frontal LEDs are solid blue and rear Mode red LEDs flash alternately The front Orientation light is steady blue,... - Page 19 RTH-Process 1. Record "Home Point" 2. Trigger return conditions 3. Adjust the direction of the head 4. Return to the return altitude set by APP (1) Regardless of the current height of the aircraft, if the aircraft is within 5 meters of the horizontal distance, land directly; (2) If the horizontal distance is within 5 meters and within 20 meters, return at the current altitude;...
-
Page 20: Search The Drone Apron
4.4 Search the Drone Apron When the aircraft landed or returned to a height of about 10 meters from the ground, it will automatically enter the search for the drone apron function. Devices Connected E : 0 % R : 0 % T : 0 % A : 0 % S P E E D 0 . -
Page 21: Intelligent Flight Mode
4.5 Intelligent Flight Mode 4.5.1 Headless Mode Record a flight path,the direction of the nose is the direction of advance,the heading and forward direction of the aircraft are inde- pendent of the direction of the nose during flight. Devices Connected T : 0 % R : 0 % E : 0 %... -
Page 22: Image Tracking
4.5.3 Image Tracking Select the target on the APP. After the selecting successfully, tap on "Go" and the aircraft will follow the movements of the target. The range of tracking altitude and distance is 5-15 meters. Devices Connected N o r m a l M o d e E : 0 % R : 0 %... -
Page 23: Line Fly Mode
Waypoint Planning: You can preset the waypoint parameters such as the number of waypoints, the altitude of each waypoints and other parameters. The aircraft will follow the preset parameters after you activate waypoint mode. You can control the flying speed during flight or you can pause or resume the Waypoint mode. -
Page 24: Camera And Gimbal
3. You can pause/resume/stop the flight at any time. 4. When the aircraft is low on battery or lost connection,the aircraft will always set Return to Home as the priority mission. Line Fly Mode Devices ConnecLineted A n g l e : 0 ° T : 0 % R : 0 % E : 0 %... -
Page 25: Gimbal Pitching Axis
4.6.3 Gimbal Pitching Axis Adjustment APP Adjustment Method 1: Long press the blank space in the video preview inter- face, the mobile device should vibrate once and the icon (1) should appear by your finger then you can move your finger up and down on the screen to adjust the pitching axis. -
Page 26: Loss Of Flight Control
(2) Android phone requires USB settings, please check the "Con- necting Tutorial for Android Phones" 2. Aircraft can't be searched (1) Restart the aircraft, remote control and X-Hubsan APP first. (2) Update aircraft firmware. (3) Check if the position of the TF card slot in the fuselage is steady red. - Page 27 4.The aircraft is hovering unsteadily (1) To replace the flight place, do not fly in tall buildings, signal tower accessories (2) The aircraft compass calibration and Horizontal calibration. (3)Whether the wind is too strong to affect the flight. 5.Aircraft GPS accuracy is not accurate or cannot pass GPS accuracy test.The GPS accuracy of the aircraft is inaccurate or cannot pass the GPS accuracy test (1) Search for GPS 6 or more in outdoor open spaces...
- Page 28 Z I N O P R O P a r t s & A c c e s s o r i e s D i a g r a m ZINO000-60 ZINO000-61 ZINO000-16 ZINO000-62 ZINO000-63 Power Plate Upper Cover Upper Shell Power button Bottom Shell...
- Page 29 Z I N O P R O P a r t s & A c c e s s o r i e s D i a g r a m ZINO000-34 ZINO000-03 ZINO000-35 ZINO000-04 ZINO000-05 Button Board Keypad FPC Compass Power Power Adapter...
- Page 30 Z I N O P R O P a r t s & A c c e s s o r i e s D i a g r a m ZINO000-72 ZINO000-51 ZINO000-52 ZINO000-53 ZINO000-54 Decoration Sticker Carrying Case Adapter (CN) Car Charing 32G SD / TF Card...
- Page 31 4. Product operation in no-fly zones (i.e. natural reserves). 5. Malfunctions or problems caused by modification, refit, replace- ment or use with non-Hubsan accessories / parts, failure to follow the guidance of the manual in assembly or operaiton. 6.Damages, injuries or any legal responsibilities caused by...
- Page 32 12. The acquisition, through use of Hubsan products (specifically but not limited to aircraft), of any data, audio, video that results in infringement of law and / or rights. 13. Misuse and / or alteration of batteries, product / aircraft circuits, hardware protections (including protection circuits), RC model and battery chargers.
- Page 33 F C C I N F O R M A T I O N This equipment has been tested and found to comply with the limits for a Class B digital device, pursuant to Part 15 of the FCC Rules. These limits are designed to provide reasonable protection against harmful interference in a residential installation.
- Page 36 ●Not suitable for children under 14 years of age Product name: ZINO PRO Product Standard Number:Q / HBS 001-2017 Vendor: Shenzhen Hubsan Technology Co., Ltd Address: 13th Floor, Block C, Shenzhen Software IndustrialBase, Xuefu Road, Nanshan District, Shenzhen, Guangdong Province, China Email: service@hubsan.com...
Need help?
Do you have a question about the ZINO PRO and is the answer not in the manual?
Questions and answers