Table of Contents
Advertisement
Quick Links
- 1 Installing the 7316-Tf4 18.5-Inch Flat Panel Rack-Mounted Monitor and Keyboard
- 2 Console Features
- 3 Overview of 7316-Tf4 18.5-Inch Flat Panel Rack-Mounted Monitor and Keyboard
- 4 Installing the 7316-Tf4 18.5-Inch Flat Panel Rack-Mounted Monitor and Keyboard
- 5 Installing the Console Unit in the Rack
- 6 Using the Control Buttons
- 7 Using the Tft-Lcd Display
- Download this manual
Advertisement
Table of Contents

Related Manuals for IBM 7316-TF4


Summary of Contents for IBM 7316-TF4
- Page 1 Power Systems 7316-TF4 18.5-Inch Flat Panel Rack-Mounted Monitor and Keyboard...
- Page 3 Power Systems 7316-TF4 18.5-Inch Flat Panel Rack-Mounted Monitor and Keyboard...
- Page 4 Before using this information and the product it supports, read the information in “Safety notices” on page v, “Notices” on page 51, the IBM Systems Safety Notices manual, G229-9054, and the IBM Environmental Notices and User Guide, Z125–5823. This edition applies to IBM Power Systems servers that contain the POWER8 processor and to all associated models.
-
Page 5: Table Of Contents
Safety notices ....... . . v Installing the 7316-TF4 18.5-Inch Flat Panel Rack-Mounted monitor and keyboard ..1 What's new in Installing the 7316-TF4 18.5-Inch Flat Panel Rack-Mounted monitor and keyboard . - Page 6 Power Systems: 7316-TF4 18.5-Inch Flat Panel Rack-Mounted Monitor and Keyboard...
-
Page 7: Safety Notices
You should also refer to the safety information documentation any time you do not clearly understand any safety information in the U.S. English publications. Replacement or additional copies of safety information documentation can be obtained by calling the IBM Hotline at 1-800-300-8751. - Page 8 Electrical voltage and current from power, telephone, and communication cables are hazardous. To avoid a shock hazard: v If IBM supplied the power cord(s), connect power to this unit only with the IBM provided power cord. Do not use the IBM provided power cord for any other product.
- Page 9 Observe the following precautions when working on or around your IT rack system: v Heavy equipment–personal injury or equipment damage might result if mishandled. v Always lower the leveling pads on the rack cabinet. v Always install stabilizer brackets on the rack cabinet. v To avoid hazardous conditions due to uneven mechanical loading, always install the heaviest devices in the bottom of the rack cabinet.
- Page 10 DANGER: Hazardous voltage, current, or energy levels are present inside any component that has this label attached. Do not open any cover or barrier that contains this label. (L001) (L002) viii Power Systems: 7316-TF4 18.5-Inch Flat Panel Rack-Mounted Monitor and Keyboard...
- Page 11 DANGER: Rack-mounted devices are not to be used as shelves or work spaces. (L002) (L003) Safety notices...
- Page 12 1 laser products. Outside the U.S., they are certified to be in compliance with IEC 60825 as a class 1 laser product. Consult the label on each part for laser certification numbers and approval information. Power Systems: 7316-TF4 18.5-Inch Flat Panel Rack-Mounted Monitor and Keyboard...
- Page 13 Exchange only with the IBM-approved part. Recycle or discard the battery as instructed by local regulations. In the United States, IBM has a process for the collection of this battery. For information, call 1-800-426-4333. Have the IBM part number for the battery unit available when you call. (C003)
- Page 14 (C048) Power and cabling information for NEBS (Network Equipment-Building System) GR-1089-CORE The following comments apply to the IBM servers that have been designated as conforming to NEBS (Network Equipment-Building System) GR-1089-CORE: The equipment is suitable for installation in the following:...
- Page 15 Note: All Ethernet cables must be shielded and grounded at both ends. The ac-powered system does not require the use of an external surge protection device (SPD). The dc-powered system employs an isolated DC return (DC-I) design. The DC battery return terminal shall not be connected to the chassis or frame ground.
- Page 16 Power Systems: 7316-TF4 18.5-Inch Flat Panel Rack-Mounted Monitor and Keyboard...
-
Page 17: Installing The 7316-Tf4 18.5-Inch Flat Panel Rack-Mounted Monitor And Keyboard
Installing the 7316-TF4 17-Inch Flat Panel Rack-Mounted Monitor and Keyboard This document helps you to install the 7316-TF4 17-Inch Flat Panel Rack-Mounted Monitor and Keyboard in the rack. The latest version of this document is maintained online, see 7316-TF4 18.5-Inch Flat Panel Rack-Mounted Monitor and Keyboard (http://www.ibm.com/support/knowledgecenter/POWER8/p8egg/... -
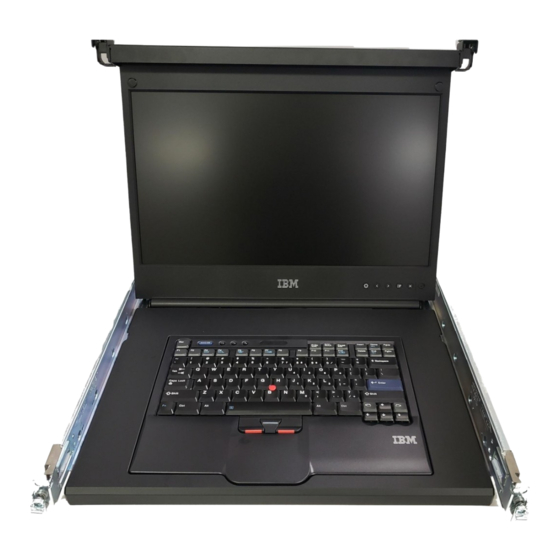
Page 18: Overview Of 7316-Tf4 18.5-Inch Flat Panel Rack-Mounted Monitor And Keyboard
This topic collection provides the overview of the 7316-TF4 18.5-Inch Flat Panel Rack-Mounted Monitor and Keyboard. The IBM 7316-TF4 18.5-Inch Flat Panel Rack-Mounted Monitor and Keyboard is a flat-panel display and keyboard tray in one unit. The console unit occupies 1U of space in a rack. - Page 19 Do not disassemble the flat-panel display or remove the ac adapter. v Two outer rails v Two console-switch mounting brackets, one with a channel (for routing the power, video, and keyboard-and-mouse cables) and six screws. Installing the 7316-TF4 18.5-Inch Flat Panel Rack-Mounted monitor and keyboard...
-
Page 20: The Ibm Documentation Cd
See the documentation that comes with your rack or console switch for more information about those products. The IBM Documentation CD Learn about the IBM Documentation CD shipped along with the 7316-TF4 18.5-Inch Flat Panel Rack-Mounted Monitor and Keyboard console. The IBM Documentation CD contains documentation for the console unit in Portable Document Format (PDF) and includes the IBM Documentation Browser to help you find information quickly. -
Page 21: Notices And Statements In This Document
The following sections provide the console unit specifications. Rail-to-rail depth measurements This topic provides the information about the rail-to-rail depth measurement to install the 7316-TF4 18.5-Inch Flat Panel Rack-Mounted Monitor and Keyboard. The console unit fits in a rack with the front to rear rail dimensions as shown in the following table. The console unit dimensions are measured outside-to-outside and are for IBM and non-IBM racks with unthreaded and threaded holes. -
Page 22: Dimensions And Weight
Installing the 7316-TF4 18.5-Inch Flat Panel Rack-Mounted Monitor and Keyboard This topic collection provides the information to install the 7316-TF4 18.5-Inch Flat Panel Rack-Mounted Monitor and Keyboard console. The console unit occupies 1U of mounting space in a rack. To install the console unit in the rack, complete the steps in the following sections. - Page 23 Electrical voltage and current from power, telephone, and communication cables are hazardous. To avoid a shock hazard: v If IBM supplied the power cord(s), connect power to this unit only with the IBM provided power cord. Do not use the IBM provided power cord for any other product.
-
Page 24: Installing The Keyboard In The Console Unit
(See the illustration.) Carefully pull the cable through the cutouts. 4. Peel the backing of the double-sided foam tape that is preinstalled on the front of the console tray. Power Systems: 7316-TF4 18.5-Inch Flat Panel Rack-Mounted Monitor and Keyboard... -
Page 25: Installing The Console Unit In The Rack
2. Select a 1U location in the rack for the console unit. 3. Remove the shipping screw from each outer slide-rail. Installing the 7316-TF4 18.5-Inch Flat Panel Rack-Mounted monitor and keyboard... - Page 26 Press the rear slide-rail bracket towards the rack flange and then pull it towards the front of the rack until the locking bracket clicks into place behind the rack flange. Power Systems: 7316-TF4 18.5-Inch Flat Panel Rack-Mounted Monitor and Keyboard...
- Page 27 You might have to move the slide-rail up and down several times, and press on the end of the bracket to release the pins so that they are correctly in the holes in the rack flange. Installing the 7316-TF4 18.5-Inch Flat Panel Rack-Mounted monitor and keyboard...
- Page 28 Carefully slide the console unit into the ball-bearing assemblies in the rails. Carefully slide the rollers on the console unit into the notch in the slide-rails as shown in the illustration. Power Systems: 7316-TF4 18.5-Inch Flat Panel Rack-Mounted Monitor and Keyboard...
- Page 29 8. On the right rail, align the C-channel on the end of the cable-management arm with the bracket on the console unit. Slide the C-channel onto the bracket until the cable-management arm thumbscrew aligns with the hole in the bracket. Tighten the thumbscrew. Installing the 7316-TF4 18.5-Inch Flat Panel Rack-Mounted monitor and keyboard...
- Page 30 10. Fully extend the console unit from the front of the rack, and then neatly route the cables within the rack and secure them with cable straps along the way. Important: If you have excess video cable, do not coil it as shown in the following illustration. Power Systems: 7316-TF4 18.5-Inch Flat Panel Rack-Mounted Monitor and Keyboard...
- Page 31 Cable tie (Optional for all racks) To secure the slide-rails to the rack after installation, install an M5 flat-head stabilizer screw in the top hole on the front of each slide-rail. Installing the 7316-TF4 18.5-Inch Flat Panel Rack-Mounted monitor and keyboard...
-
Page 32: Installing The Optional Console Switch
Learn how to install the optional console switch. You can use a console switch to attach more than one server to a single display and keyboard. The optional console switch is available separately. Power Systems: 7316-TF4 18.5-Inch Flat Panel Rack-Mounted Monitor and Keyboard... - Page 33 Then, connect the video, keyboard, and mouse connectors to the console switch. 4. For information about connecting the flat-panel monitor, thin keyboard, and servers to the console switch, see the documentation provided with the console switch. Installing the 7316-TF4 18.5-Inch Flat Panel Rack-Mounted monitor and keyboard...
-
Page 34: Using The Tft-Lcd Display
Exit button: Press this button to exit the menu or return 1 level in the menu. v Select/Menu button: Press this button to access, select, or confirm a menu option. Power Systems: 7316-TF4 18.5-Inch Flat Panel Rack-Mounted Monitor and Keyboard... -
Page 35: Using The Display Menu
– Display Info - Display Resolution and Refresh Rate – Reset Display settings - Reset Display Settings to Factory Default - confirmation required v Color Settings – Standard – Warm Installing the 7316-TF4 18.5-Inch Flat Panel Rack-Mounted monitor and keyboard... -
Page 36: Maintaining The Tft-Lcd Display
Before you perform any maintenance on the display, turn off the power. Observe the following guidelines when you clean the display: v Gently wipe the device covers and the screen with a soft cloth. Power Systems: 7316-TF4 18.5-Inch Flat Panel Rack-Mounted Monitor and Keyboard... -
Page 37: Technical Specifications
Remove finger marks and grease with a damp cloth and mild detergent; do not use solvents or abrasives. v Never use flammable cleaning material to clean an IBM display or any other electronic device. Technical specifications This topic provides the detailed technical specifications of the TFT-LCD display unit. -
Page 38: Supported Resolution Timing Charts
Vertical frequency 60.317 Hz Positive 75 Hz Positive and polarity Pixel clock 40 MHz 49.5 MHz Scan type Noninterlaced Noninterlaced Horizontal Period 26.400 µs 1056 pixels 21.333 µs 1056 pixels Power Systems: 7316-TF4 18.5-Inch Flat Panel Rack-Mounted Monitor and Keyboard... - Page 39 0.062 ms 3 lines 0.017 ms 1 line Table 6. 1152 x 864 timing chart Type Standard Timing name 1152 x 864 @ 60 Hz 1152 x 864 @ 75 Hz Installing the 7316-TF4 18.5-Inch Flat Panel Rack-Mounted monitor and keyboard...
- Page 40 88 pixels Vertical Total 16.662 ms 795 lines 13.333 ms 802 lines Display 16.097 ms 768 lines 12.768 ms 768 lines Blanking 0.566 ms 27 lines 0.565 ms 34 lines Power Systems: 7316-TF4 18.5-Inch Flat Panel Rack-Mounted Monitor and Keyboard...
- Page 41 Noninterlaced Noninterlaced Horizontal Period 15.630 µs 1688 pixels 12.504 µs 1688 pixels Display 11.852 µs 1280 pixels 9.481 µs 1280 pixels Blanking 3.778 µs 408 pixels 3.022 µs 408 pixels Installing the 7316-TF4 18.5-Inch Flat Panel Rack-Mounted monitor and keyboard...
- Page 42 Table 11. 1600 x 1200 timing chart Type Standard Timing name 1600 x 1200 @ 60 Hz 1600 x 1200 @ 75 Hz Horizontal frequency 75 kHz Positive 65.29 kHz Negative and polarity Power Systems: 7316-TF4 18.5-Inch Flat Panel Rack-Mounted Monitor and Keyboard...
-
Page 43: Hardware Maintenance Information
Tier 2 CRU: You may install a Tier 2 CRU yourself or request IBM to install it, at no additional charge, under the type of warranty service that is designated for your product. -
Page 44: Power Cords
For your safety, IBM provides a power cord with a grounded attachment plug to use with this IBM product. To avoid electrical shock, always use the power cord and plug with a properly grounded outlet. - Page 45 The cord set should have the appropriate safety approvals for the country in which the equipment will be installed. IBM power cords for a specific country or region are usually available only in that country or region. Table 13. Power cord part numbers and associated regions...
-
Page 46: Replacing The Keyboard
Removing the console unit from the rack; then, return to step 5 in this procedure. To replace a keyboard in the console unit, complete the following steps: 1. Close the flat-panel display. 2. Disconnect the keyboard-and-mouse cable from the server or console switch. Power Systems: 7316-TF4 18.5-Inch Flat Panel Rack-Mounted Monitor and Keyboard... - Page 47 8. Hold the new keyboard near the keyboard tray and carefully route the keyboard-and-mouse cable down through the keyboard tray cutout and up through the cutout that is behind the flat-panel display. (See the illustration.) Carefully pull the cable through the cutouts. Installing the 7316-TF4 18.5-Inch Flat Panel Rack-Mounted monitor and keyboard...
-
Page 48: Replacing The Cable-Management Arm
(keyboard-and-mouse, video, and power cables). 3. Close the flat-panel display. 4. Temporarily remove all cables from the cable-management arm. Power Systems: 7316-TF4 18.5-Inch Flat Panel Rack-Mounted Monitor and Keyboard... - Page 49 11. Align the C-channel on the end of the cable-management arm with the bracket on the console unit. Slide the C-channel onto the bracket until the cable-management arm thumbscrew aligns with the hole in the bracket. Tighten the thumbscrew. Installing the 7316-TF4 18.5-Inch Flat Panel Rack-Mounted monitor and keyboard...
-
Page 50: Replacing The Slide-Rail Assemblies
3. Close the flat-panel display. 4. If you installed the optional flat-head stabilizer screws in the top hole on the front of each slide-rail, remove them and set them aside. Power Systems: 7316-TF4 18.5-Inch Flat Panel Rack-Mounted Monitor and Keyboard... - Page 51 Remove the thumbscrew that attaches the cable-management arm to the outer slide-rail bracket. Slide the C-channel on the cable-management arm completely away from the bracket on the console unit. Thumbscrew Cable-management arm Installing the 7316-TF4 18.5-Inch Flat Panel Rack-Mounted monitor and keyboard...
- Page 52 Place the console unit on a table or other flat surface. 6. To close the extended rails, press up on the release latch 1 and push the extended rail towards the rack so that it is fully closed 2. Power Systems: 7316-TF4 18.5-Inch Flat Panel Rack-Mounted Monitor and Keyboard...
- Page 53 8. Remove the front bracket of the outer slide-rail from the rack by pulling the blue tab out 1 while you pull the end of the slide-rail away from the rack flange and toward the center of the rack 2. Installing the 7316-TF4 18.5-Inch Flat Panel Rack-Mounted monitor and keyboard...
- Page 54 Holding the slide-rail horizontally, align the rear slide-rail bracket so that the bracket is on the outside of the rack mounting flanges. Power Systems: 7316-TF4 18.5-Inch Flat Panel Rack-Mounted Monitor and Keyboard...
- Page 55 11. Use a #1 Phillips screwdriver to remove the four screws that attach each inner slide-rail to the console unit. Then, attach the corresponding new inner slide-rails to the unit, using the same hardware. Make sure that you orient the inner slide rails correctly (see the illustration). Installing the 7316-TF4 18.5-Inch Flat Panel Rack-Mounted monitor and keyboard...
-
Page 56: Replacing The Console Unit
4. Remove the console unit from the rack: a. Remove the thumbscrew that attaches the cable-management arm to the outer slide-rail bracket. Slide the C-channel on the cable-management arm completely away from the bracket on the Power Systems: 7316-TF4 18.5-Inch Flat Panel Rack-Mounted Monitor and Keyboard... - Page 57 Thumbscrew Cable-management arm L012 CAUTION: Pinch hazard. (L012) b. Fully extend the console unit out of the rack. c. Press in both release latches 1. Installing the 7316-TF4 18.5-Inch Flat Panel Rack-Mounted monitor and keyboard...
-
Page 58: Moving The Keyboard
4. Hold the keyboard near the keyboard tray and carefully route the keyboard-and-mouse cable down through the keyboard tray cutout and up through the cutout that is behind the flat-panel display. (See the illustration.) Carefully pull the cable through the cutouts. Power Systems: 7316-TF4 18.5-Inch Flat Panel Rack-Mounted Monitor and Keyboard... -
Page 59: Removing And Replacing The Outer Slide-Rails
1. Remove the rear bracket of the outer slide-rail from the rack by pulling the blue tab out 1 while you move the end of the slide-rail away from the rack flange and toward the center of the rack 2. Installing the 7316-TF4 18.5-Inch Flat Panel Rack-Mounted monitor and keyboard... - Page 60 2. Repeat step 1 and step 2 for the other outer slide-rail. Power Systems: 7316-TF4 18.5-Inch Flat Panel Rack-Mounted Monitor and Keyboard...
- Page 61 Holding the slide-rail horizontally, align the rear slide-rail bracket so that the bracket is on the outside of the rack mounting flanges. Installing the 7316-TF4 18.5-Inch Flat Panel Rack-Mounted monitor and keyboard...
-
Page 62: Installing The Console Unit In The Rack
1. Extend the inner part of the outer slide-rails and slide them forward to the front of the outer rails. Carefully slide the rollers on the console unit into the notch in the slide-rails as shown in the illustration. Power Systems: 7316-TF4 18.5-Inch Flat Panel Rack-Mounted Monitor and Keyboard... - Page 63 3. Align the C-channel on the end of the cable-management arm with the bracket on the console unit. Slide the C-channel onto the bracket until the cable-management arm thumbscrew aligns with the hole in the bracket. Tighten the thumbscrew. Installing the 7316-TF4 18.5-Inch Flat Panel Rack-Mounted monitor and keyboard...
- Page 64 Stabilizer screw 5. If you removed a console switch from behind the console unit, reinstall it now. 6. Reconnect to the server or console switch all cables that you removed. Power Systems: 7316-TF4 18.5-Inch Flat Panel Rack-Mounted Monitor and Keyboard...
- Page 65 To minimize the electrical interference if you have excess video cable, arrange the cable in figure-eight loops, as shown in the following illustration. Secure the cable in the middle with a cable tie or strap. Cable tie Installing the 7316-TF4 18.5-Inch Flat Panel Rack-Mounted monitor and keyboard...
- Page 66 Power Systems: 7316-TF4 18.5-Inch Flat Panel Rack-Mounted Monitor and Keyboard...
-
Page 67: Notices
This information was developed for products and services that are offered in the USA. This material may be available from IBM in other languages. However, you may be required to own a copy of the product or product version in that language in order to access it. -
Page 68: Privacy Policy Considerations
All statements regarding IBM's future direction or intent are subject to change or withdrawal without notice, and represent goals and objectives only. All IBM prices shown are IBM's suggested retail prices, are current and are subject to change without notice. Dealer prices may vary. -
Page 69: Trademarks
IBM, the IBM logo, and ibm.com are trademarks or registered trademarks of International Business Machines Corp., registered in many jurisdictions worldwide. Other product and service names might be trademarks of IBM or other companies. A current list of IBM trademarks is available on the web at Copyright and trademark information at www.ibm.com/legal/copytrade.shtml. - Page 70 This product is in conformity with the protection requirements of EU Council Directive 2004/108/EC on the approximation of the laws of the Member States relating to electromagnetic compatibility. IBM cannot accept responsibility for any failure to satisfy the protection requirements resulting from a non-recommended modification of the product, including the fitting of non-IBM option cards.
- Page 71 Warning: This is a Class A product. In a domestic environment this product may cause radio interference in which case the user will be required to take adequate measures. IBM Taiwan Contact Information: Electromagnetic Interference (EMI) Statement - Korea Notices...
- Page 72 Um dieses sicherzustellen, sind die Geräte wie in den Handbüchern beschrieben zu installieren und zu betreiben. Des Weiteren dürfen auch nur von der IBM empfohlene Kabel angeschlossen werden. IBM übernimmt keine Verantwortung für die Einhaltung der Schutzanforderungen, wenn das Produkt ohne Zustimmung von IBM verändert bzw.
-
Page 73: Class B Notices
Properly shielded and grounded cables and connectors must be used in order to meet FCC emission limits. Proper cables and connectors are available from IBM-authorized dealers. IBM is not responsible for any radio or television interference caused by unauthorized changes or modifications to this equipment. - Page 74 This product is in conformity with the protection requirements of EU Council Directive 2004/108/EC on the approximation of the laws of the Member States relating to electromagnetic compatibility. IBM cannot accept responsibility for any failure to satisfy the protection requirements resulting from a non-recommended modification of the product, including the fitting of non-IBM option cards.
- Page 75 Um dieses sicherzustellen, sind die Geräte wie in den Handbüchern beschrieben zu installieren und zu betreiben. Des Weiteren dürfen auch nur von der IBM empfohlene Kabel angeschlossen werden. IBM übernimmt keine Verantwortung für die Einhaltung der Schutzanforderungen, wenn das Produkt ohne Zustimmung von IBM verändert bzw.
-
Page 76: Terms And Conditions
Permissions for the use of these publications are granted subject to the following terms and conditions. Applicability: These terms and conditions are in addition to any terms of use for the IBM website. Personal Use: You may reproduce these publications for your personal, noncommercial use provided that all proprietary notices are preserved. - Page 78 Printed in USA...
Need help?
Do you have a question about the 7316-TF4 and is the answer not in the manual?
Questions and answers