Hach ORBISPHERE 3100 User Manual
Portable analyzer
Hide thumbs
Also See for ORBISPHERE 3100:
- Basic user manual (384 pages) ,
- Basic user manual (410 pages)

Related Manuals for Hach ORBISPHERE 3100


Summary of Contents for Hach ORBISPHERE 3100
- Page 1 DOC024.52.93051 ORBISPHERE Model 3100 Portable Analyzer USER MANUAL 09/2019, Edition 10...
-
Page 3: Table Of Contents
Table of Contents Section 1 General Information ......................3 1.1 Disclaimer ............................ 3 1.2 Safety information ........................3 1.2.1 Use of hazard information ....................3 1.2.2 Safety recommendations ....................4 1.2.3 Safety precautions ......................4 1.2.4 Internal batteries ......................... 5 1.2.5 Service and repairs ...................... - Page 4 Table of Contents 5.3 Advanced settings ........................32 5.4 Calibration ..........................33 5.4.1 Barometric sensor calibration....................33 5.4.2 Gas sensor calibration.......................33 5.5 Default measurement configuration settings ................34 5.5.1 Measurement configuration factory settings..............35 5.6 Import / Export..........................35 5.6.1 Exported files........................36 5.7 Service instrument........................37 5.8 Service O2 channel ........................37 Section 6 Maintenance and Troubleshooting ................39 6.1 Maintenance..........................39...
-
Page 5: Section 1 General Information
However, Hach assumes no responsibility for any inaccuracies that may be contained in this manual. In no event will Hach be liable for direct, indirect, special, incidental, or consequential damages resulting from any defect or omission in this manual, even if advised of the possibility of such damages. -
Page 6: Safety Recommendations
Immediately discontinue use of the instrument if, while using or charging the battery, the battery emits an unusual smell, smoke or the enclosure feels unusually hot to the touch. Contact your Hach Service Center, if any of these problems are observed. •... -
Page 7: Internal Batteries
Authority regulations. The mother board without the battery can then be shipped safely. 1.2.5 Service and repairs None of the instrument’s components can be serviced by the user. Only personnel from Hach or its approved representative(s) is (are) authorized to attempt repairs to the system and only components formally approved by the manufacturer should be used. -
Page 8: Precautionary Labels
General Information 1.2.6 Precautionary labels Read all labels and tags attached to the instrument. Personal injury or damage to the instrument could occur if not observed. This symbol, when noted on a product enclosure or barrier, indicates that a risk of electrical shock and/or electrocution exists and indicates that only individuals qualified to work with hazardous voltages should open the enclosure or remove the barrier. -
Page 9: Section 2 Specifications
Section 2 Specifications 2.1 Technical specifications Specifications are subject to change without notice. ANALYSIS Non-flammable gaseous or liquid samples Sample Sample temperature -5 to 45°C (23 to 113°F) Sample pressure 0 to 10 bar (0 to 140 psi) Measurement range 0 to 2000 ppb ±... -
Page 10: Instrument Dimensions
Specifications 2.2 Instrument dimensions 170 ~ 180 Figure 1 3100 instrument dimensions (mm) -
Page 11: General Principle Of Operation
Specifications 2.3 General principle of operation Optical sensing of oxygen originates from the work of Kautsky in 1939 where he demonstrated that oxygen can dynamically quench the fluorescence of an indicator (decrease the quantum yield). This principle has been reported in various fields of application such as monitoring aquatic biology in waste water, tests for blood gas analysis and cell culture monitoring. - Page 12 Specifications...
-
Page 13: Section 3 Installation
If anything is missing or damaged, contact the manufacturer or your dealer immediately. A thin protective film has been placed over the screen of the ORBISPHERE 3100 analyzer to protect it from damage during transportation. For a clear view of the screen, this film must be peeled off before using the analyzer for the first time. -
Page 14: Installation Startup Checklist
Installation Figure 3 Tool kit (4mm instrument version illustrated) 1 x Particle filter 1 x Cross head screwdriver 1 x Syringe 1 x Flat head screwdriver 1 x Box 5 syringe/instrument connectors (4mm 1 x Stainless steel or flexible tubing (stainless version only) steel illustrated) 1 x Box 10 meshes for particle filter... -
Page 15: Reconnect Battery Power
Installation 3.5 Reconnect battery power For safety reasons, the battery pack will not be connected during shipment. Once the instrument has been unpacked, the battery power should be reconnected using the following procedure: 1. Tilt the instrument towards the rear, to reveal two screws underneath (No. 1) that hold the instrument front panel in place. -
Page 16: Instrument Switches And Connectors
Installation 3.6 Instrument switches and connectors The following diagrams illustrate the side views of the instrument and their key features: Figure 4 Left side view Handle USB connection Instrument ON/OFF switch External power supply connection RS232 connection Card identification system (option not yet available) Figure 5 Right side view Sample flow adjustment valve Sample flow valve with inlet and outlet connections (the... - Page 17 Installation There is one switch and three connectors located on the left side of the instrument. The three connectors are protected with a metal tab which must be unscrewed and removed before use. Each tab has a symbol on it to indicate its function. Refer to Figure 4 on page 14 and the table that follows:...
-
Page 18: Instrument Connections
Installation 3.7 Instrument connections 3.7.1 External power WARNING When using an external power supply to power the instrument, ensure the external power socket is earthed. In addition to the internal rechargeable battery pack, the instrument can be powered by an external power source using the supplied adapter and cable. -
Page 19: Connecting Sample Lines
Installation 3.8 Connecting sample lines Measurements can be taken on a continuous or sample by sample basis. In either mode, the instrument must be connected to the sample line as follows: 1. The sample inlet and outlet connections on the instrument are located on the ON/OFF sample flow valve (refer to Figure 5 on page 14 and enlarged in the diagram below):... -
Page 20: Pc Software Installation
Install the PC software by inserting the USB key into your PC and running the setup program (entitled setup.exe) from the directory Orbisphere 3100\Installation Files\PC Software on the USB drive. Follow the on-screen instructions and the software will be installed on your hard disk in a new directory: C:\Program Files\Hach Lange\3100 PC Software\. -
Page 21: Create New User Table
Installation 3.9.1 Create new user table From the application’s File menu, select New and then User Table. A default user is created automatically, with an ID of “0”, a User Name of “Default”, and a level of “User”. None of these fields can be changed. The password is set automatically to “1234”, but this can be changed. -
Page 22: Create New Measurement Configuration Table
Installation 3.9.2 Create new measurement configuration table From the application’s File menu, select New and then O2 Instrument to create a new measurement configuration table. Note: The other two options, CO2 Instrument and Dual Channel Instrument are for future use. A default entry is created automatically, with an ID of “0”, a Location Name and Product Name of “Default”. -
Page 23: Transfer Files To The Instrument
1. From the PC copy the files to the USB storage device in a top-level directory of 3100. The files will typically be located in: C:\Program Files\Hach Lange\3100 PC Software\ with file extensions of .cdm (for measurement configurations) and .ndu (for user tables). -
Page 24: Instrument Storage
Installation 3.10 Instrument storage 3.10.1 General guidelines When not in use, ensure the instrument is turned OFF by pressing the ON/OFF switch until the green indicator light is extinguished. Refer to Figure 4 on page CAUTION If the instrument is to be stored in an environment where the temperature is likely to be 0°C (32°F) or below, then to avoid any damage to the instrument make sure there is no liquid inside. -
Page 25: Section 4 User Interface
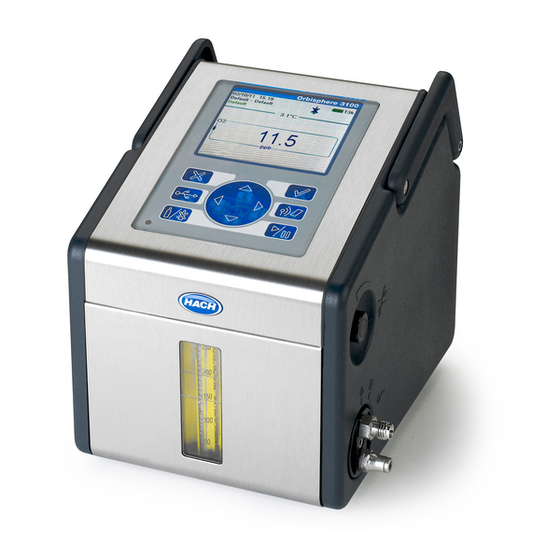
Section 4 User Interface 4.1 Keypad and function keys 1. Cancel key 4. Arrow keys 2. USB key 5. Enter key 3. Sample or continuous mode key 6. RFID key 7. Measurement key The user interface of the instrument consists of a display screen, 6 function keys and a set of 4 arrow keys in the center. -
Page 26: Data Entry
User Interface 4.2 Data entry 4.2.1 Select data To select a data item from a list, use the up and down arrow keys to highlight the required value, followed by the Enter key to select it. 4.2.2 Enter data When required to enter data (e.g. a password in the following example), a screen will be displayed showing the field default value (0000) and the valid range (0 - 9999) below it. -
Page 27: Measurement
User Interface 4.4 Measurement 4.4.1 Measurement mode Two measurement modes are available: • Continuous mode • Sample mode Continuous mode is typically used for process measurement, whereas sample mode is aimed at laboratory measurements of small volume individual samples such as cans, bottles, etc. Continuous mode cycle •... -
Page 28: Standard Measurement Display
User Interface 4.4.3 Standard measurement display Figure 6 Measurement display 1. Instrument date and time 7. Battery life remaining 2. Measurement location and product name 8. USB symbol indicates USB key attached 3. User name 9. Measurement mode (continuous shown) 4. -
Page 29: Diagnostic Measurement Display
User Interface The numeric measurement value at the end of the curve is refreshed every 5 seconds. The curve is refreshed every 5 seconds in sample mode. In continuous mode, the refreshment rate is the same as that defined as the storage interval parameter (see Advanced settings on page 32). -
Page 30: Measurement Configuration List
User Interface 4.4.6 Measurement configuration list From the measurement screen, press the right arrow key until the list of measurement configurations stored in the instrument (below left) is displayed. Note: These configurations are defined by the user on the PC (see Create new measurement configuration table on page 20) and imported into the instrument (see... -
Page 31: Out Of Range Display
User Interface 4.4.8 Out of range display The sensor measures dissolved oxygen up to a maximum value of 2 ppm. Should the measured concentration go above this value, then the screens illustrated below will be displayed. The measurement value will be displayed as hyphens and will alternate with an “Out of range” message. -
Page 32: Main Menu
User Interface 4.5 Main menu The main menu is only accessible if the user is logged on at supervisor level and is accessed using the Enter key from the standard or diagnostic measurement display. The main menu options are described in detail in Main Menu on page 31 of this manual. -
Page 33: Section 5 Main Menu
Section 5 Main Menu 5.1 Overview The main menu is only available to users logged on at supervisor level. To access the main menu from the measurement screen, press the Enter key on the main keypad to display the following options: Scroll through the menu using the up and down arrow keys. -
Page 34: Basic Settings
Main Menu 5.2 Basic settings Language Selection Language Select the working language for the instrument from the list available Date and Time Adjustment Date format Define the display format for the date (DD/MM/YY or MM/DD/YY) Date Enter the day, the month and the year in the format defined above Time format Enter the display format for the time using a 12 or 24 hour clock Time... -
Page 35: Calibration
Using a known oxygen sample (reference sample) • Enter a factory parameter provided by Hach (this option is only required when the sensor spot has been replaced) If the calibration mode displayed is not the required mode, then press the Enter key and select the required mode from the three options available in the drop-down list: •... -
Page 36: Default Measurement Configuration Settings
Main Menu O2 high level adjustment - Reference sample Run the reference sample through the instrument and adjust the flow to approximately 150 mL/min. In the Calibration mode window select Reference sample Scroll down to the Reference value window and enter the oxygen value of the sample Let the sample run through the instrument for 5 minutes to stabilize the measurement Scroll down to the Start Calibration window and press the Enter key to start the calibration Wait until the Signal in range and Stability reached fields display Yes which indicates the... -
Page 37: Measurement Configuration Factory Settings
Main Menu 5.5.1 Measurement configuration factory settings The following table shows the factory defined oxygen measurement configuration settings for the instrument: Instrument Settings Instrument mode Continuous mode. Sample type Beer Gas unit type Dissolved Gas unit High alarm Disabled Low alarm Disabled O2 measurement offset 0.0 ppb... -
Page 38: Exported Files
Main Menu 5.6.1 Exported files The following files will be automatically exported from the instrument to the USB mass storage device under a top-level directory of 3100: • All measurement configuration tables (*.cdm) • All user tables (*.ndu) • All solubility tables (*.sol) •... -
Page 39: Service Instrument
Main Menu 5.7 Service instrument Board Information This option is useful for troubleshooting purposes and displays information about the mother board, measurement board and battery Temperature Checking This option is useful for troubleshooting purposes and displays the temperature readings of the measurement board, pigtail, battery pack and sample Sample Temperature Calibration You will need a sensor simulator for this option. - Page 40 Main Menu...
-
Page 41: Section 6 Maintenance And Troubleshooting
Section 6 Maintenance and Troubleshooting 6.1 Maintenance 6.1.1 Maintenance schedule This following table shows the recommended maintenance schedule for the ORBISPHERE 3100 instrument. This proposed schedule should be modified according to operating conditions. Interval Item Clean outside of the instrument with a damp cloth and run clean water Daily through the instrument to clean the internal passageways Clean outside of the instrument with a damp cloth and run 20 mL of ethanol... - Page 42 Maintenance and Troubleshooting 2. Once removed, the flow chamber assembly (No. 2) can be seen located to the right of the flow meter. 3. Remove the holding screw from the flow chamber assembly. 4. Holding the assembly between thumb and forefinger, gently ease it out of the instrument and discard.
-
Page 43: Troubleshooting
Maintenance and Troubleshooting 6.2 Troubleshooting 6.2.1 List of events The following bit mask tables can be viewed on the diagnostic measurement screen (supervisor option only) as illustrated in Diagnostic measurement display on page 27. They are also included in the measurement file (Measurement.txt) an example of which is shown in Figure 7 on page Common events... -
Page 44: Measurement Troubleshooting
Perform the monthly cleaning procedure as described in Maintenance schedule on page 39 Change LDO spot Channel out Contact Hach service Perform the monthly cleaning procedure as described in Maintenance Silver bead does not move freely in the sample schedule on page 39 6.2.3 O... -
Page 45: Section 7 Parts And Accessories
Section 7 Parts and Accessories 7.1 3100 Kits Kit N° Description DGK3100-MB100 Beverage kit includes: 3100 instrument (4 mm), EU power plug, and accessories DGK3100-MB200 Beverage kit includes: 3100 instrument (4 mm), US power plug, and accessories Beverage kit includes: 3100 instrument (4 mm), Korean version, US power plug, DGK3100-MB200K and accessories DGK3100-MB2040... -
Page 46: Spare Parts And Accessories
Parts and Accessories 7.2 Spare parts and accessories Part N° Description 3100-M0-000 Portable O instrument 4mm 3100-M0-00K Portable O instrument 4mm, Korean version 3100-M0-040 Portable O instrument 1/4 inch. 3100-M0-04K Portable O instrument 1/4 inch., Korean version 3100-M0-060 Portable O instrument 6mm 3100-M0-06K Portable O... - Page 47 Tel. +49 (0) 2 11 52 88-320 SWITZERLAND Fax (970) 669-2932 Fax +49 (0) 2 11 52 88-210 Tel. +41 22 594 6400 orders@hach.com info-de@hach.com Fax +41 22 594 6499 www.hach.com www.de.hach.com © Hach Company/Hach Lange GmbH, 2010, 2017–2019. All rights reserved.
Need help?
Do you have a question about the ORBISPHERE 3100 and is the answer not in the manual?
Questions and answers