Advertisement
Quick Links
®
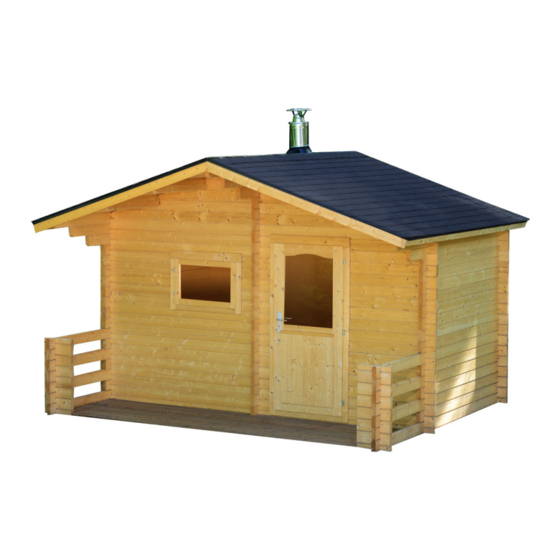
Appalachia Sauna
Installation & Owner's Manual
Thank you for your purchase of your Appalachia sauna! Should you have any questions during assembly,
please feel free to call us at 888.355.3050, or email sales@almostheaven.com.
Regular business hours are 9-5 EST, M-F.
Advertisement

Subscribe to Our Youtube Channel
Related Manuals for Almost Heaven Saunas Appalachia


Summary of Contents for Almost Heaven Saunas Appalachia
- Page 1 Appalachia Sauna Installation & Owner’s Manual Thank you for your purchase of your Appalachia sauna! Should you have any questions during assembly, please feel free to call us at 888.355.3050, or email sales@almostheaven.com. Regular business hours are 9-5 EST, M-F.
- Page 2 It is recommended that you read this manual as well as the European manuals in their entirety before attempting assembly so you understand the sequence of the various steps. Assembly of the Appalachia Sauna requires a higher level of skill than our other sauna models. The skill level of a contractor or high-level “handyman” is suggested.
- Page 3 Screw the two half logs to the stringers using the included 70mm screws or 2-3/4” deck screws. Place your screw between the grooves in the log and drive flush with the surface so that the next log will nest correctly. Double- check square and then attach two full logs to twohalf logs with screws. page 2 APPALACHIA SAUNA INSTALLATION MANUAL...
- Page 4 Row seven will use two side logs (019) that are flat (no grooves) on the porch ends of the log. page 3 APPALACHIA SAUNA INSTALLATION MANUAL...
- Page 5 15. Continue to work your way up with the appropriate logs. After the tenth log is placed on the front of the sauna, begin using logs (010) and (011) to frame the window. page 4 APPALACHIA SAUNA INSTALLATION MANUAL...
- Page 6 At row 16 on the two sides, use the longer logs (020) to begin the cantilever extension that will support the roof. (Review steps 20-26 before continuing to see how the cantilever extension logs alternate with the logs located on the front and rear walls). page 5 APPALACHIA SAUNA INSTALLATION MANUAL...
- Page 7 (022) is tapered at the top for the right side wall and (026) is tapered for the left side wall. NOTE: Do not screw the cantilever logs to the all logs yet. This will be addressed in step 33. (022) and (026) logs are tapered 23. While working your way up with the extension logs, locate the sections (W1-1) and (W2-1) which are the angled portions of the front and rear walls. 24. Disconnect the individual logs that form (W1-1) and (W2-1). 25. Alternate the front and rear wall individual pieces from (W1-1) and (W2-1) with the center wall logs as you work your way up. page 6 APPALACHIA SAUNA INSTALLATION MANUAL...
- Page 8 (024) as shown as you work your way up. (Review steps 28-32 before continuing to see how the cantilever extension logs alternate with the logs located on the front and walls.) 29. View of front showing progress to this point. 30. Further disassemble (W1-1) and (W2-1) to separate peak log sections for front and rear walls. page 7 APPALACHIA SAUNA INSTALLATION MANUAL...
- Page 9 This is important as you do not want the roof to appear “bowed” when complete. 34. Once the cantilever logs are properly positioned and fixed to the wall logs, begin laying out the roof boards. 35. Tap each roof board into place with a mallet prior to nailing into the cantilever logs. page 8 APPALACHIA SAUNA INSTALLATION MANUAL...
- Page 10 Cut to length as needed. 39. Find the left and right eave edging boards (EaE5-1) and nail to the roof edge reinforcement boards as shown. Cut to length as needed. 40. Place the facia boards (FaB7-1) on the roof edge and secure to the ends of the cantilever logs and roof board. page 9 APPALACHIA SAUNA INSTALLATION MANUAL...
- Page 11 Also, if the floor boards don’t reach to the foundation stringers you can create and install a filler piece using purchased lumber. 45. Install the floor boards in the sauna room (FB5-1) by nailing to the stringers. NOTE: Leave a 1/16” +/- gap between the floor boards in the sauna room to allow the room to draw fresh air and to let any water flow out of the floor. page 10 APPALACHIA SAUNA INSTALLATION MANUAL...
- Page 12 The purpose of the trim is only to cover the gap for aesthetic purposes. 49. Install the floor trim (FIB2-1) around each room at the point where the floor meets the walls. Cut the trim to fit as needed. 50. In the sauna room, install the upper bench supports (SP2) 780mm above the floor so the end butts against the side wall. Install the lower bench support (SP3) 330mm above the floor so the end of the boards allign with the front edge of the upper bench support. page 11 APPALACHIA SAUNA INSTALLATION MANUAL...
- Page 13 52. Install the top and lower benches, securing to the walls with 70mm screws. 53. View of installed benches. 54. View of completed sauna room. Your sauna is now ready for roofing. The sauna includes shingles but does not include drip edge. Purchase the appropriate colored drip edge at your local home center as well as shingles if you desire a different color than the included black shingles. NOTE: If using a wood-burning stove you should first install the stove and chimney before roofing the sauna. Follow the heater installation instructions included with your heater for the appropriate electric or wood-burning unit. page 12 APPALACHIA SAUNA INSTALLATION MANUAL...
Need help?
Do you have a question about the Appalachia and is the answer not in the manual?
Questions and answers