Table of Contents
Advertisement
®
Saneo
B, Saneo
Cassette toilet
EN
Installation Manual. . . . . . . . . . . . . . . . . . . . 19
Kassettentoilette
DE
Montageanleitung. . . . . . . . . . . . . . . . . . . . 31
Toilettes à cassette
FR
Instructions de montage . . . . . . . . . . . . . . .44
Toilette a cassetta
IT
Indicazioni di montaggio . . . . . . . . . . . . . .57
Cassettetoilet
NL
Montagehandleiding . . . . . . . . . . . . . . . . .70
SANITATION
SANEO
®
®
C, Saneo
BLP, Saneo
®
Saneo
BW, Saneo
®
®
CLP, Saneo
BS, Saneo
®
CW
®
CS,
Advertisement
Table of Contents

Related Manuals for Dometic Saneo Series


Summary of Contents for Dometic Saneo Series
- Page 1 SANITATION SANEO ® ® ® ® ® ® Saneo B, Saneo C, Saneo BLP, Saneo CLP, Saneo BS, Saneo ® ® Saneo BW, Saneo Cassette toilet Installation Manual....19 Kassettentoilette Montageanleitung.
- Page 3 Saneo B, Saneo C...
- Page 4 Saneo B, Saneo C...
- Page 5 Saneo B, Saneo C Saneo B, C...
- Page 6 Saneo B, Saneo C Saneo BS, BW Saneo CS, CW...
- Page 7 Saneo B, Saneo C Saneo BLP, CLP...
- Page 8 Saneo B, Saneo C...
- Page 9 Saneo B, Saneo C...
- Page 10 Saneo B, Saneo C...
- Page 11 Saneo B, Saneo C...
- Page 12 Saneo B, Saneo C...
- Page 13 Saneo B, Saneo C R = 10 mm...
- Page 14 Saneo B, Saneo C Saneo BLP, Saneo CLP Saneo BW, Saneo CW Saneo BS, Saneo CS Ø5 Ø5...
- Page 15 Saneo B, Saneo C...
- Page 16 Saneo B, Saneo C...
- Page 17 Saneo B, Saneo C – – – – – 12 Vg...
- Page 18 Saneo B, Saneo C rt + bl + ws – rt + rt + rt + ws – ws – ws –...
-
Page 19: Table Of Contents
Saneo B, Saneo C Please read this instruction manual carefully before installation and first use, and store it in a safe place. If you pass on the product to another person, hand over this instruction manual along with it. Table of contents Explanation of symbols . -
Page 20: Explanation Of Symbols
Explanation of symbols Saneo B, Saneo C Explanation of symbols WARNING! Safety instruction: Failure to observe this instruction can cause fatal or serious injury. CAUTION! Safety instruction: Failure to observe this instruction can lead to injury. NOTICE! Failure to observe this instruction can cause material damage and impair the function of the product. -
Page 21: General Safety
Saneo B, Saneo C Intended use General safety WARNING! • This device can be used by children aged 8 years or over, as well as by persons with diminished physical, sensory or mental capacities or a lack of experience and knowledge, providing they are supervised, or have been taught how to use the device safely and are aware of the resulting risks. -
Page 22: Technical Description
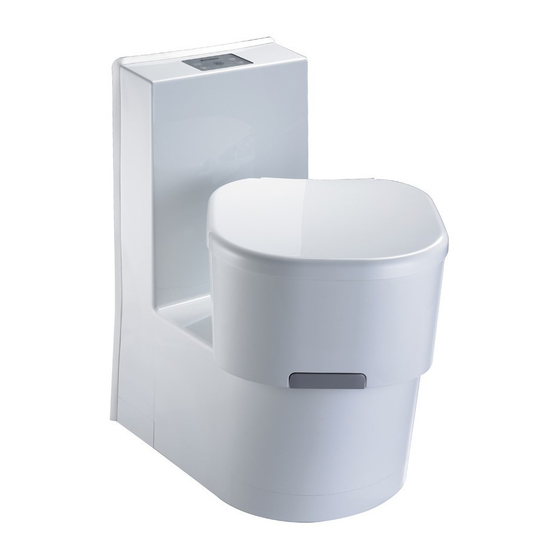
Technical description Saneo B, Saneo C Technical description The cassette toilet Saneo consists of a toilet permanently installed in the vehicle and a removable, mobile cassette as a holding tank. The cassette is externally accessible through a door. Depending on the model, the toilet gets the rinse water from a tank integrated in the housing or from a freshwater tank in the vehicle. -
Page 23: Installing The Toilet
Installing the toilet Installing the service door You can find the description for installing the service door in the enclosed document Dometic Seitz SK 5, optional and model-dependent). Making wall cutouts Service door wall cutout ➤ Make a rectangular opening in the outer wall with the following dimensions (fig. -
Page 24: Setting Up The Toilet
Installing the toilet Saneo B, Saneo C Setting up the toilet NOTICE! All components of the system must be installed in frost-free areas. In freezing temperatures, there is a risk of damage caused by frost. ➤ Install the toilet according to the description for the respective model version. ➤... - Page 25 Saneo B, Saneo C Installing the toilet Note that the cassette protrudes 112 mm out of the cassette housing (fig. a, page 11). ➤ Place the housing base (fig. a 1, page 11) flush with the installation frame of the service door (fig.
-
Page 26: Setting Up The Saneo Bw, Saneo Cw, Saneo Bs, Saneo Cs, Saneo Blp, Saneo Clp Toilets
Installing the toilet Saneo B, Saneo C Setting up the Saneo BW, Saneo CW, Saneo BS, Saneo CS, Saneo BLP, Saneo CLP toilets These models have a wall connection console. The control and operating panel is integrated in the wall connection console. Models Saneo BW and Saneo CW feature a built-in water tank, while models Saneo BS and Saneo CS do not have a water tank. -
Page 27: Installation Of The Tank Flap
Saneo B, Saneo C Installing the toilet ➤ Perform a leak test. NOTICE! The operating pressure (water pressure) of the solenoid valve should not exceed 6 bar. The solenoid valve is damaged by excessive pressure. Performing a measurement to test the flushing output NOTE Water supply (vehicle-side pump): The toilet requires a min. -
Page 28: Electrical Connection
Electrical connection Saneo B, Saneo C ➤ Put the tank flap on the tank. ➤ Tightly fasten the tank flap with four C4x25 countersunk screws (not included). ➤ Slide the O-ring onto the inner tube of the tank flap (fig. k, page 16): –... - Page 29 Saneo B, Saneo C Electrical connection The layout of the touch-switch control unit (fig. m A, page 18) and of the tact-switch control unit (fig. m B, page 18) is as follows: Item Label 5-pin connector for Reed sensors cassette tank and micro-switch cassette Only Saneo BW, CW Float level indicator, water tank Jumper (only touch-switch control unit)
-
Page 30: Technical Data
Technical data Saneo B, Saneo C Technical data Dometic Saneo 12 Vg Input voltage Max. 2 A with internal pump Current consumption Max. 10 A with external pump 150 kg Max. person weight See fig. 4, page 5 to fig. 9, page 10 Dimensions 0 °C to +50 °C...
Need help?
Do you have a question about the Saneo Series and is the answer not in the manual?
Questions and answers