
Related Manuals for Unitech PA400


Summary of Contents for Unitech PA400
- Page 1 Data Collection Terminal - PA400 - User's Manual Version 1.0 © 2014 Unitech Electronics Co., Ltd. All rights reserved. Unitech is a registered trademark of Unitech Electronics Co., Ltd.
-
Page 3: Preface
Preface About This Manual This manual explains how to install, operate and maintain the PA400 Data Collection Terminal. No part of this publication may be reproduced or used in any form, or by any electrical or mechanical means, without permission in writing from the manufacturer. - Page 4 Regulatory Compliance Statements FCC Warning Statement This equipment has been tested and found to comply with the limits for a Class B digital device, pursuant to part 15 of the FCC rules. These limits are designed to provide reasonable protection against harmful interference in a residential installation.
- Page 5 FCC Label Statement This device complies with part 15 of the FCC rules. Operation is subject to the following two conditions: 1. This device may not cause harmful interference, and 2. This device must accept any interference received, including interference that may cause undesired operation.
- Page 6 The laser safety warning label required by the DHHS/IEC for the PA400 series' optional laser scanner module is located on the memory compartment cover, on the back of the unit.
-
Page 7: Battery Notices
If the main battery is removed, the backup battery ensures the data on SDRAM is safe for up to 2 hours. To prevent data loss, do not leave the PA400 uncharged with the main battery removed for an extended period. For more details, refer to the section titling Charging the Battery. -
Page 8: Battery Charge Notice
• Do not leave the lithium-Ion battery discharged and unused for an extended period because the battery will wear out and the longevity of the battery will be at least shorter than half of the one with frequent recharges. Battery charge notice It is important to consider the environment temperature whenever the Lithium- Ion battery pack is charged. Charging is most efficient at normal room temperature or in a slightly cooler environment. -
Page 9: Storage And Safety Notice
It is recommended to store batteries within normal room temperature ranges. Warranty The following items covered under Unitech Limited Warranty are free from defects during normal use: • PA400 – 1-year limited warranty. -
Page 10: Table Of Contents
Battery charge notice ....................VI Storage and safety notice ..................VII Warranty ......................VII Chapter 1 Getting Started ....................1 Introducing the PA400....................1 Package Contents ....................2 Device components....................3 Inserting the memory card and the SIM card............5 Charging the battery....................6 Turning your unit on and choosing your language ..........8... - Page 11 Chapter 4 Connecting to a PC and Synchronizing Information ........19 ® Setting up Windows Mobile Device Center on ...........20 ® ® Setting up ActiveSync on Windows XP and older ..........21 Synchronizing with your computer ...............22 Chapter 5 Managing Your Device..................24 Changing basic settings..................24 Customizing sounds and notifications..............25 Managing memory and battery power ..............26 Working with files ....................28 Adding and removing programs ................29 Using Task Manager ....................30...
- Page 12 - X -...
-
Page 13: Chapter 1 Getting Started
Getting Started Introducing the PA400 Thank you for purchasing the PA400 Data Collection Terminal. Your PA400 was designed for users who need a compact and durable portable computer for data collection and real time transactions. The unitech PA400 Data Collection Terminal is a compact mobile computing device designed for maximum durability. -
Page 14: Package Contents
Package Contents PA400 Terminal USB Cable Wrist Strap Power Adapter / Plugs QRG/UM CD-ROM - 2 -... -
Page 15: Device Components
Device components Component Description • Press and hold to turn on / off your device. POWER button • When the device is on, press to suspend / resume your device. Connect to 3.5mm stereo headphone (microphone- in function notsupported), which allows you to listen to audio media or use the hands-free kit. To record, tap START / Notes (or hold down the Fn Headphone connector key and the 5 key). If you do not see the Recording toolbar, tap Menu / View Recording Toolbar. Tap the round Record symbol on the screen. The unit will record until the square Stop symbol is pressed. - Page 16 Camera and Flash • The flash lets you take pictures in low-light conditions. Speaker Listen to audio media or a phone call from here. Connect to the PA400 USB Client Cable, PA400 PA400 Custom IO Port USB Host cable or PA400 9 Pin Serial - 4 -...
-
Page 17: Inserting The Memory Card And The Sim Card
Inserting the memory card and the SIM card You need to remove the cover on the left panel using a Phillips-0 screw driver before you can install the memory card and the SIM card on your device. NOTE: The device supports up to 32GB microSD memory cards with minimum 48MHz clock rate. -
Page 18: Charging The Battery
3. To remove a card, push the card to release from the slot. NOTE: Make sure you have saved any data in open programs before removing the memory card. 4. Replace the cover and then secure it with the screws. Charging the battery IMPORTANT: Fully charge the battery at least 4 hours. - Page 19 NOTE: The converter plug varies with the region of your purchase. 2. Locate the PA400 Custom IO Connector on the bottom of the device. Connect the custom end of the PA400 Custom USB Client cable to the connector on your device.
-
Page 20: Turning Your Unit On And Choosing Your Language
Turning your unit on and choosing your language WARNING! BEFORE TURNING THE DEVICE ON, THE DEVICE MUST BE PLUGGED IN TO AN EXTERNAL POWER SOURCE. Once you have started to charge your device, you can turn it on. 1. Press the POWER button on the right panel of the device for about 5 seconds. - Page 21 9. The only way to change the language you have selected is to reinstall the firmware using the Firmware update utility. NOTE: Only Microsoft applications and messages will be translated into languages other than English. All other error messages, notifications and other applications may appear in English. 11. When the handheld has been configured for the language you selected, the next step is to calibrate the touch screen. 12.
-
Page 22: Chapter 2 Operating Basics
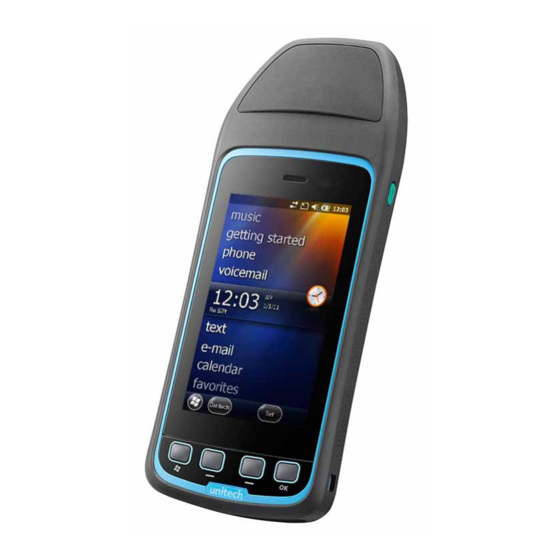
Chapter 2 Operating Basics Home screen The Home Screen is an easy way to launch your favorite programs. You can view high-level information at a glance, with notifications for Live services, e-mail and SMS/MMS. To navigate the Home screen, slide your fingertip up/down on the screen; or simply drag the highlighted bar to the desired item on the screen. The programs provided on the Home screen include: • pictures: You can select your photos from this menu. -
Page 23: Status Indicators
• text: If you have the phone feature set up on your unit, you can send and receive text messages from this menu. • e-mail: Email can be set up and launched here. • calendar: Appointments can be managed from here. • favorites: Internet Explorer can be launched from here. -
Page 24: Programs Screen
Icon Description Icon Description Roaming mode GPRS network available 3G connected GPRS network connected HSDPA network available Programs screen Press the START ( ) button to access the Programs screen. The main features of the Programs screen are listed below. Slide your fingertip up/down on the Programs screen to browse more items and then access an item by tapping on the item. Power menu Press and hold the POWER button for about 3 seconds. -
Page 25: Securing Your Device
• Shutdown: Turn off the device. • Enable Airplane mode: Enable the Airplane mode for the device. • Reset: Restart the device. • Vibration On: Enable the Vibration mode for the device. NOTE: If the countdown or the Power menu does not appear when the POWER button is held down, continue to hold down the POWER button for at least 8 seconds to start the reset. - Page 26 You will then see the following screen: To unlock the keypad, slide the lock symbol. Lock your device Locking your device prevents access to personal data. When you enable this feature, your device will automatically lock after a specified time of inactivity. A screen will be displayed requiring your device lock password before access is granted.
-
Page 27: Using The Phone
Chapter 3 Using the Phone Before using your phone, purchase an AT&T GSM 3G cellular voice or data plan from your local AT&T carrier. You can use Phone to make phone calls, set up speed dials, keep track of calls, and send SMS messages just like all the standard features of a mobile phone. - Page 28 2. Enter the phone number by tapping keys on the keypad. 3. Tap the BACK key ( ) if you need to delete a number. 4. Tap Talk icon. TIP: When you tap a key on the keypad, a list of names and numbers is displayed as your device searches Contacts, Call History, and Speed Dial to find a matching name or number. The next key you tap continues to narrow the search.
-
Page 29: Receiving And Ending A Call
Making an international call Tap and hold the 0 (Zero) key on the keypad until “+” symbol appears. Enter the full phone number you want to dial, and tap Talk icon. The full phone number includes the country code, area code (without the leading zero, if any), and phone number. Making an emergency call Enter the emergency number for your locale and then tap the Talk icon. Receiving and ending a call When you receive a phone call, an incoming call message appears on the screen and you are given the option to answer or ignore it. -
Page 30: Speed Dial
Speed dial You can create speed dial entries for frequently-called numbers so you can dial a number by tapping a single key. Using speed dial 1. Launch Contacts. 2. Select a contact to view the contact details. 3. Select the desired phone number and tap Menu ( ) / Add to Speed Dial. 4. Specify the Name, Number, and Location assignment of theSpeed Dial entry. -
Page 31: Connecting To A Pc And Synchronizing Information
Chapter 4 Connecting to a PC and Synchronizing Information You can take information from your computer wherever you go by synchronizing them to your device. The following types of information can be synchronized: ® • Microsoft Outlook information, which includes Outlook e-mail, contacts, calendar, tasks, and notes • Notes, which are created using Microsoft® Office OneNote® 2007 • Media, such as pictures, music and video • Favorites, which are the bookmarked links to your favorite web sites • Files, such as documents and other files Before you can synchronize, you will first need to install and set up either ActiveSync or Windows Mobile Device Center on your computer. -
Page 32: Setting Up Windows Mobile ® Device Center On
® Setting up Windows Mobile Device Center on ® ® Windows Vista and newer Microsoft Windows Mobile Device Center is the ® ® ® replacement for Microsoft ActiveSync on Windows Vista and newer. Some versions of Windows Vista® come with Windows Mobile Device Center already installed. -
Page 33: Setting Up Activesync ® On Windows ® Xp And Older
from your device to the Photo Gallery on your computer. • Click Pictures, Music and Video / Add media to your device from Windows Media Player to synchronize music and video files using ® Windows Media Player. • Click File Management / Browse the contents of your device to view documents and files on your device. -
Page 34: Synchronizing With Your Computer
Synchronizing with your computer Connect your device to your PC to synchronize the information between your device and PC. While your device is connected, ActiveSync (or Windows Mobile Device Center on your PC) synchronizes every time you make a change on either the PC or your device. Starting and stopping synchronization You can manually synchronize either from your device or computer. From your device: 1 Click Start ( ) / ActiveSync, and then click Sync. 2. To end synchronization before it completes, click Stop. TIP: To delete a partnership with one computer completely,disconnect your device from that computer first. In ActiveSync onyour device, tap Menu / Options, select the computer name, thentap Menu / Delete. - Page 35 2. Select the check box for any items you want to synchronize. If you cannot select a check box, you might have to clear the check box for the same information type elsewhere in the list. 3. To change synchronization settings for an information type, for instance, E-mail, select it and tap Settings. 4. You can then set the download size limit, specify the time period of information to download, and more. Some information types such as Favorites, Files and Media cannot be selected in ActiveSync Options on your device.
-
Page 36: Managing Your Device
Chapter 5 Managing Your Device Changing basic settings Personalizing the Home screen The Home screen is the starting place for most of the tasks you perform on your device and gives you access to all the features and programs of your device. -
Page 37: Customizing Sounds And Notifications
The Vibrate icon appears in the title bar. Copying a sound to your device You can use a .wav, .mid, .wma, or .mp3 audio file on your device as a ring tone, notification, or reminder. 1. Connect the device to your PC using the PA400 Custom USB client cable. 2. On your PC, copy the sound file you want. 3. Explore the phone’s contents: - 25 -... -
Page 38: Managing Memory And Battery Power
• In Windows Mobile Device Center, tap File Management / Browse the contents of your device. • In ActiveSync on your PC, tap Explore and double-tap My Windows Mobile-Based Device. 4. Navigate to your device’s Application Data / Sounds folder and then paste the audio file. Managing memory and battery power Battery Life The Lithium-Ion (Li-Ion) battery life is dependent upon the application and operating environment. For example, estimated battery life will be approximately xx hours with the unit turned on but idle, with the backlight on, all radios and compass off when using a new battery. - Page 39 Checking the phone memory 1. On the Home screen, tap Start ( ) / Settings / System / Memory. 2. From the Main tab and Storage Card tab, check the available memory and the available storage on your device. Changing the power management settings You can use Power Management to check the battery, and configure settings that prolong battery life. 1. On the Home screen, tap Start ( ) / Settings / Power.
-
Page 40: Working With Files
Working with files You can copy files between your device and computer, or copy files to a storage card installed on your device. You can also efficiently manage your files and folders using File Explorer. Copying files to your computer 1. Connect your device to your PC. 2. Do any of the following: • In Windows Mobile Device Center, tap File Management / Browse the contents of your device. • In ActiveSync on your PC, tap Explore. This opens the Mobile Device folder for your device. 3. Browse your device for files that you want to copy to your PC. -
Page 41: Adding And Removing Programs
NOTE: Unlike PC’s, Windows Embedded Handheld does not support a Recycle Bin. Once a file is deleted, it cannot be recovered. Adding and removing programs Before you purchase additional programs for your device, make sure that they are compatible with the Windows Embedded Handheld operating system. Also, before you launch the program installer, check first whether the installer can directly run on Windows Embedded Handheld or needs to be run on a computer. -
Page 42: Using Task Manager
Using Task Manager Task Manager allows you to view or stop the programs currently running on your device. 1. On the Home screen, tap Start ( ) / Task Manager. 2. On the Task Manager screen, select a program on the list and then tap End Task. -
Page 43: Using Additional Hardware Features
Chapter 6 Using Additional Hardware Features Flashlight The LEDs for the camera flash can also be used as a flashlight. Tap Start ( ) / Torch to toggle the Flashlight on and off. Assigning Buttons (hardware keys) Tap Start ( ) / Settings / Personal / Buttons. Under Program Buttons, your favorite programs can be assigned to several of the keypad buttons. The list of assignable buttons is shown on the left hand side with the program that is assigned by default on the right. -
Page 44: Working With Bluetooth
Working with Bluetooth All units have embedded Bluetooth capability—a short-range wireless communication technology that exchanges information (beam) over a distance of up to 30 feet (10 meters), without requiring a physical connection. Bluetooth settings: tap / Settings / Bluetooth. Mode: To enable Bluetooth, select the check box Turn on Bluetooth. If you want other Bluetooth devices to find your unit, also select the check box make this device visible to other devices. Devices: Tap Add new device to search for other Bluetooth devices. -
Page 45: Working With Wi-Fi
3. Tap the name of the other Bluetooth device and tap Next. For enhanced security, use passcodes. Enter the same passcode on the other unit. 4. Under Advanced, you can change the name of the other device and add additional services, if available. Tap Save. Bluetooth connection with a PC 1. - Page 46 gives you the option to connect to one. Turn Wi-Fi off when not in use to save battery power and possibly speed up other processes. NOTE: If your unit is connected to a PC that is connected to the Internet, the unit will use the PC’s Internet connection and Wi-Fi will not show up in the Wireless Manager screen.
-
Page 47: Working With The Camera
with your administrator whether the Exchange server requires an encrypted (SSL) connection. Tap Next. Troubleshooting Wi-Fi connection problems: If the unit seems to be connected to the network, but you are having difficulty using the network connection, tap / Settings / Connections / Wi-Fi. The Network Cards window will open and allow you to confirm that the connection is appropriately configured as either a Work or Internet connection. If you are unable to connect to a network, try connecting to another network without any security, such as a Wi-Fi hotspot, to determine if the issue is the hardware or the network. - Page 48 The camera application would start by displaying progress icon on the window and shortly the camera preview would be available on view finder in full screen either in Portrait or Landscape mode as per the camera settings defined in the application and the Device orientation. Taskbar and start menu will not be visible. User Interface A tap on the preview screen shows the buttons over the preview. A tap on the LEFT soft key ( ), will show the pull up menu with the list of icons on it.
- Page 49 Capturing Still/Video When buttons are viewable over the preview, a tap on the camera ( ) icon displayed on the screen captures a still image. If preview not focused, a quick double-tap on the preview screen would focus the object (if focus is enabled in settings menu). The still can be captured after this by tapping on the Camera icon. Focus success is indicated by a GREEN BOX displayed at center of the screen. (figure below) If video has to be captured, the mode has to be switched from Still to Video as explained in the previous section. A tap of the capture/ record button (...
- Page 50 taking still/Video in different light conditions. Sunny: Select this option when talking Still/Video in Day/Light places. Incandescent: Select this option when talking Still/Video in Incandescent light places. Fluorescent: Select this option when talking Still/Video in Fluorescent light places. Selection of any one of the option should immediately applythat setting to camera preview on view finder. This setting wouldalso be applied to the Still image is taken.
- Page 51 - -3 [Minimum Brightness] Selection of any one of the option should immediately apply that setting to camera preview on view finder. The positive values increase and negative values decrease brightness accordingly. Captured still images/Video should save with the selected Brightness level. • Flash Settings ( ) A tap on the Flash Settings icon displays the following options. - On: Selection of this option should enable the flash icon ( ) on the screen and flash light will GLOW while capturing still images.
- Page 52 in-detail below. • Still Resolution 4:3 ( The 4:3 options on the Still Resolution menu, should display the supported image resolutions. - 1280x960 (1.3MP) - 2048x1536 (3MP) - 2560x1920 (5MP) - 3264x2448 (8MP) Selection of any one of the resolution will apply to the view finder immediately in case of aspect ratio change. The size displayed on the top right corner area of the preview is updated with the new setting. The images captures would be of size that was selected.
- Page 53 Still image/Video to be stored. • Focus Settings ( A Tap on the Focus Settings icon, will display the following options. Enable: This enables the AF feature with double-tap of preview. - Disable: This disables the AF Feature. • Image Review ( A tap on the Image Review icon will display the following options. 2seconds: Image review will be displayed for 2 seconds after a still capture.
- Page 54 Format: • Deg/Min/Sec: Option to select the GPS information format. • Decimal Degree: Option to select the GPS informationformat. • APP Settings ( A tap on the APP Settings icon displays the sub menu andoptions mentioned below. UI Orientation • Rotation on Tilt: This option would enable the automatic rotation of UI screen based on device orientation/tilt. • Fixed Landscape: This option would have the camera application in landscape mode irrespective of device orientation. • Fixed Portrait: This option would have the camera application in portrait mode irrespective of device orientation.
- Page 55 • CAMERA ( A tap on the camera icon on the review screen would take the application to camera mode. • Video Settings ( - Resolution ( A tap on the Video Resolution icon, will display the following options. • 320x240 (QVGA) • 640x480 (VGA) • 800x480 (WVGA) Selection of any one of the resolution will apply to the view finder immediately. The size displayed on the top right corner area of the preview is updated with the new setting.
-
Page 56: Working With Gps
- Pause Time-out ( ) A tap on the Pause Time out option will display the following options. Selection of any of the options will decide the timeout of the PAUSE feature while recording. The video while being recorded has the option to be STOPPED (and saved) or being PAUSED and continued. If paused, the video recording would wait for timeout (mentioned below) seconds, complete recording and then save the video file. • 10seconds • 20seconds • 60seconds • Disable Working with GPS... -
Page 57: Working With Wwan (The Phone)
access GPS data. When using more than one GPSaware application, the same GPS program port must be used in each application. Ensure that the COM port on the GPS-aware application(s) is set to the same GPS program port as shown in the Programs tab of the GPS applet. The program port must be a different port than the hardware port. By default, this is COM3. NOTE: Some GPS-aware applications may not communicate over GPS ports. - Page 58 wireless communication devices are not allowed, go to Wireless Manager to TURN OFF all wireless communications. Simply turning the Power key off does not turn off these communications. Installing (or changing) the SIM card 1. Hold down the Power key for about 3 seconds and release to display the power menu.
- Page 59 Manager / Phone. 4. Test the settings by tapping / Internet Explorer and then browse to a web page. The phone will automatically start dialing when you try to open a web page. 5. If the phone will not connect, try other settings before calling the carrier technical support.
- Page 60 Services: This unit is data-only and dialing controls are not available. Settings can be changed for Call Barring, Caller ID, Call Forwarding, Call Waiting, Fixed Dialing and Voicemail and Text Messages. Network: Find and set your preferred networks. Version: View the RIL, MUX, RHA and AUD versions, as well as the manufacturer, model and revisions number of the WWAN module.
- Page 61 If a mild detergent is used, ensure all soap residue is removed. Do not use any chemical cleaners and do not put the unit in the dishwasher. Care of the touch screen: Use only the PA400 stylus or other devices specifically designed for use with touch screens.
- Page 62 The use of ballpoint pens, nails or other sharp objects to operate the touch screen will scratch and/or damage the unit. Keep the touch screen clean by gently wiping the display, using a soft, dampened cloth with either clean water or glass cleaner.
-
Page 63: Appendix I System Specification
Appendix I System Specification CPU: TI OMAP DM3730 1 GHz Memory: 512 MB RAM, 32GB eMMC Flash OS: Windows Embedded Handheld 6.5 System Language: Simp. Chinese, Traditional Chinese, English, French, German, Italian, Japanese, Korean, Russian, Spanish, or Portuguese (Brazilian) ® Multi-touch 4.3 inch Capacitive WVGA sunlight-readable Gorilla Display glass display. TFT (480 x 800 pixel) Keypad... - Page 64 Weight: 0.4 kg (0.84 lb) with battery Enclosure Size: 15.5 cm x 8.2 cm x 2.5 cm Operating temp: –30 °C to +60 °C (–22 °F to +140 °F) Storage temp: –40 °C to +70 °C (–40 °F to +158 °F) Humidity: 90% relative humidity with temperatures between 30 ºC and 60 ºC (22 ºF and 144 ºF) Method 507.5, Procedure II Sealing: IEC-60529 IP68 Environmental Drop: 1.22 m (4 ft.), Method 516.6, Procedure IV, Transit Drop (MIL-STD-810G) Vibration: Vibration resistant, Method 514.6, Procedure I & II, Category 5 Altitude: 4,572 m (15,000 ft) at 23 °C (73 °F) to 12,192 m (40,000 ft) at –30 °C (–22 °F) Method 500.5, Procedure I, II & III...
-
Page 65: Appendix Ii Worldwide Support
Appendix II Worldwide Support Unitech’s professional support team is available to quickly answer questions or technical-related issues. Should an equipment problem occur, please contact the nearest Unitech regional service representative. For complete contact information please visit the Web sites listed below:...
Need help?
Do you have a question about the PA400 and is the answer not in the manual?
Questions and answers