
Subscribe to Our Youtube Channel
Related Manuals for HighPoint RocketRAID 1640


Summary of Contents for HighPoint RocketRAID 1640
- Page 1 RocketRAID 1640 User's Manual Revision: 1.0 Date: Mar. 2003 HighPoint Technologies, Inc.
- Page 2 Backup your important data before using HighPoint's products and use at your own risks. In no event shall HighPoint be liable for any loss of profits, or for direct, indirect, special, incidental or consequential damages arising from any defect or error in HighPoint's products or manuals.
-
Page 3: Table Of Contents
Table of Contents Table of Contents Chapter 1 Introduction Serial ATA Overview ................. 1-1 RAID Basics ....................1-1 RocketRAID 1640 ..................1-2 Chapter 2 Adapter Installation Adapter Layout ..................2-1 Adapter Installation .................. 2-1 Verifying the Adapter's Installation ............2-2 Driver Installation .................. - Page 4 Table of Contents Chapter 5 Trouble Shooting Appendix A Glossary Appendix B Contact Technical Support...
-
Page 5: Serial Ata Overview
Chapter 1 Introduction This chapter discusses RAID-related Serial ATA background information, and the RocketRAID 1640 Serial ATA RAID solution. Contents of this Chapter: 1.1 Serial ATA Overview 1.2 RAID Basics 1.3 RocketRAID 1640... - Page 6 Introduction 1.1 Serial ATA Overview Serial ATA is a high performance interface for IDE storage devices, and is the evolu- tionary replacement for the longstanding ATA physical storage interface. It is a prac- tical add-on solution that is compatible with today ' s leading operating systems, and can be utilized alongside the existing PC architecture without the need for physical modification.
-
Page 7: Rocketraid 1640
The RocketRAID 15xx, and 16xx series host adapaters are Serial ATA RAID solutions developed by HighPoint Technologies, Inc. The RocketRAID 1640 is a 4-channel Serial ATA 150 RAID 5 host adapter, that provides multi-level RAID support including RAID 0, 1, 1/0, 5, and JBOD. The RocketRAID 1640 is a high quality, cost effective, mass storage solution for home and business applications. - Page 8 - this helps combat the risk of damage to vital PC components due to excessive heat retention. IDE Hard Disk Compatible The RocketRAID 1640 is compatible with the RocketHead 100 IDE to Serial ATA con- verters. This device allows users to connect ATA100 and ATA133 parallel IDE hard disk drives to the Serial ATA controller.
-
Page 9: Adapter Installation Adapter Layout
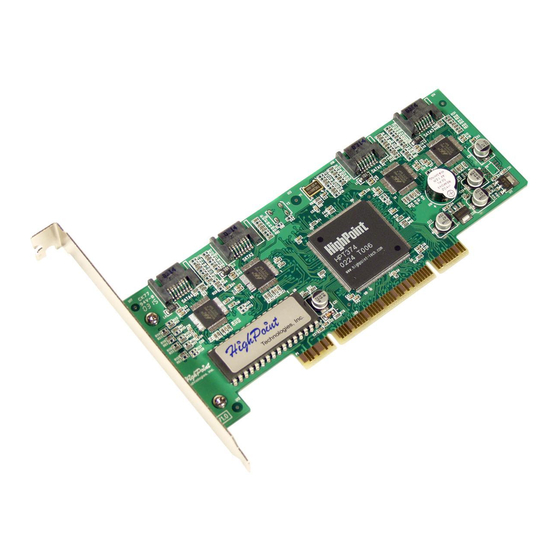
Chapter 2 Adapter Installation This chapter will describe how to install the RocketRAID 1640 adapter into a computer, and how to properly attach hard drives to the adapter. Please make sure to read through this chapter carefully before installing the adapter. - Page 10 Adapter Installation 2.1 Adapter Layout Adapter (Picture 1) Picture 1 2.2 Adapter Installation Picture 2...
- Page 11 2. Please discharge static electricity from your body by touching a conductor. 3. Remove the corresponding card bracket from the back of the computer chassis. 4. Insert the RocketRAID 1640 adapter steadily into a PCI slot on motherboard and then settle with a screw (see picture 2).
-
Page 12: Driver Installation
2.4 Driver Installation After the RocketRAID 1640 host adapter is installed and recognized by the computer, allow the operating system to boot. The host adapter's device driver must be installed. - Page 13 Adapter Installation Windows 9x/ME ! ! ! ! ! Installation After the operating system has booted, Windows will automatically detect the newly installed adapter, and prompt the user to install its driver. Follow these steps to install the driver. 1. After the Add New Hardware Wizard window appears, press the Next button until the following window appears: 2.
- Page 14 Windows NT4.0 ! ! ! ! ! Installing the RocketRAID 1640 driver for an existing Windows NT 4.0 system 1. Click Start ---> Settings ---> Control Panel, then double-click on the SCSI Adapters icon. 2. A new window should be displayed - click on the Driver tab, then click on the Add button.
- Page 15 6. Confirm the following system prompts to finish the driver installation. When installation is complete, restart the computer. Installing the RocketRAID 1640 driver during Windows NT 4.0 installation 1. Press F6 key when the installation program prompts Setup is inspecting your computer's hardware configuration.
- Page 16 Windows 2000 ! ! ! ! ! Installing the RocketRAID 1640 driver for an existing Windows 2000 system After the operating system has booted, Windows 2000 will automatically detect the newly installed adapter, and prompt the user to install it's driver. Follow these steps to install the driver.
- Page 17 Next to continue. 5. Confirm the follow up windows and click the Finish button to continue. 6. Next, Windows will find the HighPoint RCM device. Please confirm the Digital Signature Not Found window when it appears, and restart the computer when prompted.
- Page 18 6. In the following window, click on Continue Anyway, then click Finish in the following window. 7. Next, Windows will find the HighPoint RCM device. Please confirm the Digital Signature Not Found window when it appears. Windows will then display a prompt to restart the system.
- Page 19 Adapter Installation Installing the RocketRAID 1640 driver during Windows XP installation 1. Booting from the CD-ROM - when the Windows XP Setup blue screen appears, look towards the bottom of the screen. Windows will prompt you to press the F6 key if you want to install a third part SCSI or RAID driver.
-
Page 20: Bios Configuration
Chapter 3 BIOS Configuration Utility The RocketRAID 1640 includes a built-in BIOS configuration utility. This utility provides options to configure and manage hard disks or disk arrays connected to the RocketRAID 1640 host adapter. The BIOS configuration utility is especially useful when arrays must be created before and OS is installed. - Page 21 BIOS Configuration Utility 3.1 Entering the BIOS Configuration Utility When the following information is displayed on the screen during bootup, press CTRL+H key access the BIOS configuration utility. The main interface of BIOS configuration utility is as below: This column lists all currently available operation commands. Main Menu: This column lists all the hard disks and disk arrays connected to the Status:...
- Page 22 BIOS Configuration Utility 3.2 Creating a Disk Array Follow these steps to create a disk array: 1. Within the Menu column of the main interface, use the arrow keys to highlight the Create command and press ENTER. This will open a list of array modes (also referred to as RAID levels).
- Page 23 BIOS Configuration Utility If user selected a RAID 1array, JBOD array in step 1, the Block Size is N/A, see below: 5. Within the Menu column of the main interface, use the arrow keys to highlight the Start Creation option, and press ENTER. When creating RAID 0, 1/0 or JBOD array, simply use the arrow key to highlight the Start Creation process and press ENTER.
- Page 24 BIOS Configuration Utility A warning message will then be displayed. See the image below: Please pay close attention to this warning. Press N to cancel, and press Y to proceed with he duplication process. When creating a RAID 5 array, several options will be displayed: Zero Build and No Build.
- Page 25 BIOS Configuration Utility Please pay close attention to this warning. Press N to cancel, and press Y to continue. If Y is selected, another warning message will be displayed. See the image below: Select Y to create the array, and N to cancel. Warning: Please pay close attention when warning message are displayed during step 5.
- Page 26 BIOS Configuration Utility Highlight the target disk array, and press ENTER to delete it. 2. A warning message will then appear. See the image below Pay close attention to this warning. Press Y to delete the selected array, or press N to cancel.
-
Page 27: Settings
2. Use the arrow keys to select Set Boot Mark, and highlight the target disk or disk array and press ENTER. This option will instruct this disk or array to act as the boot unit, when motherboard has designated the RocketRAID 1640 to act as the boot device. -
Page 28: View
BIOS Configuration Utility 3. Highlight the Remove Boot Mark to remove the boot designation from a selected boot disk or disk array. Use the arrow keys to highlight the target disk or disk array and press ENTER. 4. To change a disk or disk array's mode setting, use the arrow keys to highlight the Device Mode option and press ENTER. -
Page 29: Duplicate Critical Raid 1 Array
BIOS Configuration Utility 4. To view information about a particular disk/RAID Array, use the arrow keys to highlight the RAID array option, and press ENTER. The following window will be displayed (see the image below): 5. To view information about logical drives, use the arrow keys to highlight the Logical Drives option, and press ENTER. -
Page 30: Rebuild A Broken Raid Array
BIOS Configuration Utility Select the Rebuild option to duplicate, or select Continue to boot to skip this proce- dure. The array can be repaired using after the operating system has booted, using the RAID software (chapter 4 covers this subject). 3.8 Rebuilding a Broken RAID array If the BIOS detects that a RAID 1 has been broken, when a spare disk is unavailable, several options will be displayed. - Page 31 BIOS Configuration Utility Highlight the target disk and press ENTER to select it. b) The BIOS will then start the rebuild/duplication process. See the image below: The ESC can be used to cancel the procedure anytime during the rebuild/duplication process. c) Continue to boot - this option will allow the BIOS to skip the rebuild option, and boot into the operating system.
-
Page 32: Introduction
Chapter 4 ATA RAID Software This chapter discusses the HighPoint Storage Management Software. Contents of this chapter: 4.1 Introduction 4.2 Installation 4.3 Getting Started 4.4 Using the Software... - Page 33 RAID 0, RAID 1, RAID 10 (1/0), RAID 5, and JBOD. The Management Service is designed to run continually on computers that utilize one or more HighPoint ATA RAID controller. It is designed to receive and carry out com- mands issued by the Management Console: logging events, executing scheduled tasks, and creating or rebuilding RAID arrays.
- Page 34 With the Default option selected, the setup program will create a Program group. Click on the Start button, then click the Programs selection and highlight the HighPoint entry. The following items should be displayed: HSM Service Manage For the administrative system...
- Page 35 ATA RAID Software The colored traffic lights represent the Service's status. The ( ) button can be used to activate or disable the Server Side software. A green "light" indicates the Software is active. A red "light" indicates the software is disabled. 2.
- Page 36 4.4 Using the Software # # # # # The File tab This software allows you to connect to remote computers that utilize HighPoint RAID controllers, via an Internet connection. After verifying the system's name and pass- word, the software can be used to monitor, repair or modify existing RAID arrays utilized by the remote system.
- Page 37 ATA RAID Software Enter the remote system's address, name and port information into the appropriate fields, then click OK. Make sure the Address and Port information is correct - the software will be unable to connect to the remote system if any information is left out. Note: If you do not need to connect to a remote system, and only need to work with arrays attached to the system you are working with, choose to add a new system, and enter the following information into the appropriate fields:...
- Page 38 ATA RAID Software Click on Y to delete the connection, or N to cancel this operation. Note: Make sure the connection is not active - it must be disconnected before it can be deleted from the connection list. # # # # # Connect to a Remote System Click the Connect button on the tool bar, or click on the Operation tab and select the Connect item from the menu.
- Page 39 ATA RAID Software 2. Remote Server Configuration Click on the File tab, and select the System Configuration option from the menu. A new window will be displayed. See the image below: You can modify the values of the System Port and Event Port fields. # # # # # System Port When connecting to the remote system, make sure the port value is correct.
- Page 40 ATA RAID Software The User Management displays information about all valid user accounts, and pro- vides options to create, delete or modify user information. # # # # # Adding a user Follow these steps to add a new user: 1) Click on the Add button, and enter a user name and password.
- Page 41 ATA RAID Software # # # # # Deleting a User Highlight and select a user entry from the User Management window, and click on the Delete button. The selected user will then be deleted. Make sure the selected user is not connected to the remote computer - the Delete option will be disabled if the user is connected to the system.
- Page 42 # # # # # The Management tab The HighPoint Storage management Console software provides a variety of RAID management features. These features are listed under the RAID Management menu displayed under the main interface window. Sub-menus display additional information about RAID configurations, and make management an simple task .
- Page 43 ATA RAID Software Clicking on a drive icon to display information about this disk - the right side of the screen will provide information about the physical disk, including the model, location, transfer mode and capacity. Clicking on an array icon will provide information about the selected array, including the name of the array, the RAID type or level, and capacity.
- Page 44 ATA RAID Software Step 3: Specify the Block Size When creating a RAID 0 or 10 array, select the Block Size from the drop-down menu, and click on the Next button. See the image below: When creating a RAID 5 array, select the Block Size from the drop-down menu, and the appropriate Creation Option.
- Page 45 ATA RAID Software 1) Zero Build Create and initialize data blocks with zero build parities - this will create the array and initialize parity, but will delete all data from each of the hard disks. Use this option when starting from scratch. 2) Scrub (build parity) This will create an array and initialize parity using the existing data on the hard disks.
- Page 46 ATA RAID Software After selecting the required disks, click on the Finish button to create the array. Renaming an Array Click on the Management tab, then select the Array Management option from the menu. Select the array you wish to rename from the tree display, and click on the Rename button found on the toolbar.
- Page 47 ATA RAID Software Click Y to delete the selected array, or click N to cancel the operation. Note: You can not delete arrays that are bootable or are in the process of being dupli- cated, initialized, rebuilt or verified. Adding a Disk to an Array Click on the Management tab, then select the Array Management option from the menu.
- Page 48 ATA RAID Software Click OK to start the rebuild process, see below. When the system detects a physical disk, a dialogue box will appear. Select a single disk from the list, and add it to the broken array. Continue to add disks to the broken array until the "broken"...
- Page 49 ATA RAID Software Rebuilding an Array Click on the Management tab, then select the Device Management option from the menu. Highlight the array that needs to be rebuilt, and click on the Rebuild Array button. Broken RAID 5, RAID 1, or a sub-RAID 1 of a RAID 10 array can use this feature.
- Page 50 ATA RAID Software Assign a disk to the spare pool If you need to assign a spare disk to an important array, select the Assign to Dedicated Array option. Disk arrays that can utilize the spare feature will be then be displayed, and listed on the drop-down menu towards the right hand side of the array list.
- Page 51 ATA RAID Software Enter an e-mail address, the recipient's name, and the notification options. Three types of e-mail notification options are available: Information, Warning, and Error. You can enable any number of these options. Click OK to confirm your selections. Modify Recipient Click on the Modify button located on the toolbar, or click on the Operation tab and select the Modify Recipient option.
- Page 52 ATA RAID Software When an array needs to be regularly verified or rebuilt, you can create a new scheduled task to automatically manage this procedure. The Task Schedule list displays information about all added tasks. Double click one of the task entries, or select one and click on the Details button to display detailed information about the selected task.
- Page 53 ATA RAID Software The above window is used configure how often a particular task should be run. The current time of the connected remote system is displayed at the top. To add a new task: 1. Enter a name for the task. You can also use the default task name. 2.
- Page 54 ATA RAID Software The View tab 1. Event View Click the View tab, and select the Event View option from the menu. This will display a list of all the logged events of the remote system. There are three types of logged events: Information, Warning, and Error. Checking one of the Filter options will display all the selected type of events in # # # # # the following event View window.
- Page 55 Trouble Shooting Please refer to this chapter if you encounter any problems while using the RocketRAID 1640. It provides answers to the most frequently asked questions, and solutions to some of the more common problems associated with the host adapter.
- Page 56 2. The hard disk connected to adapter can not be detected out. After the RocketRAID 1640 adapter is recognized by the system, the adapter's BIOS will start to scan for hard disk drives. If drives are detected, the following information...
- Page 57 1. Set SCSI device as the first-booting device in main board BIOS; 2. Set a booting device in RocketRAID 1640 adapter BIOS (refer Chapter 3 on how to set a boot device). Note: If the regular IDE hard disks are chosen, by using the RocketHead 100 converter connect to RocketRAID 1640, please make sure the hard disks jumper must correctly set to the master position.
- Page 58 Trouble Shooting 4. What should I do if an array is reported as broken? If an array is reported a broken, shutdown the system and make sure the power and IDE cables are securely attached to the hard disks. If necessary, change the cables, then power on the system.
- Page 59 Appendix A Glossary Array Also known as Disk Array, two or more hard disks combined together to appear as a single device to the host computer. RAID Redundant Array of Independent Disks, it is a method of combining several hard disks (physical disks) into one logical unit (logical disk), thus providing higher performance and data redundancy.
- Page 60 Appendix A RAID 5 RAID 5 includes a rotating parity array, thus, all read and write operations can be overlapped. RAID 5 stores parity information but not redundant data. It requires at least three disks to provide the most economic way to maximize data capacity with faster transfer rate.
- Page 61 Appendix A Spare Pool Logically the place where spare disks stay. When a disk is added into the spare pool, it will become a spare disk. Synchronize Same as Duplicate.
- Page 62 If you encounter any problems or have any questions about the product, please make sure to read through the manual. Additional information about HighPoint products is available from our web site: http://www.highpoint-tech.com If the information provided by the manual and our web site are unable to answer your...
- Page 63 PCC Part 15 Class Radio Frequency Interference Statement FCC Part 15 Class B Radio Frequency Interference Statement This equipment has been tested and found to comply with the limits for a Class B digital device, pursuant to part 15 of the FCC Rules. These limits are designed to provide reasonable protection against harmful interference in a residential installa- tion.
Need help?
Do you have a question about the RocketRAID 1640 and is the answer not in the manual?
Questions and answers