
Related Manuals for HighPoint Rocket 1608A


Summary of Contents for HighPoint Rocket 1608A
- Page 1 R1608A NVMe Switch AIC User Guide Rocket 1608A (R1608A) NVMe Switch AIC User Guide V1.00 - Apr. 24, 2024 Copyright 2024 HighPoint Technologies, Inc. All rights reserved HighPoint Technologies, Inc...
-
Page 2: Table Of Contents
2.1. R1608A Layout ....................5 2.2. PCIe Host Interface ..................8 2.3. Storage Interface ................... 8 2.4. Basic Specifications ..................8 3. R1608A Installation Instructions ............9 4. Revision History .................. 12 Version 1.00, Apr. 24, 2024 .................12 HighPoint Technologies, Inc... -
Page 3: Overview
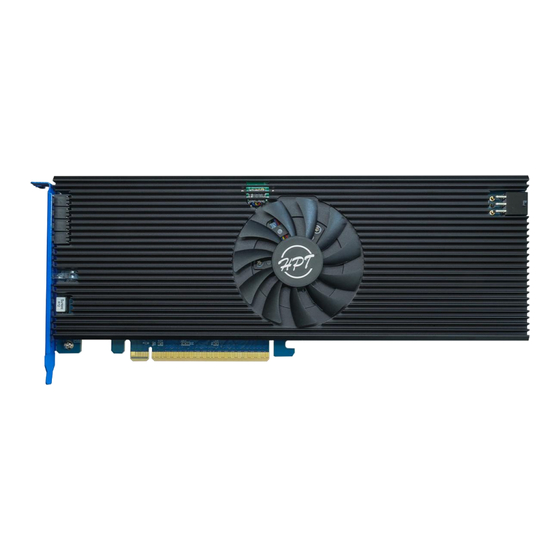
The R1608A is the latest member of our PCIe Gen5 NVMe Switch AIC product family. HighPoint Rocket Series NVMe connectivity AICs address the needs of solution providers and system integrators that cater to vertical marketplaces for high-speed industrial, corporate, and media applications. -
Page 4: Fru
The secure boot feature permits only authenticated firmware to execute. The switch boots the root of the trusted firmware from the internal boot ROM(IBR)and uses that firmware to authenticate the external firmware stored in the SPI flash and prevent the execution of unauthenticated code. HighPoint Technologies, Inc... -
Page 5: R1608A Hardware Description
2.1. R1608A Layout The layout of the R1608A is presented in two parts. Front View The following figure shows the key components of the R1608A. ○ ○ ○ ○ ○ ○ ○ ○ ○ ○ ○ HighPoint Technologies, Inc... - Page 6 6-pin PCIe power cable. LED View The following figure shows the LED Indicators of the R1608A. SSD1 LED SSD0 LED SSD3 LED SSD2 LED SSD4 LED SSD5 LED SSD7 LED SSD6 LED Status LED Fault LED HighPoint Technologies, Inc...
- Page 7 Fault LED The R1608A is powered off. Fast Flash Red The LED blinks red at 4 Hz to indicate that the Broadcom chipset temperature has exceeded the recommended temperature threshold (105℃) or fan speed lower than 600 RPM. HighPoint Technologies, Inc...
-
Page 8: Pcie Host Interface
Form Factor Full-Height, Single-Width Weight 1.015kg Length 11.18" Dimension Height 4.33" Power consumption 82.64W Power supply PCIe: 12V(±8%), 3.3V (±8%) Work temperature +5°C ~ + 55°C Storage temperature -20°C ~ +80°C MTBF (Mean Time Before Failure) 920,585 Hours HighPoint Technologies, Inc... -
Page 9: R1608A Installation Instructions
Unpack and remove the R1608A and check it for damage. If it appears damaged, please get in touch with HighPoint Technical Support. Remove the six screws on the back of the R1608A that secure the heat sink to the PCB and lift the heat sink up from the right side to remove it. - Page 10 Install the heat sink to the R1608A PCB. 1) Remove the blue film from the thermal pad on the heat sink. 2) Align the left side of the heat sink with the PCB and carefully lower the right side. HighPoint Technologies, Inc...
- Page 11 R1608A correctly in the slot. 3) Connect the 6-pin PCIe power cable to the external power connector on the right side of the R1608A. Power up the SSD external power supply. Turn on the power to the system. HighPoint Technologies, Inc...
-
Page 12: Revision History
R1608A NVMe Switch AIC User Guide 4. Revision History Version 1.00, Apr. 24, 2024 Initial version. HighPoint Technologies, Inc...
Need help?
Do you have a question about the Rocket 1608A and is the answer not in the manual?
Questions and answers