
Related Manuals for HighPoint Rocket 1108


Summary of Contents for HighPoint Rocket 1108
- Page 1 Rocket 1108 (R1108) 8x M.2 Port to PCIe 3.0 x16 NVMe HBA Quick Installation Guide V1.01...
-
Page 2: System Requirements
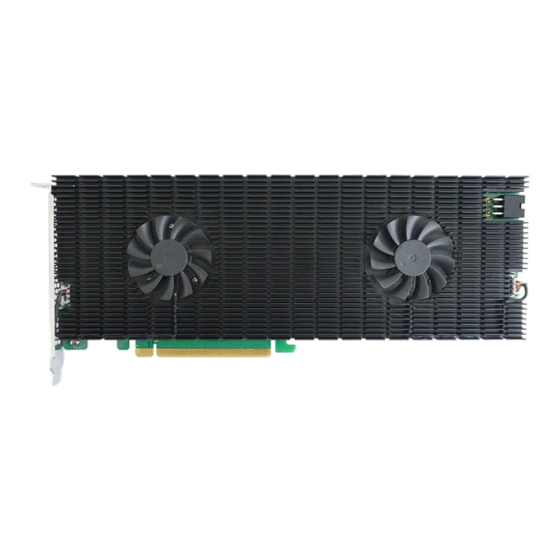
System Requirements PC Requirements System with a free PCIe 3.0 (or 4.0) x16 slot • Windows 11, 10 / Server 2022, 2019, 2016, Microsoft Hyper-V • RHEL/Debian/Ubuntu/Fedora/Proxmox/Xenserver (Linux kernel • 3.10 and later) macOS 10.13.6 ~ macOS 13.x • FreeBSD 12.1 and later •... - Page 3 R1108 Hardware Front View Full Height form factor 0000 Full-Length anodized aluminum heat sink Low-Noise Cooling Fan External power port PCIe 3.0 x16 Host Interface...
-
Page 4: Hardware Installation
Hardware Installation Step 1. On the rear of the R1108, remove the six screws that secure the unit’s heat sink to the PCB. Step 2. Carefully remove fan’s power cable from the right-side of the heatsink as shown below, then carefully flip the heatsink to the left (like turning a page from a book). - Page 5 Step 3. After removing the casing, carefully turn it over to view the thermal pads. The blue film must be removed from each pad before reinstalling the panel. The film protects the pads from damage and foreign objects prior to installation. However, it will also prevent the thermal pad from conducting the heat away from the NVMe SSDs if not removed.
- Page 6 Step 5. Please remove these screws from each of the M.2 slots. Step 6. Gently insert the SSD into the slot. Note: If the NVMe SSDs were used previously, make sure the connectors are clean and free of dust prior to installation. Step 7.
- Page 7 The following example shows eight M.2 NVMe SSDs installed into Ports 1-8: Step 8. After installing all SSDs, carefully flip the heatsink to the right. Note: Make sure the SSDs are carefully, but securely installed into each M.2 port. Loose connections can cause a variety of stability and performance issues, and may ultimately result in data loss.
- Page 8 Step 10. On the rear of the R1108, refasten the 6 screws that were removed in step 1. Note Make sure the aluminum cover is properly aligned with the : controller board (PCB), and that it makes full contact with the thermal pad, before refastening it to the R1108.
- Page 9 The R1108 relies on two power sources to support eight SSDs; power supplied through the PCIe bus, and power from the system’s PSU via an external 6 pin PCIe power cable. If the external cable is not connected, there will be insufficient power to support all 8 SSD’s; this may cause the SSDs to drop offline.
-
Page 10: Customer Support
Document Downloads: https://www.highpoint-tech.com/hba-gen3-nvme-m2 Customer Support If you encounter any problems while utilizing the R1108, or have any questions about this or any other HighPoint Technologies, Inc. product, feel free to contact our Customer Support Department. Web Support: https://www.highpoint-tech.com/support-and-services HighPoint Technologies, Inc. websites: https://www.highpoint-tech.com...
Need help?
Do you have a question about the Rocket 1108 and is the answer not in the manual?
Questions and answers