Furuno MCU-002 Manual
Remote control units
Hide thumbs
Also See for MCU-002:
- User manual (2 pages) ,
- User manual (17 pages) ,
- Installation (2 pages)

Related Manuals for Furuno MCU-002


Summary of Contents for Furuno MCU-002
- Page 1 MCU-002 / MCU-004 / MCU-005 Remote Control Units This document describes specifications, functions, and installation of these control units.
-
Page 2: Table Of Contents
INDEX Specifications Installing MCU-002 and MCU-004 1.1. MCU-002 / MCU-004 / MCU-005 – 3.1. Dimensions Summary 3.2. Flush Mounting 1.2. Technical Specifications 3.3. Interconnection Operation – User Interface Installing MCU-005 2.1. MCU-002 Keys and Functions – Basic 4.1. Dimensions Operation 4.2. -
Page 3: Technical Specifications
1. Specifications 1.1. MCU-002 / MCU-004 / MCU-005 – Summary Item MCU-002 MCU-004 MCU-005 Appearance Release 2013 2016 2018 Compatible Displays NavNet TZtouch v3.12 NavNet TZtouch v5.01 NavNet TZtouch2 v6.21 and Versions NavNet TZtouch2 v2.03 NavNet TZtouch2 v3.01/4.01 (Not for NavNet TZtouch) -
Page 4: Operation - User Interface
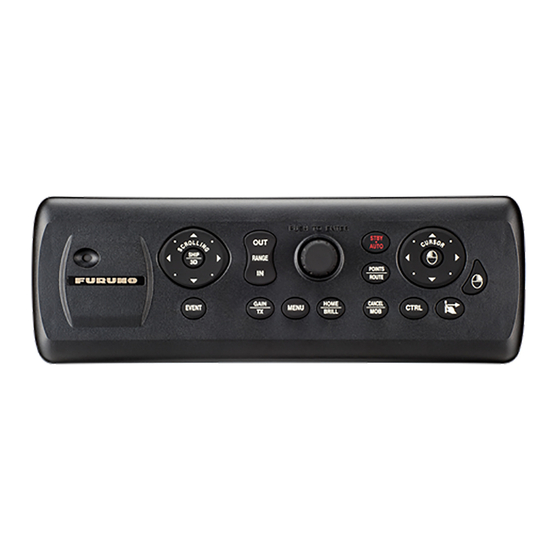
2. Operation – User Interface 2.1. MCU-002 Keys and Functions – Basic Operation The MCU-002 consists of 10 hardware keys to control the TZT9/14/BB and TZTL12F/15F/2BB as described below. MCU-002 Keys Descriptions STBY / AUTO Sets the NAVpilot-300/711C to STBY or AUTO modes... -
Page 5: Mcu-004 Keys And Functions - Differences From Mcu-002
2.3. MCU-004 Keys and Functions – Differences from MCU-002 The MCU-004 keys work almost the same as the MCU-002 except for the following unique keys and features. Uniqueness with MCU-004 – Overview MCU-004 vs. MCU-002 A buzzer is built in. - Page 6 (4) Edge Key The [Edge] key works differently between TZT9/14/BB and TZTL12F/15F. TZT9/14/BB It works the same as the [ENT] key of MCU-002 such as showing RotoKey™ menus and selecting the RotoKey™ or contextual menus. TZTL12F/15F (1) It activates the Edge Swipe functions. Instead of swiping the screen from the top, bottom, right, or left edge, press the [Edge] key and move the joystick in the same direction as you Edge Swipe with your finger.
-
Page 7: Mcu-005 Keys And Functions - Basic Operation
2.4. MCU-005 Keys and Functions – Basic Operation The MCU-005 consists of full keys to control the TZTL12F/15F/2BB as described below. Descriptions Power status The LED shows the status of MCU-005 power. SCROLLING Chart, Radar, and Fish Finder screens are scrolled. SHIP/3D Short press: The screen goes back to the vessel position, i.e. -
Page 8: Cross Cursor
You can turn the screen mode into the 3D mode by selecting [3D Mode] from the contextual menu. However, you cannot pan/tilt the chart with the MCU-002/4, because sliding the screen with two fingers is the only way to pan/tilt it. The 3D chart will always be at the default angle as shown at right. - Page 9 (6) Note on Power On (MCU-002, MCU-004, and MCU-005) It is not possible to turn on the display with the MCU-002/4/5. Make sure to press the power key of the TZT9/14/BB and TZTL12F/15F/BB. However, the power can be turned off with the operation of [HOME &...
-
Page 10: Installing Mcu-002 And Mcu-004
3. Installing MCU-002 and MCU-004 3.1. Dimensions MCU-002 MCU-004... -
Page 11: Flush Mounting
3.2. Flush Mounting The MCU-002 and MCU-004 can be flush mounted on a console from the front side as shown below. MCU-002 MCU-004 (Extracted from User Guide) 3.3. Interconnection The MCU-002 and MCU-004 can be used with the TZT9/14/BB and TZTL12F/15F/2BB by USB connection. Connect the MCU-002/004 to the USB port of the TZT9/14/BB and TZTL12F/15F/2BB as shown in the following examples. - Page 12 Example 1 A USB hub without external power supply may be used to connect multiple sets MCU-004, when it has enough supply current for the connected units. Example 2 A USB hub with external power supply may be used to supply enough power to multiple sets of MCU-004.
-
Page 13: Installing Mcu-005
4. Installing MCU-005 4.1. Dimensions 4.2. Flush Mounting The MCU-005 can be flush mounted on a console from the front side as shown at right. 4.3. Interconnection The full keyboard unit MCU-005 supports full operation of TZTL12F/15F/2BB by hardware key operation. In order to utilize the MCU-005 in the network, connect the MCU-005 to a PoE hub (Alternative A / Type-A), or POE injector, max. - Page 14 PoE Hub Requirement (if not using the supplied POE injector) A PoE hub for the MCU-005 should be compatible with Alternative A (Type A). PoE stands for Power over Ethernet. In additon to data comunication, power is supplied through an Ethernet cable. Power feeding of PoE has two (2) types: Alternative A (Type A) or Alternative B (Type B).
-
Page 15: Grouping Mcu-004 And Mcu-005
5. Grouping MCU-004 and MCU-005 With one (1) MCU-004 connected to one of the displays or one (1) MCU-005 networked in the Ethernet, the controllable display can be switched in the network. Note: The MCU-004 works with both NavNet TZtouch (TZT9/14/BB) and TZtouch2 (TZTL12F/15F/2BB), and the MCU-005 with NavNet TZtouch2 (TZTL12F/15F/2BB) only. -
Page 16: Mcu-005
5.2. MCU-005 In the following example, one (1) TZT2BB processor is connected with dual displays and networked with two (2) TZTL12F/15F v6.21. Two (2) MCU-005 units are installed at port and starboard sides and customized to control the displays at the port and starboard respectively. 5.3. - Page 17 Preparation – Check in Advance (1) All the displays in the network are turned on. (2) All the MCU-004 units to be used are connected. (3) Unique nicknames are assigned to all the displays in order to identify the display location easily. Setting Procedures (1) Access [Settings] –...
-
Page 18: Limitation By Display Versions
6. Limitation by Display Versions Make sure that the latest software versions of NavNet TZtouch and TZtouch2 are installed to use the MCU-004 (for NavNet TZtouch/TZtouch2) and MCU-005 (for NavNet TZtouch2). Old versions have limitations in available functions as shown in the following table. NavNet TZtouch with MCU-004 Remarks V4.21 or earlier (released in 2016)
Need help?
Do you have a question about the MCU-002 and is the answer not in the manual?
Questions and answers