Advertisement
Quick Links
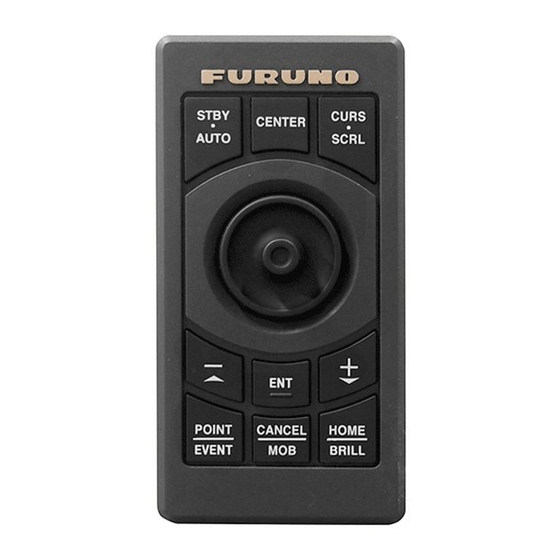
REMOTE CONTROL UNIT
Installation
Pilot holes (four places)
34±0.5 mm (1.34")
49.6±0.5 mm (1.95")
Note: This template may have expanded or
shrunk slightly. Please confirm
dimensions before use.
Controls
Control description
Tips and Notice
Tips and Notice
· In the cursor mode of the MCU-002, the cross cursor is easier to use than the arrow cursor. To use the cross cursor, set [Cross Cursor] to [ON] in
the [General] menu.
Set [Cross Cursor] to [ON] .
· You can not set the guard zone with the MCU-002. Use the touch operation to set the guard zone.
STBY•AUTO
key
Switches the steering mode of the FURUNO NAVpilot-700
series Autopilot between the STBY and AUTO modes.
+, -
key
· Selects an item from the RotoKey
and dialog box.
◄ Orientation
Screen Capture
Track Rec.
Event
SD-Left
SD-Right
Lat/Lon
Cancel
3D
· Zooms in (+) and out (-).
· Raises (+) and lowers (-) the brilliance on the
Brilliance/Power window.
ENT
key
· Activates a selected item.
· Opens the RotoKey
TM
menu.
CANCEL/MOB
key
Short press:
· Closes the menu or dialog box.
· Stops the audio alarm.
· Ends the tool mode
(End Route, End Move, etc.).
How to install the Remote Control Unit
Using the mounting template, open a mounting hole in the
installation site.
Set the flush mount gasket and unit to the hole.
Fix the unit with four flush mount screws (Ø3x13), then attach
the front panel.
Connect the USB connector of the unit to the USB port.
If it is necessary to remove the front
panel after the unit is installed, insert a
slotted head screwdriver into the slot
on the unit, then turn the screwdriver.
Outline and dimensions
59
34±0.5
Synchronize Time with GPS
m
Cross Cursor
NavData Transparency
Depth Alarm Value
Sea Surface Temperature Alarm
Temperature Alarm Value
Temperature Alarm Range Minimum Value
Temperature Alarm Range Maximum Value
TM
/main/pop-up menu
N 26°27.027'; W 80°56.264'
53.97 NM
/
230.6°
Go To
New Point
New Route
More...
Long press:
· Enters the MOB mark at the
own ship's position.
MCU-002
Model
19
35.5
#38
Fixing holes
1.5 10
4
Gasket
(MASS: 0.14 ± 10 % kg)
Cross Cursor
30.0 ft
Off
70.0
°
F
60.0
°
F
70.0
°
F
FUNC
key
Activates the function set at [Function
Gesture] menu.
The purpose of this guide is to provide the basic operation and
installation of the Remote Control Unit MCU-002.
All brand and product names are trademarks, registered
trademarks or service marks of their respective holders.
Front panel
Flush mount gasket
Packing List
Name
Remote Control Unit
MCU-002
Front Panel
FRC-D01-003
Flush Mount Gasket
FRC-D01-008
Flush Mount Screw
SUS304 BH T/S-1
Note:
1. Table1 indicates tolerance of dimensions
which is not specified.
2. #: Minimum service clearance.
Table 1
DIMENSIONS (mm)
TOLERANCE (mm)
0 < L ≤ 50
50 < L ≤ 100
100 < L ≤ 500
CENTER
key
· Returns your ship to the center of the screen
(Plotter/Weather/Radar display).
· Cancels the echo history (Fish finder display).
CURS•SCRL
key
Switches the joystick gesture between the cursor mode
and scroll mode.
Joystick
Short push: Works same as the tap gesture.
· Opens the pop-up menu.
· Activates the item selected by the cursor.
Long push: Works same as the long press gesture.
· Opens the detail pop-up menu.
Operate the joystick:
Cursor mode operation
· Moves the cursor.
Scroll mode operation
· Pans the display (Plotter/Weather/Radar display).
· Shifts the range and scrolls back the picture (Fish finder display).
HOME/BRILL
key
Short press:
Long press:
· Opens the home screen.
· Opens the Brilliance/Power window.
Flush mount
screw
Mounting
hole
Type
Qty
1
1
1
4
±1.5
±2.5
±3
Advertisement

Related Manuals for Furuno MCU-002


Summary of Contents for Furuno MCU-002
- Page 1 Tips and Notice Tips and Notice · In the cursor mode of the MCU-002, the cross cursor is easier to use than the arrow cursor. To use the cross cursor, set [Cross Cursor] to [ON] in the [General] menu. Synchronize Time with GPS Cross Cursor Set [Cross Cursor] to [ON] .
- Page 2 How to operate the menus Main menu operation Push the joystick. Push the joystick. Push the joystick. Push the joystick. HOME BRILL Open the home screen. Open the home screen. Activate the selected item. Activate the selected item. Select the [Menu] icon Select the [Menu] icon Select a sub menu item Select a sub menu item...
Need help?
Do you have a question about the MCU-002 and is the answer not in the manual?
Questions and answers