
Related Manuals for Viega 2230.12


Summary of Contents for Viega 2230.12
- Page 1 Easytop mounting unit with SC-Contur Instructions for Use for water meters Model Year built: 2230.12 from 02/2008 en_INT...
- Page 2 Easytop mounting unit with SC-Contur 2 from 24...
-
Page 3: Table Of Contents
Table of contents Table of contents About these instructions for use Target groups Labelling of notes About this translated version Product information Standards and regulations Intended use 2.2.1 Areas of use 2.2.2 Media Product description 2.3.1 Overview 2.3.2 Press connection with SC-Contur 2.3.3 Sealing elements 2.3.4... -
Page 4: About These Instructions For Use
This restriction does not extend to possible operating instructions. The installation of Viega products must take place in accordance with the general rules of engineering and the Viega instructions for use. -
Page 5: About This Translated Version
About these instructions for use About this translated version This instruction for use contains important information about the choice of product or system, assembly and commissioning as well as intended use and, if required, maintenance measures. The information about the products, their properties and application technology are based on the current standards in Europe (e. -
Page 6: Product Information
Product information 2 Product information Standards and regulations The following standards and regulations apply to Germany / Europe and are provided as a support feature. Regulations from section: Fields of application Scope / Notice Regulations applicable in Ger‐ many Planning, execution, operation DIN EN 806, part 1 and maintenance of potable water installations... - Page 7 Product information Regulations from section: Product description Scope / Notice Regulations applicable in Ger‐ many Suitability for drinking water Trinkwasserverordnung (TrinkwV) installations Suitability for drinking water DIN 50930-6 installations Requirements in plastic compo‐ DVGW-Arbeitsblatt W270 nents in drinking water installa‐ tions Regulations from section: Overview Scope / Notice...
- Page 8 Product information Regulations from section: Compatible components Scope / Notice Regulations applicable in Ger‐ many Permitted pipe types DVGW-Arbeitsblatt W 534 Permitted copper pipes DVGW-Arbeitsblatt GW 392 Permitted copper pipes DIN EN 1057 Permitted stainless steel pipes DVGW-Arbeitsblatt GW 541 Permitted stainless steel pipes DIN EN 10312 Permitted stainless steel pipes...
-
Page 9: Intended Use
Product information Intended use Coordinate the use of the model for areas of use and media other than those described with the Viega Service Center. 2.2.1 Areas of use Use is possible in the following areas among others: Drinking water installations... -
Page 10: Press Connection With Sc-Contur
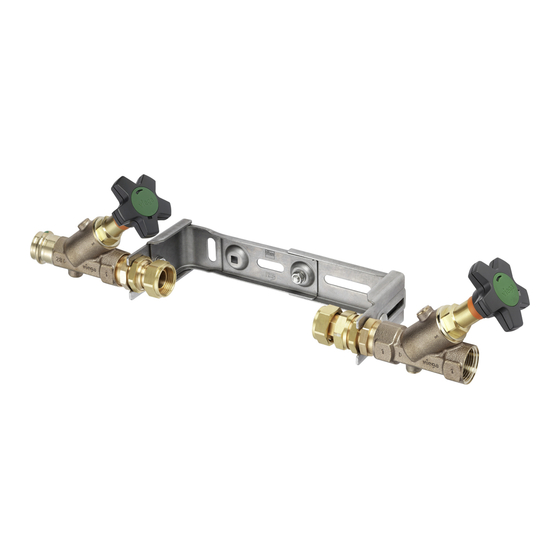
Product information The model is equipped as follows: water meter bow made of stainless steel, stainless, depth and length-adjustable water meter screw connection, inlet side sealable, outlet side length- adjustable inlet side Easytop slanted seat valve model 2230.52 outlet side Easytop CRV slanted seat valve model 2230.92 all parts that come into contact with water are made of gunmetal/ silicon bronze fixing material... -
Page 11: Sealing Elements
SC-Contur Fig. 2: SC-Contur Viega press connections are equipped with the SC-Contur. The SC- Contur is a safety technology that is certified by the DVGW and ensures that the connection is guaranteed to be leaky in an unpressed state. In this way, unpressed connections are noticed immediately during a leakage test. -
Page 12: Threaded Connection
Product information 2.3.4 Threaded connection Prerequisite for a threaded connection, which seals via a thread, is a threaded pair in accordance with applicable regulations, see Ä „Regula‐ tions from section: Threaded connection“ on page 7. Pursuant to these regulations, a permitted threaded pair comprises a conical external thread and a cylindrical internal thread, e.g. -
Page 13: Technical Data
Product information Should you have any questions on this subject, please contact the Viega Service Center. 2.3.7 Technical data Observe the following operating conditions for the installation of the model: Operating temperature [T 20 °C Operating pressure [P 1.6 MPa (16 bar) Information for use 2.4.1... -
Page 14: Handling
Handling 3 Handling Assembly information 3.1.1 Permitted exchange of sealing elements Important instruction With their material-specific qualities, sealing elements in press connectors are adapted for use with the corre‐ sponding media and/or the areas of use of the piping sys‐ tems and are generally only certified for them. -
Page 15: Required Tools
Press jaw or press ring with corresponding hinged adapter jaw, suit‐ able for the pipe diameter and suitable profile Fig. 3: Press jaws Recommended Viega press machines: Pressgun 5 Pressgun Picco Pressgun 4E / 4B... -
Page 16: Assembly
Handling Assembly 3.2.1 Replacing the sealing element Removing the sealing element Do not use pointed or sharp-edged objects to remove the sealing element. These could damage the sealing element or bead. Remove the sealing element from the bead. Inserting the sealing element Insert a new, undamaged sealing element into the bead. -
Page 17: Pressing The Connection
Handling Cut the pipe properly using a pipe cutter or fine-toothed hacksaw. Avoid grooves on the pipe surface. 3.2.3 Pressing the connection NOTICE! Leaky press connections due to pipes being too short If two press connectors are to be mounted onto a pipe without an interval, the pipe must not be too short. - Page 18 Handling Requirements: The pipe end is not bent or damaged. The pipe is deburred. The correct sealing element is in the press connector. EPDM = polished black The sealing element is undamaged. The complete sealing element is in the bead. Push the press connector onto the pipe as far as it will go.
-
Page 19: Mounting Preparation
Handling Carry out the pressing process. Open and remove the press jaw. ð Connection is pressed. 3.2.4 Mounting preparation Mounting is demonstrated with the example model 2230.15. NOTICE! The supplied fixing set is designed for installation on a solid wall. Adapt the fixing material to the ground and the ambient conditions. - Page 20 Handling Inlet: Screw the water meter screw connection into the Easytop slanted seat valve. Sealing is achieved using an O-Ring. INFO! Use the adapters supplied with article 717902. Sealing is achieved using an O-Ring. Outlet: Screw the water meter screw connection into the Easytop CRV slanted seat valve.
- Page 21 Handling Secure the Easytop CRV slanted seat valve on the water meter bow. NOTICE! Observe the flow direction! Screw the lock nut finger-tight against the water meter bow. Tighten the lock nuts of the water meter screw connection. Loosen the fixing nut of the slide and push in the slide. Easytop mounting unit with SC-Contur 21 from 24...
-
Page 22: Vertical Installation
Handling Place the water meter with seal on the inlet screw fitting and tighten finger-tight. Push the slide with seal back to the water meter and tighten the screw fitting finger-tight. Tighten the water meter screw connections. Tighten the fixing nut of the slide. 3.2.6 Vertical installation Assembly steps... -
Page 23: Leakage Test
Handling Tighten the lock nuts of the water meter screw connection. Loosen the fixing nut of the slide and push in the slide. Place the water meter with seal on the inlet screw fitting and tighten finger-tight. Push the slide with seal back to the water meter and tighten the screw fitting finger-tight. -
Page 24: Disposal
Handling Viega recommends actuating the fitting regularly and checking its function. Replacing the valve top When the valve tops need to be replaced, use the models 2237.22 and 2238.22. Replace water meter screw connection When the water meter screw connection needs to be replace, use the model 2230.71.
Need help?
Do you have a question about the 2230.12 and is the answer not in the manual?
Questions and answers