Table of Contents
Advertisement
Advertisement
Table of Contents

Related Manuals for HP VR Backpack G2


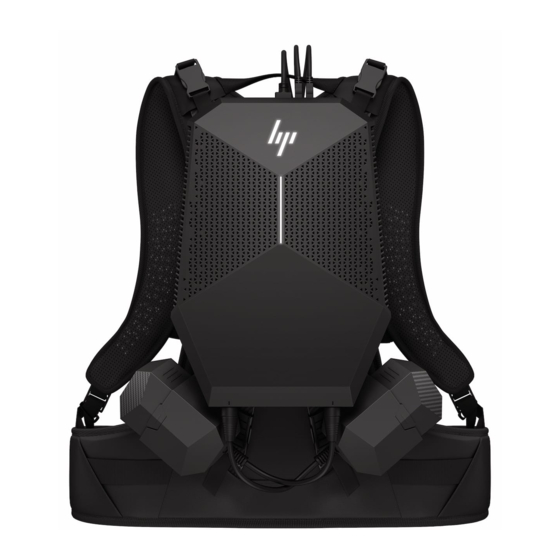
Summary of Contents for HP VR Backpack G2
- Page 1 Maintenance and Service Guide HP VR Backpack G2 PC...
- Page 2 Intel and Core are trademarks of Intel bound by the terms of the HP End User License Not all features are available in all editions of Corporation or its subsidiaries in the U.S.
- Page 3 Safety warning notice WARNING! To reduce the possibility of heat-related injuries or of overheating the device, do not place the device directly on your lap or obstruct the device air vents. Use the device only on a hard, flat surface. Do not allow another hard surface, such as an adjoining optional printer, or a soft surface, such as pillows or rugs or clothing, to block airflow.
- Page 4 Safety warning notice...
-
Page 5: Table Of Contents
Table of contents 1 Product description ............................1 2 Product features ............................3 Standard configuration features ........................... 3 Top components ..............................3 Right (side) components ............................4 Bottom ................................... 4 3 Illustrated parts catalog ..........................5 Computer major components ..........................5 Miscellaneous parts ............................... - Page 6 TPM BIOS settings (select products only) ......................40 8 Using HP PC Hardware Diagnostics (UEFI) ....................... 41 Downloading HP PC Hardware Diagnostics (UEFI) to a USB device ..............41 9 Backing up, restoring, and recovering ......................43 Creating recovery media and backups ........................ 43 Using HP Recovery media (select products only) ................
- Page 7 11 Power cord set requirements ........................49 General requirements ............................49 Japanese power cord requirements ........................49 Country-specific requirements ..........................50 12 Statement of memory volatility ........................51 Nonvolatile memory usage ..........................53 Questions and answers ............................55 13 Recycling ..............................57 Index ................................
- Page 8 viii...
-
Page 9: Product Description
Table 1-1 Product components and their descriptions Category Description Product Name HP VR Backpack G2 PC Processor 8th-generation Intel® Core™ i7-8850H, 2.6 GHz, turbo up to 4.3 GHz, 6 cores, 9 MB SmartCache, L3, 45 W; Intel UHD Graphics 630 Chipset... - Page 10 Table 1-1 Product components and their descriptions (continued) Category Description 180 W Smart PFC, non-slim barrel, 7.4 mm straight Power cord 1.5 m (C13) Operating system Windows® 10 Pro 64 Chapter 1 Product description...
-
Page 11: Product Features
Product features Standard configuration features Features may vary depending on the model. For support assistance and to learn more about the hardware and software installed on the computer model, run the HP Support Assistant utility. Top components Table 2-1 Identifying the top panel components... -
Page 12: Right (Side) Components
Right (side) components Table 2-2 Identifying the right panel components Item Component RJ-45 (network) jack USB 3.1 Type-A ports (2) Vent Bottom Table 2-3 Identifying the bottom components Item Component Left battery connector Left alignment pin connector Docking connector Right alignment pin connector Right battery connector Chapter 2 Product features... -
Page 13: Illustrated Parts Catalog
Illustrated parts catalog Computer major components Table 3-1 Identifying computer major components and their part numbers Item Component Spare part number Front cover L62394-001 Graphics fan (included in fan kit) L05349-001 Memory fan (included in fan kit) L05349-001 WLAN antenna (includes gasket) L62404-001 Heat sink L62397-001... - Page 14 Table 3-1 Identifying computer major components and their part numbers (continued) Item Component Spare part number Battery connectors and cable assembly L62406-001 Rear antenna, right (included in miscellaneous parts kit) L05775-001 Rear antenna, left (included in miscellaneous parts kit) L05775-001 (10) Power connector (DC in) L05345-001...
-
Page 15: Miscellaneous Parts
Intel 9260 802.11ac 2 × 2 + Bluetooth 5.0 (non-vPro) L64045-005 Cable kit (includes top cover voodoo lighting cable, battery charger cable, backlit protective tape, power L02927-001 board cable, ZVR Backpack cable, fan cable and bracket) HP ZVR Backpack combination cable L20517-001 Battery charger L02934-001 Backpack... - Page 16 Table 3-2 Miscellaneous part descriptions and part numbers (continued) Component Spare part number For use in the United Kingdom 100613-016 Power cord (C13, 1.83 m) For use in Brazil 438723-001 For use in Europe 100614-009 For use in India 403440-001 For use in Israel 398062-001 For use in Italy...
-
Page 17: Removal And Replacement Procedures Preliminary Requirements
Removal and replacement procedures preliminary requirements Tools required You will need the following tools to complete the removal and replacement procedures: Phillips P0 screwdriver ● Torx driver (T10) ● Thin, flat and non-conductive prying tool. ● IMPORTANT: Use a non-conductive tool. A conductive tool can damage the system board, chassis or components. -
Page 18: Drive Handling
Drive handling IMPORTANT: Drives are fragile components that must be handled with care. To prevent damage to the computer, damage to a drive, or loss of information, observe these precautions: Before removing or inserting a hard drive, shut down the computer. If you are unsure whether the computer is off or in Hibernation, turn the computer on, and then shut it down through the operating system. -
Page 19: Generating Static Electricity
IMPORTANT: To prevent damage to the device when you are removing or installing internal components, observe these precautions: Keep components in their electrostatic-safe containers until you are ready to install them. Before touching an electronic component, discharge static electricity by using the guidelines described in this section. -
Page 20: Personal Grounding Methods And Equipment
● Use field service tools, such as cutters, screwdrivers, and vacuums, that are conductive. ● Recommended materials and equipment HP recommends the following materials and equipment to prevent static electricity: ● Antistatic tape Antistatic smocks, aprons, or sleeve protectors ●... -
Page 21: Packaging And Transporting Guidelines
Field service kits ● ● Static awareness labels ● Wrist straps and footwear straps providing 1 MΩ ±10% resistance ● Material handling packages ● Conductive plastic bags ● Conductive plastic tubes ● Conductive tote boxes Opaque shielding bags ● Transparent metallized shielding bags ●... -
Page 22: Removal And Replacement Procedures
Accessing these parts can damage the computer or void the warranty. IMPORTANT: This computer does not have user-replaceable parts. Only HP authorized service providers should perform the removal and replacement procedures described here. Accessing the internal part could damage the computer or void the warranty. - Page 23 Remove the six Phillips M2.0 × 26.0 screws (2) that secure the top cover to the computer. Insert a thin, flat and non-conductive prying tool into the small gap between the top cover and the computer chassis, and then pry the cases apart. IMPORTANT: Use a non-conductive tool.
-
Page 24: Fans
Fans Table 5-2 Fan description and part number Description Spare part number Fan kit (includes graphics fan and memory fan) L05349-001 The computer houses two separate fans – one graphics fan and one memory fan. Before removing the fans, follow these steps: Prepare the computer for disassembly (Preparation for disassembly on page 14). - Page 25 Disconnect the memory fan cable from the system board (4), and then remove the memory fan from the computer (5). Reverse this procedure to install the fans. Component replacement procedures...
-
Page 26: Solid State Drive
Solid state drive Table 5-3 Solid-state drive descriptions and part numbers Description Spare part number 1 TB L62399-001 512 GB L62401-001 256 GB L62400-001 Before removing the solid-state drive, follow these steps: Prepare the computer for disassembly (Preparation for disassembly on page 14). -
Page 27: Memory Modules
Memory modules Table 5-4 Memory module descriptions and part numbers Description Spare part number 16 GB memory module 937438-855 8 GB memory module 937236-855 NOTE: It is not necessary to remove the memory module to remove the system board. Remove the memory module only if it needs to be replaced. - Page 28 Grasp the edge of the memory module (2), and then gently pull the module out of the slot. Use the same procedure to remove both memory modules. IMPORTANT: To prevent damage to a memory module, hold the module by the edges only. Do not touch the components on a memory module.
-
Page 29: Wlan Antenna
WLAN antenna Table 5-5 WLAN antenna description and part number Description Spare part number WLAN antenna kit (includes gasket) L62404-001 Before removing the WLAN antenna, follow these steps: Prepare the computer for disassembly (Preparation for disassembly on page 14). Remove the top cover (see Top cover on page 14). -
Page 30: Wlan Module
WLAN module Table 5-6 WLAN module description and part number Description Spare part number Realtek RTL8822BE 802.11ac 2 × 2 Wi-Fi + Bluetooth 4.2 924813-855 Intel 9260 802.11ac 2 × 2 + Bluetooth 5.0 (non-vPro) L64045-005 IMPORTANT: To prevent an unresponsive system, replace the wireless module only with a wireless module authorized for use in the computer by the governmental agency that regulates wireless devices in your country or region. -
Page 31: Rtc Battery
RTC battery Before removing the RTC battery, follow these steps: Prepare the computer for disassembly (Preparation for disassembly on page 14). Remove the top cover (see Top cover on page 14). Remove the WLAN antenna (see WLAN antenna on page 21). -
Page 32: Battery
Battery Table 5-7 Battery descriptions and part numbers Description Spare part number Battery, 8 cell, 73 Wh L65631-001 Battery, 4 cell, 36 Wh L41691-005 Before removing the battery, follow these steps: Prepare the computer for disassembly (Preparation for disassembly on page 14). - Page 33 Remove the two Phillips M2.5 × 6.5 screws (1) that secure the battery bracket. Then lift the bracket out of the computer (2). Remove the three remaining Phillips M2.0 × 3.0 screws that secure the battery (1), and then remove the battery from the computer (2).
-
Page 34: Heat Sink
Heat sink Table 5-8 Heat sink description and part number Description Spare part number Heat sink L62397-001 Before removing the heat sink, follow these steps: Prepare the computer for disassembly (Preparation for disassembly on page 14). Remove the top cover (see Top cover on page 14). -
Page 35: Power Button Board
Power button board Table 5-9 Power button board description and part number Description Spare part number Power button board L63399-001 Before removing the power button board, follow these steps: Prepare the computer for disassembly (Preparation for disassembly on page 14). Remove the top cover (see Top cover on page 14). - Page 36 Remove the two Phillips M2.5 × 4.5 screws (2) that secure the power button board to the computer, and then remove the board from the computer (3). Reverse this procedure to install the power button board. Chapter 5 Removal and replacement procedures...
-
Page 37: Battery Connector And Cable Assembly
Battery connector and cable assembly Table 5-10 Battery cable kit description and part number Description Spare part number Battery cable kit L62406-001 Before removing the battery connector and cable assembly, follow these steps: Prepare the computer for disassembly (Preparation for disassembly on page 14). -
Page 38: System Board
System board Table 5-11 System board descriptions and part numbers Description Spare part number System board with Intel Core i7-8850H processor (for use in models without the Windows operating L62393-001 system; includes thermal grease) System board with Intel Core i7-8850H processor (for use in models with the Windows operating system; L62393-601 includes thermal grease) Before removing the system board, follow these steps:... - Page 39 Disconnect the following cables from the system board: (1) Power connector cable (2) Power button cable (3) Power button board cable Remove the screw that secures each antenna (1), and then move the antennas out the way (2) so that you can access the I/O bracket.
- Page 40 Lift the I/O bracket out of the computer (3). Remove the two Phillips M2.5 × 4.5 screws (1) that secure the system board to the computer. Lift the system board out of the computer (2). Reverse this procedure to install the system board. Chapter 5 Removal and replacement procedures...
-
Page 41: Power Connector (Dc-Out) For Vr Headset
Power connector (DC-out) for VR headset Table 5-12 DC-out power connector Description Spare part number DC-out power connector L63398-001 Before removing the DC-out power connector, follow these steps: Prepare the computer for disassembly (Preparation for disassembly on page 14). Remove the top cover (see Top cover on page 14). - Page 42 Pull the power connector away from the side of the computer to remove it (3). Reverse this procedure to install the DC-out power connector. Chapter 5 Removal and replacement procedures...
-
Page 43: Power Connector (Dc-In) And Cable
Power connector (DC-in) and cable Table 5-13 Power connector description and part number Description Spare part number Power connector and cable L05345-001 Before removing the power connector and cable, follow these steps: Prepare the computer for disassembly (Preparation for disassembly on page 14). -
Page 44: Interpreting System Validation Diagnostic Front Panel Leds And Audible Codes
Interpreting system validation diagnostic front panel LEDs and audible codes During the system validation phase that occurs at system startup, the BIOS validates the functionality of the following subsystems and conditions: AC adapter ● System board power ● ● Processor failure ●... - Page 45 The red LED blinks to represent the major error category (long blinks). The white LED blinks to represent the minor error category (short blinks). For example, 3.5 indicates 3 long red blinks and 5 short white blinks to communicate the processor is not detected. Table 6-2 Interpreting blink codes Component tested...
-
Page 46: Computer Setup (Bios) And Tpm
Use extreme care when making changes in Computer Setup. Errors can prevent the computer from operating properly. Starting Computer Setup Turn on or restart the computer, and when the HP logo appears, press to enter Computer Setup. ▲ Navigating and selecting in Computer Setup... -
Page 47: Updating The Bios
Do not shut down the computer or initiate Sleep. Do not insert, remove, connect, or disconnect any device, cable, or cord. Type support in the taskbar search box, and then select the HP Support Assistant app. – or – Select the question mark icon in the taskbar. -
Page 48: Changing The Boot Order Using The F9 Prompt
For any compliance issues arising from your operation/usage of TPM which violates the above mentioned requirement, you shall bear all the liabilities wholly and solely. HP will not be responsible for any related liabilities. -
Page 49: Using Hp Pc Hardware Diagnostics (Uefi)
Using HP PC Hardware Diagnostics (UEFI) HP PC Hardware Diagnostics is a Unified Extensible Firmware Interface (UEFI) that allows you to run diagnostic tests to determine whether the computer hardware is functioning properly. The tool runs outside the operating system so that it can isolate hardware failures from issues that are caused by the operating system or other software components. - Page 50 Additional BIOS crisis recovery tool HP provides a BIOS crisis recovery tool through the HP PC Hardware Diagnostics 3-in-1 USB key. This tool can be used by HP authorized service providers to recover systems that have failed due to a corrupted BIOS. For more information about using the 3-in-1 USB key for BIOS crisis recovery, go to http://www.hp.com/go/...
-
Page 51: Backing Up, Restoring, And Recovering
Use HP Recovery Manager to create HP Recovery media after you successfully set up the computer. This ● step creates a backup of the HP Recovery partition on the computer. The backup can be used to reinstall the original operating system in cases where the hard drive is corrupted or has been replaced. For... -
Page 52: Using Windows Tools
HP Recovery media can also be used to customize the system or restore the factory image if you replace the hard drive. -
Page 53: Using The Hp Cloud Recovery Download Tool (Select Products Only)
HP Recovery Manager software allows you to recover the computer to its original factory state by using the HP Recovery media that you either created or that you obtained from HP, or by using the HP Recovery partition (select products only). If you have not already created recovery media, see... -
Page 54: Using The Hp Recovery Partition (Select Products Only)
Using HP Recovery media (select products only) on page ● If your computer does not allow the creation of HP Recovery media or if the HP Recovery media does not work, you can obtain recovery media for your system from support. You can find contact information from the HP website. -
Page 55: Using Hp Recovery Media To Recover
Using HP Recovery media to recover You can use HP Recovery media to recover the original system. This method can be used if your system does not have an HP Recovery partition or if the hard drive is not working properly. -
Page 56: 10 Specifications
10 Specifications Table 10-1 Specifications Item Value Dimensions Width 232.1 mm (9.1 in) Depth 317.2 mm (12.5 in) Height 57.3 mm (2.3 in) Approximate weight Workstation compute module 2.0 kg (4.5 lb) Complete compute module with harness and external batteries 4.0 kg (8.8 lb) Power supply (internal battery) 20 minute operation... -
Page 57: 11 Power Cord Set Requirements
11 Power cord set requirements The power supplies on some computers have external power switches. The voltage select switch feature on the computer permits it to operate from any line voltage of 100 V ac-120 V ac or 220 V ac-240 V ac. Power supplies on those computers that do not have external power switches are equipped with internal switches that sense the incoming voltage and automatically switch to the proper voltage. -
Page 58: Country-Specific Requirements
Country-specific requirements Additional requirements specific to a country are shown in parentheses and explained below. Table 11-1 Power cord country-specific requirements Country Accrediting Agency Country Accrediting Agency Australia (1) EANSW Italy (1) Austria (1) Japan (3) METI Belgium (1) CEBC Norway (1) NEMKO Canada (2) -
Page 59: 12 Statement Of Memory Volatility
Intel-based and AMD-based system boards contain nonvolatile memory subcomponents as originally shipped from HP, assuming that no subsequent modifications have been made to the system and assuming that no applications, features, or functionality have been added to or installed on the system. - Page 60 Select the Main menu, select Apply Factory Defaults and Exit, select Yes to save changes and exit, and then select Shutdown. Reboot the system. If the system has a Trusted Platform Module (TPM) and/or fingerprint reader, one or two prompts will appear—one to clear the TPM and the other to Reset Fingerprint Sensor; press or tap to accept or to reject.
-
Page 61: Nonvolatile Memory Usage
A utility must be used for Computer Setup (BIOS) or a writing data to this custom utility. memory and is available on the HP website; go to http://www.hp.com/ support. Select Find your product, and then follow the on-screen instructions. - Page 62 512 KB flash Stores Fingerprint reader memory is Only a digitally signed (select products fingerprint programmed by user application can make the only) templates. enrollment in HP call to write to the flash. ProtectTools Security Manager. Chapter 12 Statement of memory volatility...
-
Page 63: Questions And Answers
HP has provided options in Computer Setup (BIOS) to allow you to run in legacy BIOS, if required by the operating system. Examples of this requirement would be if you upgrade or downgrade the OS. - Page 64 IMPORTANT: Resetting will result in the loss of information. These steps will not reset Custom Secure Boot Keys. See question and answer 7 for information about resetting the keys. Turn on or restart the computer, and then press while the “Press the ESC key for Startup Menu” message is displayed at the bottom of the screen.
-
Page 65: 13 Recycling
Follow the local laws and regulations in your area for battery disposal. HP encourages customers to recycle used electronic hardware, HP original print cartridges, and rechargeable batteries. For more information about recycling programs, see the HP Web site at http://www.hp.com/recycle. -
Page 66: Index
47 removal and replacement 26 location 3 changing using the f9 prompt HP PC Hardware Diagnostics (UEFI) power cord set requirements using 41 country specific 50 bottom components 4 HP Recovery Manager power requirements, product... - Page 67 44 system recovery 45 system 45 system restore point USB flash drive 47 creating 44 using HP Recovery media 44 system restore point, creating 43 recovery media creating using HP Recovery top components 3 Manager 44 top cover...
Need help?
Do you have a question about the VR Backpack G2 and is the answer not in the manual?
Questions and answers