Table of Contents
Advertisement
Advertisement
Table of Contents

Related Manuals for Honeywell Home THR860S


Summary of Contents for Honeywell Home THR860S
- Page 1 User Manual THR860S Two Channel 7 Day Programmer 50051987-002 Rev.A...
- Page 2 This product must be correctly installed and configured to work properly. If you are not experienced in electrical wiring, we recommend professional installation to avoid possible personal injury or equipment damage. DISCONNECT ELECTRIC POWER BEFORE INSTALLATION: Can cause electrical shock or equipment damage.
-
Page 3: Table Of Contents
Contents About your new programmer Wall bracket installation .....15-16 System wiring ...........17-20 Features ..............4 Installer setup ...........21-25 Quick reference to controls ......5 Date/time settings ..........6 Appendix Operation and programming Alternate programme schedules ....25 In case of difficulty ........26 Operating modes ..........7 Cost-saving programme schedules..8 To adjust programme schedules ....9 Special functions... -
Page 4: About Your New Programmer
User Manual About your new 2 channel programmer The THR860SWE is designed to work with your existing thermostat, heating and hot water. It can work automatically, or you can adjust it manually to maintain a comfortable indoor environment while minimising energy use and costs associated with heating both your home and the hot water you require. -
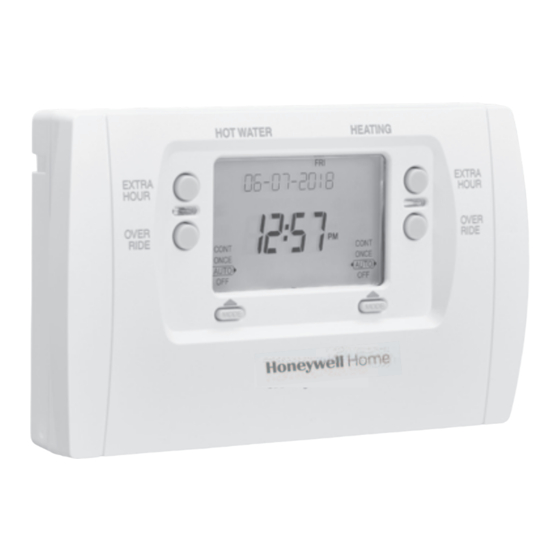
Page 5: Quick Reference To Controls
Quick reference Press to extend Current hot water Line of Current Daily programme Operating Press to extend time heating (see text area periods (see page modes (see heating time (see page 11) page 7) page 11) Light is on when Light is on when heating system is on hot water heater... -
Page 6: Date/Time Settings
Operation and Programming Date/time settings Set to DAY/TIME To change the date or time, set the slider to DAY/TIME. Use the + or - buttons to set the correct day, then press the OK mon tue wed thu fri sat sun SET THE DAY button. -
Page 7: Operating Modes
Operating modes HOT WATER HEATING Press the MODE button repeatedly to select an operating mode. You can set the Hot Water and Heating modes separately, by mon tue wed fri sat sun 30/12/2010 pressing the appropriate button as shown at left. Both work the 12:34 same way: cont... -
Page 8: Cost-Saving Programme Schedules
Operation and Programming Cost-saving programme schedules The programmer is preset at the factory to turn off your home heating and hot water when they’re less likely to be needed. The preset schedules are shown below. To change them, see pages 9-12. (See also two alternate schedules on page 25). -
Page 9: To Adjust Programme Schedules
To adjust programme schedules Set to HOT WATER The Hot Water and Heating schedules must be programmed or HEATINg independently, but the procedure is the same for both. 1 Move slider to HOT WATER or HEATINg, then press + or - to tue wed thu fri sat sun SET ON-TIME 1 adjust the “On”... -
Page 10: Special Functions
Special Functions Temporary schedule overrides Press to turn system on or off The OVERRIDE buttons work like a simple “on/off” switch. If you press the button when the system is on, it will turn off. If off, it will turn on. The Hot Water and Heating override buttons work mon tue wed fri sat sun SYSTEM OVERRIDE... -
Page 11: Extra Hour
Temporary schedule overrides — Extra Hour The EXTRA HOUR buttons can extend the current “On” period Press to add extra hour(s) for 1 to 3 hours more. For example, if you expect guests you may want heating or hot water on for longer than usual. You can also mon tue wed fri sat sun use these buttons to switch on the system for a short period of... -
Page 12: Holiday Mode
Special Functions Temporary schedule overrides — Holiday Set slider to RUN The Holiday feature turns off your heating and hot water while you are away for an extended time (up to 99 days). After the mon tue wed fri sat sun designated time both systems resume normal operation. -
Page 13: Advanced Features
Advanced features • Preset programme schedules: The programmer is preset to follow the schedules shown on page 10 (Schedule A) unless you change the settings. However, instead of changing the settings manually, you can choose either of 2 other pre-configured schedules. Schedule B keeps heating and hot water on longer if you’re often at home. -
Page 14: Installation And Setup
Installation and Setup System installation Installation procedure 1 Disconnect electrical power 2 Install programmer 3 Connect system wiring Hot water Cylinder cylinder 4 Restore electrical power thermostat 5 Configure system operation Room 6 Test system operation Boiler Thermostat System wiring Programmer Heating/hot water systems NOTE: If you are not experienced in equipment installation and electrical wiring, we... -
Page 15: Wall Bracket Installation
Remove wall bracket and select location Use a screwdriver to loosen screws and separate the programmer from the wall bracket as shown at left. Select a mounting location about 1.2 to 1.5 metres from the floor where the display can be seen clearly, in an area where the ambient temperature is between 0 and 40º... - Page 16 Installation and Setup Mounting options Use appropriate wood screws or anchor Mount flush on wall screws to mount the wall bracket flush against the wall. Use metal screws to mount on an existing junction box. Pull wiring through the wall bracket and connect to screw terminals as shown on page 17.
- Page 17 Connect system wiring Terminal screws Connect wiring from your heating and hot water system to the programmer terminal screws as shown at left. See wiring diagrams on pages 18-20. 1 Make sure electrical power is off. 2 Strip insulation to expose about 7 mm of bare wire.
- Page 18 Installation and Setup Wiring diagrams Y-Plan S-Plan Note 1: This is a Class II device (i.e., double insulated). A Note 3: Gravity circulation hot-water systems should be parking terminal is available for earth wiring if required. fitted with a suitable hot-water control valve as shown in Plan C on page 19.
- Page 19 Wiring diagrams C-Plan W-Plan (wiring shown as a hot-water priority system) Note 1: This is a Class II device (i.e., double insulated). A Note 3: Gravity circulation hot-water systems should be parking terminal is available for earth wiring if required. fitted with a suitable hot-water control valve as shown in Plan C above.
- Page 20 ST7000A (see notes 1-2) Note 1: If replacing a Honeywell ST7000A, a permanent mains power supply must be provided for the new THR860S programmer. Note 2: If replacing a Honeywell ST7000A, you must configure the new THR860S as a “Mini-Programmer” (see page 23).
-
Page 21: Installer Setup
Installer setup Press and hold both Installer settings allow you to customise how your system works. Check the table to see if any settings need to be changed. SET INSTALLER OK? To change installer settings: 1 Set slider to RUN. Press OK to begin 2 Press and hold the OK and - buttons together until the screen displays “Set Installer OK?”... -
Page 22: Installer Setup
Installation and Setup Installer setup functions and settings ** Factory default setting Function Description Setting Options 12: AM/PM 12-hour time format ** Clock format 24: 24-hour time format 0: Always off Screen backlight 1: Screen lit when button is pressed 2: Always on ** 0: No change Summer/winter time change... - Page 23 Installer setup functions and settings ** Factory default setting Function Description Setting Options 2: 2 on, 2 off time periods per day Daily time periods 3: 3 on, 3 off time periods per day ** A: Standard (see page 8) ** Preset time schedules B: More comfort (see page 25) C: More economy (see page 25)
- Page 24 Installation and Setup To test the system After you have installed and configured the programmer, you should check to make sure the system is operating correctly. Set to AUTO 1 Set the Heating and Hot Water operating modes to AUTO HOT WATER HEATING 2 Press the Heating and Hot Water OVERRIDE buttons to turn...
-
Page 25: Alternate Programme Schedules
Alternate programme schedules In addition to the default programme schedule shown on page 8, you can set the system to run either of the schedules shown below. Either schedule can be changed as described on pages 9 12. Schedule B Monday-Friday ON 1 [off 1]... -
Page 26: In Case Of Difficulty
Appendix In case of difficulty Programmer screen • Check the heating system to make sure the programmer has is blank electrical power. • Check to ensure the heating and hot water channels on the programmer are turned on. The indicator lights should be lit. • Make sure the room thermostat and cylinder thermostat are Radiators are cold, or no switched on and set to appropriate temperature levels. hot water is available • Check the boiler to see if it is operational. - Page 28 For assistance with this product please visit livewell.honeywellhome.com bk-electronic GmbH Hardhofweg 40 74821 Mosbach Germany Country of origin: UK ©2019 Resideo Technologies Inc. This product manufactured by Resideo and its affiliates. The Honeywell Home trademark is used under licence from Honeywell International Inc. All rights reserved.
Need help?
Do you have a question about the THR860S and is the answer not in the manual?
Questions and answers
Cannot open the front panel on THR860S
@Tracee Barthorpe
How do I remove front panel to charge program
The heating is working but not the hot water