Table of Contents
Advertisement
Quick Links
Advertisement
Table of Contents

Related Manuals for Spartherm XS 500


Summary of Contents for Spartherm XS 500
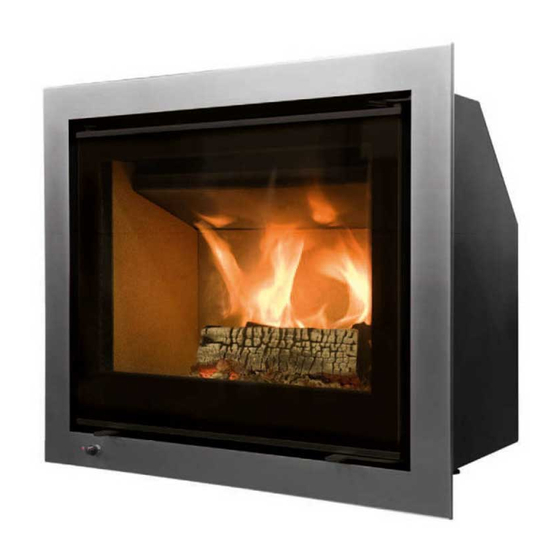
- Page 1 Installation and Operating Instructions Linear Fireplace Cassettes...
- Page 2 FOREWORD / QUALITY PHILOSOPHY You have chosen to purchase a Spartherm fireplace cassette – thank you for the trust you have placed in us. In a world characterised by an abundance of choice and mass production, our company name is associated with the principles of our owner Mr. Gerhard Manfred: “High technical quality combined with contemporary design and service for the...
-
Page 3: Table Of Contents
CONTENTS General information 4. Installation 4.1 Installation of the fireplace cassette into an existing fireplace 1. Certified quality / definition 4.2 Installing the frame 1.1 Scope of delivery 4.3 Aligning the fireplace cassette 1.2 Transport damage 4.4 Installing or dismantling the firebox into/from the convection air jacket 2. -
Page 4: General Information
GENERAL INFORMATION 6. Cleaning and care 6.1 Maintenance Spartherm fireplace cassettes are high quality German products. They 7. Troubleshooting are easy to install because they are pre-assembled. Please observe these 7.1 Glass experiencing heavy, quick and irregular sooting instructions and discuss them together with the new owner of the fireplace 7.2 Fire is difficult to light... -
Page 5: Certified Quality / Definition
1. CERTIFIED QUALITY / DEFINITION 1.2 TRANSPORT DAMAGE Our fireplace cassettes are tested according to DIN 13229. Please immediately check the goods on delivery (visual inspection). Note any damage that may have occurred on your delivery note and then please This family of cassettes can be installed in five standard sizes (500-900) inform your fireplace fitter. -
Page 6: Adjusting The Feet Of Linear Fireplace Cassettes
2.1 ADJUSTING THE FEET OF LINEAR FIREPLACE DIN 18896: Fireplaces using solid fuels, technical specifications CASSETTES for installation and use DIN EN 13384: Exhaust gas systems calculation method DIN 18160-1/2: Exhaust gas systems / residential chimneys Fireplaces may only be installed in rooms and locations where no danger results from their position, structural conditions and type of use. -
Page 7: Multiple Installations
Fireplace and the airflow volume of the ventilation systems do not cause low pres- XS 500 S 600 M 700 L 800 XL 900 cassette sure less than 0.04 mbar in the installation room used for the open Technical Unit... - Page 8 Edge-folding Edge-folding Linear cassette XS 500 Linear cassette 600-900 (S, M, L, XL) Dimensions Linear XS Linear S Linear M Linear L Linear XL Dimensions Linear XS Linear S Linear M Linear L Linear XL Linear cassettes 500 (mm) 600 (mm)
- Page 9 Linear cassette XS 500 Linear cassette 600-900 (S,M,L,XL) Cassette frame 45, 60, 80 mm Cassette frame 60, 80, 100 mm Firebox door with ceramic glass Firebox door with ceramic glass Firebox lining Firebox lining Firebox Firebox Exhaust gas socket Inspection/maintenance openings...
-
Page 10: Combustion Air Supply
2.4 COMBUSTION AIR SUPPLY 2.7 GENERAL REQUIREMENTS FOR THE USE OF FIREPLACE CASSETTES IN EXISTING FIREPLACES Fireplace cassettes may only be installed in rooms with at least one door to the outside or a window that can be opened or are directly or indirectly The fireplace cassettes are suitable, amongst other things, for retrofitting linked to a combustion air supply in other rooms. -
Page 11: Preparation Of The Existing Fireplace
• The fireplace cassette can be connected to a flexible exhaust gas flue, which is fed through the existing chimney flue. This flexible exhaust gas XS 500 466 mm flue must correspond to DIN 1856-T2. (Manufacturer e.g.: Westaflex, S 600... -
Page 12: Thermal Radiation Field
3.2 THERMAL RADIATION FIELD 3.4 SPECIAL SAFET Y MEASURES FOR PROTECT- ING ADJACENT COMBUSTIBLE CONSTRUCTION No combustible construction components, furniture, curtains or decoration COMPONENTS FROM FIRE ( WHEN RETROFITTING may be placed within a distance of 800 mm (see Fig. 4) of the firebox door THE CASSETTE INTO A FIREPLACE) in the thermal radiation field. -
Page 13: Masonry Work For Walls Needing Protection
• The masonry work (100 mm) can be dispensed with when the build- Linear cassette Setup floor Mounting wall Ceiling Side wall ing’s alls are: - At least 115 mm thick XS 500 40 mm 60 mm 200 mm 60 mm - Made of non-combustible construction components S 600 40 mm... - Page 14 Design B Inlet and recirculating air apertures must be created in the fireplace. At least 50% of all indicated openings must not be closable. Linear cassette XS 500 S 600 M 700 L 800 XL 900 Recirculating air openings in cm²...
-
Page 15: Example Installation
4. INSTALLATION 3.9 EX AMPLE INSTALLATION 4.1 INSTALLATION OF THE FIREPLACE CASSETTE Fireplace cassette INTO AN EXISTING FIREPLACE Insulation Masonry work • Clean the firebox in the existing open fireplace thoroughly. Wall made of combustible materials/components or load-bearing walls • Installation measures that bring about any restriction to the open fire- Convection air pipe place and reduce safety are not permitted. -
Page 16: Installing The Frame
4.2 INSTALLING THE FRAME pushed into any gaps. - Then insert the complete fireplace cassette into the open fire-place and reach through the open exhaust gas connection on the cassette In order to install / dismantle the cassette frame, the firebox door needs to into the fireplace. -
Page 17: Aligning The Fireplace Cassette
This involves dismantling Process steps: the firebox lining and setting the adjustment screws with a 6 mm Allen key. (Not valid for linear cassette XS 500). 1. Dismantle the cassette frame (see 4.2). 2. Remove the firebox lining (see 4.9). -
Page 18: Installation Of The Convection Air Sockets
4.6 CONNECTING A HOT AIR BLOWER SOCKETS Not valid for linear cassette XS 500! In order to install the circulation pipes (convection air), initially break out the If the fireplace cassette has been ordered with a hot air blower then you dummy covers and then screw on the two sockets as shown (see Fig. -
Page 19: Dismantling And Installing The Firebox Door
4g. Connect the cable wires to the terminals on the blower as shown and to the control box for the speed regulator. Blower connection cable Mains supply 4.7 DISMANTLING AND INSTALLING THE FIREBOX DOOR After the cables have been connected, check and ensure proper function- Please follow the following steps to dismantle / install the firebox door. -
Page 20: Installing The Exhaust Gas Flue At Rear / Bottom
4. In this position, pull the door a little BOTTOM forward at the bottom. Not valid for linear cassette XS 500! 5. Now allow the door to drop down a little Exhaust gas connection at rear: so that it comes away from the upper guidance pin and can be removed. - Page 21 Exhaust gas connection at bottom: In this process, firstly follow the steps to install the exhaust gas connection at the rear and then continue as described below: 2. The exhaust gas socket is screwed into the fireplace cassette. To do so, use three of the enclosed oval head self-tapping screws with cross slot.
-
Page 22: Firebox Lining
If spare parts are required, these can be ordered from your fireplace fitter. No apron blocks are available for the linear cassette XS 500. Dismantling the firebox lining is carried out in the reverse order! Fig. -
Page 23: Operating Instructions
5. OPERATING INSTRUCTIONS • Extractor fan hoods, ventilation systems etc. that are installed together with fireplaces in the same room or group of rooms can have a nega- Read these installation and operating instructions through carefully before tive influence on the functionality of the fireplace cassette (through to installing or commissioning your fireplace cassette. -
Page 24: Burning Wood
5.3 BURNING WOOD 5.3.2 COMBUSTION AIR REGULATION 5.3.1 FIRST USE/COMMISSIONING Combustion air regulation is carried out infinitely variably by adjusting the control lever that is located underneath the door (see Fig. 11). Adjusting The fireplace cassette may only be assembled and installed by a specialist the setting is carried out with the firebox door closed! company. -
Page 25: Lighting A Fire / Burning Wood
5.4 LIGHTING A FIRE / BURNING WOOD 10. You can find out more about the correct volume of wood to add to the fire in the section “Volume of wood to add per hour” (see point 5.4.2). Lighting the fire in your fireplace cassette is very easy if you follow the 11. -
Page 26: Adding Wood / End Of The Fire
5.4.1 ADDING WOOD / END OF THE FIRE Please note: Larger volumes of wood lead to overheating and damage to your fireplace cassette. Wood briquettes have a significantly higher heat- Fuel may only be added to the fire when the initial fuel has burnt down to ing output than hardwood. -
Page 27: Heating In The Transitional Period / Unfavourable Weather Conditions
5.7 HEATING IN THE TRANSITIONAL PERIOD / UNFA- The nominal heating capacity of the individual fireplace cassettes when VOURABLE WEATHER CONDITIONS operated as a temporary heating source (meaning with operative intervals of less than 8 hours) provides the following room heating capacities: In the transitional period, meaning when the outside temperature is still high (above approx. -
Page 28: Co - Neutrality
• Wood originating from Europool palettes roof overhang on a side of the building protected from the weather). Wood • Waste, household rubbish or old clothing with moisture content < 25% will be achieved significantly quicker with • Paper, paper briquettes, cartons optimal storage. -
Page 29: Chimney Fire
• The firebox lining in your fireplace is light and not sooted after burning. 6. CLEANING AND CARE Please note: The fireplace may not be used as a waste incinerator! Fur- thermore, the fireplace is only intended for temporary burning. Continuous The fireplace cassette may only be cleaned in a cold state. -
Page 30: Maintenance
7. TROUBLESHOOTING • Cleaning the ceramic glass panel: The glass panel can be easily cleaned using standard fireplace glass cleaner, which you can also obtain from your specialist dealer. The glass fibre seals should not be You can rectify the following problems with your fireplace cassette inde- soaked with cleaning fluids! Finally, wipe the glass panel with a dry pendently, please contact your specialist dealer, stove builder or fitter for cloth. -
Page 31: Smoke Leakage When Adding Wood To The Fire
If this has not been the case from the very beginning, please check the of the warranty in accordance with these terms and conditions shall apply following points: apart from the statutory guarantee, which remains unaffected. Spartherm Feuerungstechnik GmbH gives a 5-year warranty • Has the wood been cut to a sufficient size? •... -
Page 32: Requirement Of Effectiveness For The Warranty
If such proof is not produced Spartherm Feuerungstechnik GmbH shall not to a material fault or manufacturing error, provided that the other terms be obliged to honour the warranty. -
Page 33: Liability
8.9 LIABILIT Y Damage and compensation claims not based on a defective unit supplied by Spartherm Feuerungstechnik GmbH are excluded and are not covered by the warranty undertaking. This does not apply to statutory warranty claims arising in a particular case. - Page 34 NOTES GB 34...
- Page 35 GB 35...
- Page 36 IT Il vostro rivenditore specializzato | E Sus comercios especializados NL Uw vakhandelaar | PL Państwa sprzedawca | РУС Ваш дилер Spartherm Feuerungstechnik GmbH · Maschweg 38 · D-49324 Melle Phone +49 (0) 5422 94 41-0 · Fax +49 (0) 5422 9441-14 · www.spartherm.com GB 36...
Need help?
Do you have a question about the XS 500 and is the answer not in the manual?
Questions and answers