Advertisement
Quick Links
R
"Creating Childhood Memories"
Owners & Instruction
Manual
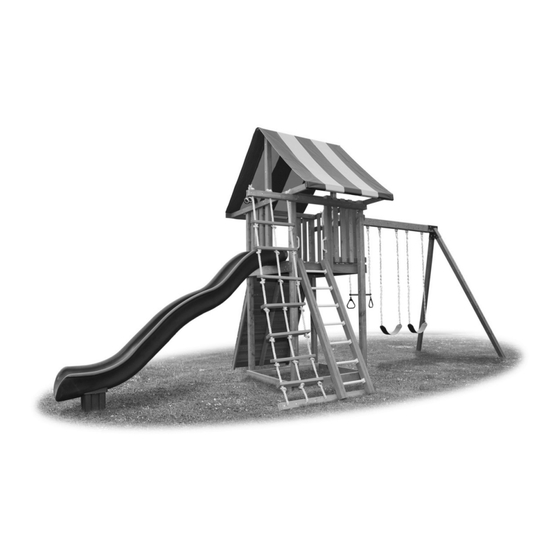
ULTIMATE
This instruction booklet is to be used exclusively for Eastern Jungle Gym
customers only. It is not to be handed out to the general public. Any duplication of
this booklet will be subject to copyright protection and federal laws.
last revised 3/30/2016
Advertisement

Related Manuals for Eastern Jungle Gym ULTIMATE


Summary of Contents for Eastern Jungle Gym ULTIMATE
- Page 1 Manual ULTIMATE This instruction booklet is to be used exclusively for Eastern Jungle Gym customers only. It is not to be handed out to the general public. Any duplication of this booklet will be subject to copyright protection and federal laws.
- Page 2 A little time now can save you time when your building! If you have any missing parts or damaged material or are having trouble installing your new Eastern Jungle Gym product. Please call Eastern Jungle Gym directly. or Email - Info@easternjunglegym.com...
- Page 3 “Creating Childhood Memories” Play Safely Instructions 1) Do not let children play on your Eastern Jungle Gym product until it is fully and safely assembled. 2) Go over all safety points with children prior to letting them play. 3) Adult supervision is required for children of all ages.
-
Page 4: Tools Required
Many parts are heavy and could seriously injure a child. 2) Your ready to start your assembly process. You will need at least two adults to safely and easily assemble your Eastern Jungle Gym. 3) Wear safety glasses when drilling out wood to protect your eyes from flying wood clips. -
Page 5: Hardware Identification
“Creating Childhood Memories” Hardware Identification (3) Sections Bag of (6) Heavy Duty Rope Rocks with Hardware Swing Hangers Safety Grab Handles Scoop Slide (7) Ladder Rungs (1) Ring Trap Combo (1) Swing Beam Support Brace (6) Spring Clips (2) Green Items not shown: Sling Swings 1 - Tent top... - Page 6 “Creating Childhood Memories” SPECIAL NOTE BEFORE BEGINNING YOUR ASSEMBLY: All Recessed holes must be piloted with 1/4” drill bit to help minimize splintering. All lag bolts must be accompanied with a washer before driving in lag bolt. Now you are ready to begin assembling!
- Page 7 Ultimate GROUND SUPPORT BASE Step #1 Gs2655 R2655 R2655 5” R2655 3½ ” Layout ground support base boards. Measure 3½” and 5” in from each corner of both 2 - Gs2655 Gs2655’s (as shown in photo). 2 - R2655 (as shown in the photo).
- Page 8 Ultimate POSTS Assembly Step #2 46½ ” P44114 Measure in 46½” from one side of P44114 posts Layout 4 - P44114 clubhouse post (as shown in the and draw a line (as shown in the photo). Do this photo). to all 4 posts.
- Page 9 Ultimate FLOOR Assembly Setup #4 After leveling, fasten 4x4 post to ground support base using 4 - 3” lags (as shown in photo). Position first completed 4x4 First post completed (as shown post into the lowest corner of in photo).
- Page 10 Ultimate FLOOR Assembly Setup #4 Fj2655 R2655 R2655 R2655 Countersink Holes Countersink Holes 5” R2655 3½ ” R2655 1 - 3” lag in each corner Measure 3½” and 5” in from each Layout floor joists corner of both Gs2655’s (as...
- Page 11 FLOOR Installation Step #5 Place floor on post teaks that you leveled earlier. At this point all four post and floor should be level. NOTE: Make sure floor orientation match ground support base orientation when placing floor on post. From under the clubhouse lag the floor Pull post tight to floor making sure that the into post in all four corners using 2 - 3”...
- Page 12 Ultimate SLIDE WALL installation Step #6 SLIDE Wall 20½” 20½” WR2496 R2429 Install top wall rail, WR2496 Place bottom wall rail, R2429 on flush with top of post using 2 - 3” floor and install into left post lags on each side.
- Page 13 Ultimate SOLID WALL installation Step #7 Solid Wall 20½” 20½” WR2496 WR2455 Place bottom wall rail, WR2455 on floor and Install top wall rail, WR2496 flush with top of install to both posts using 2 - 3” lags on each post using 2 - 3”...
- Page 14 Ultimate ACTIVITY WALL #1 installation Step #8 Activity Wall #1 R2455 Place rail R2455 from inside clubhouse flush with top of post and install with 2-3” lags on each side. Place wall board Wb54440 Place wall board, Gh2446 from outside of clubhouse from outside of clubhouse 3½”...
- Page 15 Ultimate ROCK WALL assembly Step #9 Counter sink holes face each other Start decking your rock wall Layout 2 - RWJ2484 Rock Wall Continue decking your rock wall using FB54648. Start right using FB54648 until it is joists (as shown in the photo).
- Page 16 Ultimate ROCK WALL installation Step #10 Place rock wall into back opening. From under the clubhouse Hold top of rock wall flush with top fasten rock wall to post of floor (as shown in photo). using 1 - 3” lag on each side (as Rock wall complete! shown in photo).
- Page 17 Ladder Side WALL Installation Step #12 Activity Wall #2 R2455 R2429 Place clubhouse center rail Place ½ wall rail R2429 flush Place wall board, R2455 from inside CR4446 flush with top of rail with edge of post and fasten clubhouse flush with top of post and and fasten with 2-3”...
- Page 18 Ultimate LADDER Assembly Step #13 72” 61” 50” 39” 28” 17” 6” 6” Counter sink holes face each other Counter sink holes face each other Layout 2 - LS4481 ladder rails and Measure from the top which is the Screw the ladder rungs into 7 - Ladder rungs counter sink holes side.
- Page 19 Ultimate JACOB’S LADDER TOP RAIL Step #15 Mount JT4484 Jacobs Ladder top rail onto clubhouse using 2 - 5” lags on each side. The JT4484 gets mounted under the wall top rails (as shown in photo). Through holes should be facing the ground and run parallel with the bottom rail mounted on the ladder.
- Page 20 Ultimate TENT TOP Step #17 Drape tent top over Ts2464 Do the same thing to the other tent support than over and side of tent top screw into under TR2464 tent rail. Install Tr2464 tent rail using 4 - 2”...
- Page 21 SWING BEAM Assembly Step #19 Layout CB46114 Swing Beam on the ground. Place swing hangers on beam using hardware provided. 12 @ 3/8 Hex Bolt (6½”) 24 @ 3/8 Washer 12 @ 3/8 Nut 6 @ Swing Hangers...
- Page 22 SWING BEAM Installation Step #20 Slide each SS44120 Side Mount side support brace on Position beam into place Support leg into the Angled beam flush with end. Fasten Side Support Brace. Installing with 3-3” lag bolts on each side. 4 - 3” Lag bolts on each side 3”...
- Page 23 SLIDE Installation Step #21 Install SB2420 slide block under floor Position slide in slide wall opening. where slide opening is using 2” screws Drill pilot holes at top of slide with (as shown in photo) 1/4” drill bit and secure with 2-3” lag bolts and washers.
- Page 24 Accessory Installation Step #22 Mount Binoculars on ½ wall next Mount Captain Wheel on Ts4484 to slide opening (as shown in tent support (solid wall side) (as photo). Use the hardware shown in photo). Use the hardware provided for. provided for. Install 2 pair of grab handles above rock wall and ladder.
-
Page 25: Commonly Asked Questions
(cracks) are not structural and do not affect your Jungle Gyms strength or integrity, even though they may seem quite large. By coating your Swing Set with a recommended annual sealant each year you can be confident your Eastern Jungle Gym will provide years of lasting memmories. - Page 26 In addition, for a period of Fifteen Years from the date of purchase, EJG warrants to...
- Page 27 Customer Service available 9-5pm EST Mon-Fri call 877-543-4969...
Need help?
Do you have a question about the ULTIMATE and is the answer not in the manual?
Questions and answers