Table of Contents
Advertisement
Advertisement
Table of Contents

Related Manuals for Arturia AudioFuse 8 Pre


Summary of Contents for Arturia AudioFuse 8 Pre
- Page 1 USER MANUAL...
- Page 2 Information contained in this manual is subject to change without notice and does not represent a commitment on the part of Arturia. The software described in this manual is provided under the terms of a license agreement or non-disclosure agreement. The software license agreement specifies the terms and conditions for its lawful use.
- Page 3 Thank you for purchasing AudioFuse 8Pre! AudioFuse 8Pre is an invaluable addition to the Arturia audio interface family, with the same superior sound quality that made the original AudioFuse a production powerhouse — plus additional connectivity that allows the AudioFuse 8Pre to function on its own or as an expansion to any existing setup.
- Page 4 The information contained in this manual is believed to be correct at the time of printing. However, Arturia reserves the right to change or modify any of the specifications without notice or obligation to update the hardware that has been purchased.
- Page 5 • USB type C connection: great latency, superb bandwidth, and backward compatibility with USB 2.0 (Arturia driver required for Windows systems) This manual will help you make the most of the AudioFuse 8Pre. It will also refer occasionally to the AudioFuse Control Center (AFCC), the powerful companion software we designed to work with the AudioFuse family of audio interfaces.
-
Page 6: Table Of Contents
Table Of Contents Welcome to AudioFuse 8Pre!..........................3 Overview................................... 5 2.1. The front panel ..................................5 2.1.1. Channels 1 and 2..........................................5 2.1.2. Channels 3 through 8 ........................................ 7 2.1.3. Output controls ..........................................8 2.1.4. Clock, Sync, Power, and Mode buttons ..............................10 2.2. - Page 7 7.3.3. Word Clock summary ......................................38 Frequently asked questions ..........................39 Specifications ................................40 9.1. System requirements ..............................40 9.2. Audio specifications................................ 40 9.3. Synchronization options ............................... 42 9.4. Signal Level LEDs................................42 Software License Agreement ......................... 43 Declaration of Conformity..........................45...
-
Page 8: Welcome To Audiofuse 8Pre
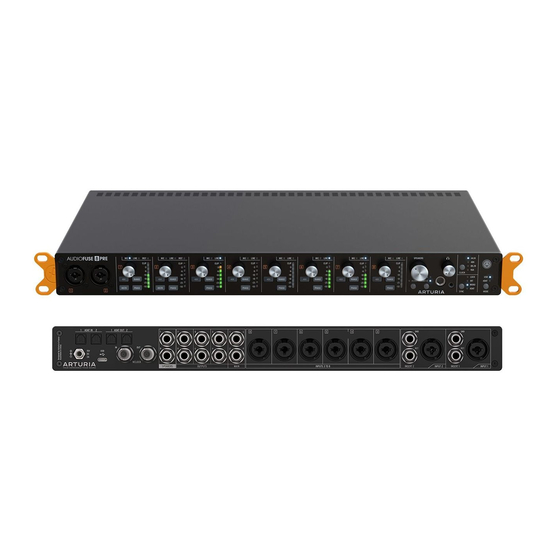
1. WELCOME TO AUDIOFUSE 8PRE! Arturia has a long history of developing hardware and software products that are popular throughout the music industry due to their innovative, powerful features, high quality, and affordability. Our first USB audio interface, the AudioFuse, was introduced in 2017. It boasts some of the finest microphone preamps the world has ever seen: Arturia's DiscretePRO®... - Page 9 Robust metal chassis in a single-space rack form factor • Rack ears can be mounted at 90º angle for tabletop use • Combines with other audio interfaces such as AudioFuse for even more flexibility. Arturia - User Manual AudioFuse 8Pre - Welcome to AudioFuse 8Pre!
-
Page 10: Overview
If the rear connectors are being used for input channels 1 and 2 and you connect something to one of the front panel connectors, the connection will switch automatically. The rear-panel connection will be restored after the front panel cable is removed. Arturia - User Manual AudioFuse 8Pre - Overview... - Page 11 INST (Instrument) This button is one of the differences between the first two input channels and the other six: Channels 3-8 do not have an INST button. Arturia - User Manual AudioFuse 8Pre - Overview...
-
Page 12: Channels 3 Through 8
There are only two Input Source LEDs (Mic and Line). • Channels 3-8 don't have an INST button. • Connections for these channels are always made on the rear panel. • Input channels 3-8 don't have insert jacks. Arturia - User Manual AudioFuse 8Pre - Overview... -
Page 13: Output Controls
That way the producer/engineer can monitor the overall mix while the person in the booth hears only the tracks that are needed for reference. Arturia - User Manual AudioFuse 8Pre - Overview... - Page 14 The Cue mix can be any combination of incoming audio sources, as defined in the no- latency monitoring mixer of the AudioFuse Control Center. ♪: The headphones receive the same mix as the speakers unless you specify otherwise in the AFCC. Arturia - User Manual AudioFuse 8Pre - Overview...
-
Page 15: Clock, Sync, Power, And Mode Buttons
However, when the 8Pre is in USB mode and you switch to Sync = ADAT or WORD there will not be an immediate change if the internal and external clock rates do not match. For additional information see the Synchronization chapter [p.35]. Arturia - User Manual AudioFuse 8Pre - Overview... - Page 16 2.1.4.3. The Arturia button In the upper right corner of the front panel is a button that displays the Arturia logo. We'll call that the "Arturia button." This is the button that will power on / off the AudioFuse 8Pre.
-
Page 17: The Rear Panel
2.2.1.1. Power connector Plug in the power connector and tighten its threaded nut snugly into position. !: Use only the power supply provided by Arturia (15V DC, 2A, positive to ground). Arturia - User Manual AudioFuse 8Pre - Overview... - Page 18 AFCC [p.19], because it provides access to even more features than are available from the front panel. ♪: The AudioFuse Control Center software is available for Mac and Windows computers. Arturia - User Manual AudioFuse 8Pre - Overview...
- Page 19 This is a very handy setting to have when you want to clock multiple units in a larger system. It helps avoid the need for additional T-connectors. Arturia - User Manual AudioFuse 8Pre - Overview...
-
Page 20: Output Connectors
But as soon as you disconnect the cable on the front panel, the connection to the rear panel will be restored. Arturia - User Manual AudioFuse 8Pre - Overview... -
Page 21: Input Connectors 3-8
♪: Use channels 1 or 2 to connect an electric guitar, bass, or any instrument that has pickups or needs a high-impedance (Hi-Z) input. Channels 1 and 2 have dedicated circuits designed for this purpose (the INST button). Arturia - User Manual AudioFuse 8Pre - Overview... -
Page 22: Virtual Loopback Channels 17 And 18
8Pre. By default there is no input selected. Use the AFCC to activate the loopback channels and to select which mix they will receive. ♪: The loopback feature is only available when the AudioFuse 8Pre is in USB mode. Arturia - User Manual AudioFuse 8Pre - Overview... -
Page 23: Registration
A more detailed version of this certificate is available after you complete the registration process. 3.1.2. Register your AudioFuse 8Pre To gain access to the AudioFuse Control Center software and other benefits, register your unit at www.arturia.com/register. Be sure to have your registration card available. Arturia - User Manual AudioFuse 8Pre - Registration... -
Page 24: Audiofuse Creative Suite
3.1.3. AudioFuse Creative Suite Your AudioFuse 8Pre comes complete with the AudioFuse Creative Suite, a collection of stunning Arturia software effects and instruments. Registration allows you to download and activate these valuable software plug-ins. 3.1.4. AudioFuse Control Center Be sure to download the AudioFuse Control Center (AFCC) from the Arturia website. -
Page 25: Setting Up The Audiofuse 8Pre
The easiest way to remember which ear goes where, so you can get it right on the first try, is that the rack ear with the Arturia logo belongs on the left side of the unit. This is true whether you mount them as forward-facing or downward-facing. -
Page 26: Tabletop Configuration
AudioFuse 8Pre with rack ears facing downward and rear feet installed Mount the rack ears as shown in the illustration above, with the Arturia logo on the left side of the AudioFuse 8Pre. Before you do, though, read the following instructions. -
Page 27: Computer Setup
AudioFuse Control Center [p.18] software. The installation process for that software will also install the Arturia USB Audio drivers on your computer. And as mentioned earlier, the AFCC will let you know when a new version of firmware is available for your unit. - Page 28 If the AudioFuse 8Pre is not already selected as the default device, click the Set Default button at the bottom of the window. Arturia - User Manual AudioFuse 8Pre - Setting up the AudioFuse 8Pre...
-
Page 29: The Usb And Adat Modes
The speaker/headphone outputs can be set either to USB output 1-2 or set to internal Cue mixer ♪: At clock rates of 88.2k and 96k the ADAT input/output channels are split between ADAT ports 1 and Arturia - User Manual AudioFuse 8Pre - The USB and ADAT modes... -
Page 30: How To Switch Modes
AudioFuse 8Pre. When two units are cascaded, the first AudioFuse 8Pre stays in USB mode so it will be the source of the USB audio for DAW playback, your music app, etc. Arturia - User Manual AudioFuse 8Pre - The USB and ADAT modes... -
Page 31: Channel Routing In Usb Mode
ADAT Out port #1, channels 1-4 USB channels 13-16 ––> ADAT Out port #2, channels 5-8 ♪: In USB mode you are able to edit the output routing using the AFCC. Arturia - User Manual AudioFuse 8Pre - The USB and ADAT modes... -
Page 32: Additional Information
Put one AudioFuse 8Pre into USB mode and the other AudioFuse 8Pre into ADAT mode. Here's how. [p.25] • Select Sync = ADAT for the AudioFuse 8Pre unit that is in ADAT mode. Arturia - User Manual AudioFuse 8Pre - The USB and ADAT modes... -
Page 33: Method 2: One Usb Connection
Analog inputs 1-8 of the second (slave) unit USB outputs 1-8 Analog outputs 1-8 of the first (master) unit USB outputs 9-16 Analog outputs 1-8 of the second (slave) unit Arturia - User Manual AudioFuse 8Pre - The USB and ADAT modes... -
Page 34: Using The Audiofuse 8Pre
The rest of the system examples involve one or the other of the two main modes of the AudioFuse 8Pre: USB mode or ADAT mode. There's a separate chapter [p.24] where you can learn about the differences between them. Arturia - User Manual AudioFuse 8Pre - Using the AudioFuse 8Pre... -
Page 35: Real-World Examples
• the engineer is listening to the Main or Cue mixes over headphones. Pretty fancy for a recording that is being made in a living room! Arturia - User Manual AudioFuse 8Pre - Using the AudioFuse 8Pre... -
Page 36: System 2: Expand An Existing System
This home studio started out with a smaller, 2-channel audio interface and then added the AudioFuse 8Pre. The flexibility and quality added through a single purchase has multiplied the capabilities of this studio many times over. Arturia - User Manual AudioFuse 8Pre - Using the AudioFuse 8Pre... -
Page 37: System 3: Record Live Drums
Arturia - User Manual AudioFuse 8Pre - Using the AudioFuse 8Pre... -
Page 38: System 4: 16 Audio Inputs, One Usb Cable
16-channel input device. The drummer is listening to the master mix through the headphones, with the monitor section of the nearest AudioFuse 8Pre set to Main 1-2. Arturia - User Manual AudioFuse 8Pre - Using the AudioFuse 8Pre... -
Page 39: System 5: 16 Audio Inputs, 2 Usb Cables
Here's a shameless plug for the song-inspiring Arturia synths drum machines. You'll love them! And with a pair of AudioFuse 8Pre audio interfaces you'll love them even more. Arturia - User Manual AudioFuse 8Pre - Using the AudioFuse 8Pre... -
Page 40: Synchronization
When the AudioFuse 8Pre is in USB mode you must use the AFCC or the computer (if MacOS) to change the clock rate. It cannot be changed from the front panel. Sync signals are always sent at the selected rate from the Word Clock and ADAT output connectors. Arturia - User Manual AudioFuse 8Pre - Synchronization... -
Page 41: As Slave
The LOCK LED will confirm that the two devices are synchronized. If the LOCK LED is not lit solid and all other conditions have been met, make sure the cables are securely connected and the master device is on. Arturia - User Manual AudioFuse 8Pre - Synchronization... -
Page 42: Word Clock Setup
3 for the last AudioFuse 8Pre. You won't need the BNC adaptor or termination plug; just be sure to set the Wordclock Impedance parameter for that unit to 75 Ohm in the AFCC. Arturia - User Manual AudioFuse 8Pre - Synchronization... -
Page 43: Word Clock Summary
Word Clock In Sync = WORD Sync = WORD Impedance = Hi-Z Impedance = 75 Ohm ♪: The last device in a Word Clock chain should always use a 75 Ohm termination circuit. Arturia - User Manual AudioFuse 8Pre - Synchronization... -
Page 44: Frequently Asked Questions
This will happen when the AudioFuse 8Pre is in ADAT mode. It will reappear when the unit is in USB mode. Note: the AFCC can still control the AudioFuse 8Pre whether it is in USB mode or ADAT mode. Arturia - User Manual AudioFuse 8Pre - Frequently asked questions... -
Page 45: Specifications
3.4k Ohms Frequency Response 20Hz/20kHz < +/- 0.07dB Maximum input gain 72db typical Maximum input level +11dBu Pad mode settings Off, -20dB, +10dB Equivalent Input Noise (EIN) @ 72dB gain -129dBu typical (un-weighted) Arturia - User Manual AudioFuse 8Pre - Specifications... - Page 46 +/- 0.04dB typical Dynamic range 115dB (A-weighted) THD+N -104dB (A-weighted) Headphones Measured values Optimal Headphones Impedance range 32-250 Ohms Output impedance 33 Ohms Maximum output level +11dBu Dynamic range 102dB (A-weighted) THD+N -92dB (A-weighted) Arturia - User Manual AudioFuse 8Pre - Specifications...
-
Page 47: Synchronization Options
9.4. Signal Level LEDs Audio Level Signal 1 -50 dBFS Signal 2 -25 dBFS Signal 3 -18 dBFS Signal 4 -10 dBFS Signal 5 -6 dBFS Signal 6 -3 dBFS Clip -1 dBFS Arturia - User Manual AudioFuse 8Pre - Specifications... -
Page 48: Software License Agreement
The License is not a sale of the original SOFTWARE. 2. Grant of License Arturia grants you a non-exclusive license for the use of the software according to the terms and conditions of this Agreement. You may not lease, loan or sub- license the software. - Page 49 (a) return of the purchase price or (b) replacement of the disk that does not meet the Limited Warranty and which is returned to Arturia with a copy of your receipt. This limited Warranty is void if failure of the software has resulted from accident, abuse, modification, or misapplication.
-
Page 50: Declaration Of Conformity
Important notice: DO NOT MODIFY THE UNIT! This product, when installed as indicate in the instructions contained in this manual, meets FCC requirement. Modifications not expressly approved by Arturia may avoid your authority, granted by the FCC, to use the product.
Need help?
Do you have a question about the AudioFuse 8 Pre and is the answer not in the manual?
Questions and answers