Table of Contents
Advertisement
Quick Links
Advertisement
Table of Contents

Related Manuals for Arturia Keylab Series


Summary of Contents for Arturia Keylab Series
- Page 1 USER’S MANUAL USER’S MANUAL...
- Page 2 Information contained in this manual is subject to change without notice and does not represent a commitment on the part of Arturia. The software described in this manual is provided under the terms of a license agreement or non-disclosure agreement. The software license agreement specifies the terms and conditions for its lawful use.
- Page 3 Key Lab Lab ! ! This manual covers the features and operation of the Arturia KeyLab, a full-featured MIDI controller designed to work with any DAW software or plug-in you own. Note: While the KeyLab is part of a package which includes our Analog Lab software, this manual will focus only on the KeyLab controller hardware.
- Page 4 The information contained in this manual is believed to be correct at the time of printing. However, Arturia reserves the right to change or modify any of the specifications without notice or obligation to update the hardware that has been purchased.
-
Page 5: Table Of Contents
Settings for the Buttons ..........................29 4.4.2.5 Settings for the Modulation Wheel ......................30 4.4.2.6 Settings for the Pedals ..........................30 4.4.3 Send your settings to the keyboard ....................31 ARTURIA – KeyLab – USER’S MANUAL... - Page 6 Recalling a Preset / Switching between Presets ................35 MIDI C ....................36 HANGING THE LOBAL HANNEL ARTURIA KEYLAB – LEGAL INFORMATION ................... 37 SOFTWARE LICENSE AGREEMENT ....................37 FCC INFORMATION (USA) ......................... 39 CANADA ..............................40 ...
-
Page 7: Introduction
1 INTRODUCTION Keylab is Arturia's newest series of USB MIDI Keyboards. The Keylab 25, Keylab 49 and Keylab 61 all feature a velocity and aftertouch sensitive keyboard. They offer a control surface designed for perfect integration with our software synthesizers. The attention to detail poured into KeyLab also makes it perfect for working with any other software plug- in or DAW you have available. -
Page 8: Keylab Overview
USB cable from your computer to the KeyLab keyboard KeyLab is a class-compliant USB device, so its driver will be automatically installed when you connect KeyLab to your computer. Fire up the Analog Lab software and read on! ARTURIA – KeyLab – USER’S MANUAL... -
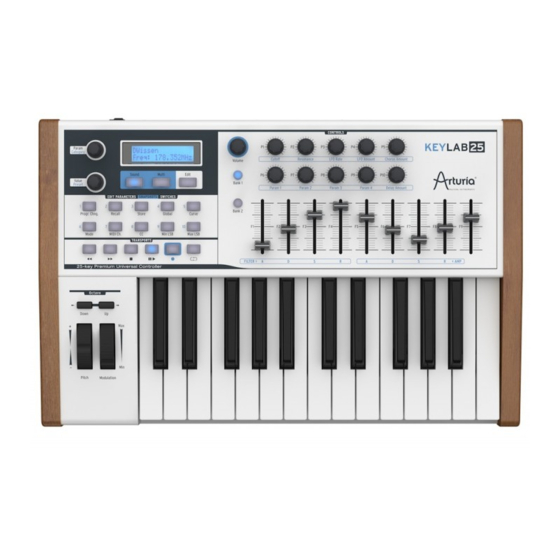
Page 9: Front Panel Overview
2.2 Front panel overview KeyLab25 front panel KeyLab49 front panel ARTURIA – KeyLab – USER’S MANUAL... - Page 10 The 16 pads on the top right of the keyboard controller can be used to trigger chords in Analog Lab. They are also generic velocity and pressure sensitive pads that can be configured in the MIDI Control Center. ARTURIA – KeyLab – USER’S MANUAL...
-
Page 11: Keyboard
Octave +1: led+ blinks at speed 1, led- does not blink • Octave +2: led+ blinks at speed 2, led- does not blink • Octave +3: led+ blinks at speed 3, led- does not blink) ARTURIA – KeyLab – USER’S MANUAL... -
Page 12: Volume Rotary Encoder
When this mode is entered, the LCD display shows the currently edited name and values. 2.2.5.3 Category/Param encoder The Category/Param encoder allows to select a filter option in the Analog Lab preset list. In Edit mode, this encoder selects an item Parameter. ARTURIA – KeyLab – USER’S MANUAL... -
Page 13: Preset/Value Encoder
For a button in Prog mode, holds the program change number. Min LSB Various functions depending on the controller: • For a knob, pad or fader in Ctrl mode, contains the minimum value sent. ARTURIA – KeyLab – USER’S MANUAL... - Page 14 KeyATmin: the Minimum Key aftertouch, from 0 to 127 • KeyATMax: the Maximum Key aftertouch, from 0 to 127 • PadATmin: the Minimum Pad aftertouch, from 0 to 127 • PadATMax: the Maximum Pad aftertouch, from 0 to 127 ARTURIA – KeyLab – USER’S MANUAL...
-
Page 15: Transport Controls
2.2.7 Transport Controls The KeyLab keyboard embeds standard sequencer transport functions, which allow controlling any external hardware or software sequencer. Buttons send standard MMC messages: Start, Stop, Record, Rewind, Fast Forward and Loop. Transport section ARTURIA – KeyLab – USER’S MANUAL... -
Page 16: Synthesis Section
There are four “Param” rotary encoders available on the KeyLab keyboard. Tweaking these parameters can alter the sound of the preset in various ways. Which parameters are affected depends on the selected preset, and are displayed on the software interface. ARTURIA – KeyLab – USER’S MANUAL... -
Page 17: Envelopes
2.2.9 Pads (KeyLab 49 and Keylab 61 only) The 16 pads are used to control the Chord mode. Each Pad can have a chord assigned to it, in order to play your harmonic content easily. Pads ARTURIA – KeyLab – USER’S MANUAL... -
Page 18: Rear Panel Overview
Every physical controller (knob, fader, button) on the hardware is mapped to a part of the software, and is dependent on each preset. ARTURIA – KeyLab – USER’S MANUAL... -
Page 19: Using Keylab With Analog Lab
Now click the Test button: If you hear a short sine wave, then your audio is set up correctly. If not, make sure the correct audio driver is selected and that your headphones or speakers are properly connected and turned on. ARTURIA – KeyLab – USER’S MANUAL... -
Page 20: Midi Setup
Audio & MIDI Settings window, which is where the preferred MIDI controller will be selected. The Audio & MIDI Settings window has a section labeled “MIDI Devices”. Simply click on the box next to the words “Arturia KeyLab”; this will enable your KeyLab keyboard to control Analog Lab. 3.2 Selecting Presets 3.2.1 The Analog Lab “Preset”... -
Page 21: Setup
Note: Each time you select a new preset it is possible that the assignments will change. This is partly because there may be different parameters available for the synthesizer on which that preset is based. For more details on editing a preset, see the Analog Lab user manual. ARTURIA – KeyLab – USER’S MANUAL... -
Page 22: Using The Pads (Keylab 49 And Keylab 61)
Note: In the picture above, a letter “S” before a preset name indicates that a Sound will be selected by that Snapshot. A letter “M” before the preset name means that a Multi has been placed there. ARTURIA – KeyLab – USER’S MANUAL... -
Page 23: Midi Control Center
The MIDI Control Center is a separate utility that can be used to configure the MIDI settings of your KeyLab keyboard. This is especially useful if you would like to make the most of the potential relationship between the KeyLab and non-Arturia plugins and DAWs. -
Page 24: Launching The Midi Control Center
4.3 Launching the MIDI Control Center Before launching the MIDI Control Center, make sure your Arturia KeyLab keyboard is connected to your computer. The MIDI Control Center is specifically designed for the KeyLab keyboard; it will not work with another MIDI device. - Page 25 Global channel, or to the Bank 1 or 2 channels. The remaining windows in the Selected Control Parameters section are very flexible, so each type of control will need its own explanation. ARTURIA – KeyLab – USER’S MANUAL...
-
Page 26: Settings For The Encoders
Continuous Controller setting (switch-type or variable). MSB/LSB are not used in this case NRPN/RPN: specify the Most Significant Byte (MSB) or • Least Significant Byte (LSB) for the controller number. Min/Max are not used in this case ARTURIA – KeyLab – USER’S MANUAL... -
Page 27: Settings For The Sliders
Continuous Controller setting (switch-type or variable). MSB/LSB are not used in this case NRPN/RPN: specify the Most Significant Byte (MSB) or • Least Significant Byte (LSB) for the controller number. Min/Max are not used in this case ARTURIA – KeyLab – USER’S MANUAL... -
Page 28: Settings For The Pads (Keylab 49 And Keylab 61)
Note Off velocity is set by the Min value. MSB/LSB are not used in this case. Define the Bank Select message to be sent with a • Patch Change. Min/Max are not used in this case. ARTURIA – KeyLab – USER’S MANUAL... -
Page 29: Settings For The Buttons
(trigger loop and stop it, for example) Keyboard preset Select one of the first 11 CC values, and the button will • switch the keyboard to the according preset memory. ARTURIA – KeyLab – USER’S MANUAL... -
Page 30: Settings For The Modulation Wheel
Gate: When the pedal is pressed it will play the note at the velocity specified by the Max value; releasing the pad will send a Note Off message at the velocity specified by the Min value. ARTURIA – KeyLab – USER’S MANUAL... -
Page 31: Send Your Settings To The Keyboard
4.4.5 Saving settings to the computer You will probably see before long that there are a lot of different ways you can use your KeyLab. In addition to working with Analog Lab, where all of our soft-synthesizers are ARTURIA – KeyLab – USER’S MANUAL... -
Page 32: Loading Settings From The Computer
When you know which configurations you need to pre-load into your KeyLab, click the “Load” button and load them into the MIDI Control Center. From there, use the “Send to Keyboard” function described in section 4.4.3. ARTURIA – KeyLab – USER’S MANUAL... -
Page 33: Using Keylab With Other Software
There are a couple of MIDI CC numbers that have been assigned the task of controlling filter brightness (CC# 74) or harmonic content (CC# 71). We’ll use CC# 74 for this example. Click on the CC number field and select the Brightness controller number as shown: ARTURIA – KeyLab – USER’S MANUAL... -
Page 34: Assign An Encoder To Control A Midi Cc # Between Two Values
To summarize, the settings seen above mean that Encoder 5 will control the Vibrato Rate of the target device, sweeping it between the values of 10 and 32 only. The vibrato will not become too fast, nor will it become too slow. ARTURIA – KeyLab – USER’S MANUAL... -
Page 35: Save The Changes To A Preset
Once you’ve created a couple of presets you can switch between your personalized configurations very quickly. Go to Edit mode, and press the “Recall” button. You will then be able to select the preset memory you want. ARTURIA – KeyLab – USER’S MANUAL... -
Page 36: Changing The Global Midi Channel
Switching between MIDI Channels is one very quick way to select which instrument and/or track you are controlling in your DAW software. Go to Edit mode, and press the “MIDI Ch.” Button. Use the “Value” knob to select the MIDI channel you want. ARTURIA – KeyLab – USER’S MANUAL... -
Page 37: Arturia Keylab - Legal Information
The License is not a sale of the original SOFTWARE. 2. Grant of License Arturia grants you a non-exclusive license for the use of the software according to the terms and conditions of this Agreement. You may not lease, loan or sub-license the software. - Page 38 8. Limited Warranty Arturia warrants that the disks on which the software is furnished is free from defects in materials and workmanship under normal use for a period of thirty (30) days from the date of purchase.
-
Page 39: Fcc Information (Usa)
(b) replacement of the disk that does not meet the Limited Warranty and which is returned to Arturia with a copy of your receipt. This limited Warranty is void if failure of the software has resulted from accident, abuse, modification, or misapplication. -
Page 40: Canada
Canada. 6.4 EUROPE This product complies with the requirements of European Directive 89/336/EEC This product may not work correctly by the influence of electro-static discharge; if it happens, simply restart the product. ARTURIA – KeyLab – USER’S MANUAL...
Need help?
Do you have a question about the Keylab Series and is the answer not in the manual?
Questions and answers