Table of Contents
Advertisement
Advertisement
Table of Contents

Related Manuals for Arturia AUDIOFUSE


Summary of Contents for Arturia AUDIOFUSE
- Page 1 USER MANUAL...
- Page 2 Information contained in this manual is subject to change without notice and does not represent a commitment on the part of Arturia. The software described in this manual is provided under the terms of a license agreement or non-disclosure agreement. The software license agreement specifies the terms and conditions for its lawful use.
- Page 3 AudioFuse comes with very high quality audio pre-amplifier based on the DiscretePro technology. AudioFuse connects you to a whole world of possibilities, gears and formats. AudioFuse is a rock-solid foundation you can rely on to keep you in the creative flow in any situation.
- Page 4 Do not use the device with thunder and lightning present; it may cause electrical shock. Do not expose the device to hot sunlight. Do not use the device when there is a gas leak nearby. Arturia is not responsible for any damage or data loss caused by improper operation of the device.
- Page 5 The information contained in this manual is believed to be correct at the time of printing. However, Arturia reserves the right to change or modify any of the specifications without notice or obligation to update the hardware that has been purchased.
-
Page 6: Table Of Contents
How to record a guitar or an instrument ......................35 4.4. Use one phone for Cue, and one for Main ......................36 4.5. Use AudioFuse to switch between 2 sets of speakers................37 4.6. Use the AudioFuse without a computer....................... 38 Software License Agreement ..........................39... -
Page 7: Overview
DiscretePRO® certificate Your AudioFuse comes with 2 pre-amplifiers using the DiscretePRO® technology to ensure the best audio quality when recording. Your AudioFuse is unique and therefore it comes with its own Audio Precision certificate as a guarantee of its performance. - Page 8 A version with more details is available after registration on www.arturia.com/register Register your AudioFuse To get access to the AudioFuse Software and support register your product on www.arturia.com/register with your registration card. Important: Go to www.arturia.com/audiofuse-start to register your product, check for the latest firmware, download the user guide and the AudioFuse Control Center software (AFCC).
-
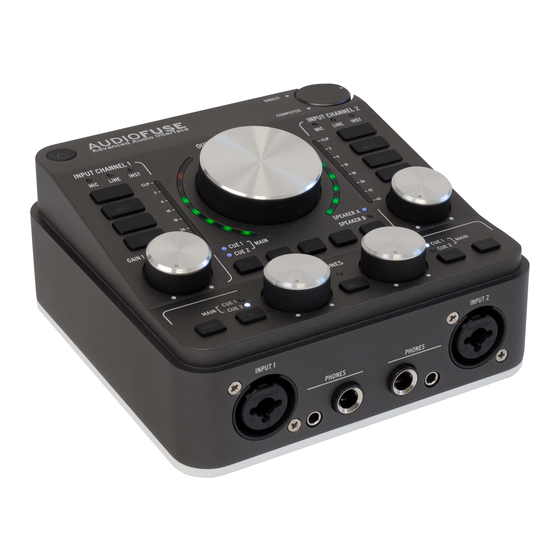
Page 9: Hardware Features
Talkback feature with a dedicated built-in microphone • A/B speaker switching • Direct monitoring • Separate Master & Monitor mix channels • USB interface with PC, Mac, iOS, Android & Linux compatibility • Aluminum chassis, leather-covered top Arturia - User Manual AudioFuse - Hardware Features... - Page 10 3dB to 72dB Inserts Output Impedance <35 ohms Input Impedance 10k ohms asymetric Max Output Level +18dBu Nominal Input Level +18dBu Line Input to Digital THD+N -101dB (A-weighted) Dynamic Range 106dB (A-weighted) Arturia - User Manual AudioFuse - Hardware Features...
- Page 11 Line Output Output Impedance <35 ohms Max Output Level +24dBu Dynamic Range 119dB (A-weighted) THD+N -95dB (A-weighted) Clocks Supported Frequency Rates 44.1 kHz, 48 kHz, 88.2 kHz, 96 kHz, 176.4 kHz, 192 kHz Arturia - User Manual AudioFuse - Hardware Features...
-
Page 12: Getting To Know Your Audiofuse
4. ADAT In/Out: Connect to any ADAT equipment with up to 8 digital inputs and 8 digital outputs. 5. USB hub: 3-port USB hub to connect your master keyboard, USB stick or dongle. Arturia - User Manual AudioFuse - Hardware Features... - Page 13 6. USB connection: Connect Audiofuse to your computer with the provided USB double cable only. Most features will be available even when only the USB power supplied by a computer. Power supply and specific adapters will be required to connect Audiofuse to tablets and phones.
- Page 14 10. Input control sections 1&2: Direct access to each feature of analog inputs 1&2: input gain with vu-metering, true 48V, phase invert, -20dB pad, "boost" option for MIC signals and instrument mode. Arturia - User Manual AudioFuse - Hardware Features...
- Page 15 14. Talkback: Press a button to give directions to your talent who is in a booth or another room: use the talkback feature with the built-in microphone. Talkback only works on sample rates up to 96kHz. Arturia - User Manual AudioFuse - Hardware Features...
- Page 16 15. Input channels 1&2: Connect microphones, instruments or line devices to the 2 XLR/ balanced 1/4” combo inputs. 16. Phones output channels 1&2: Don’t bother looking for a 1/4” or 1/8” phones adapter; AudioFuse has both connectors for each phones output. Arturia - User Manual AudioFuse - Hardware Features...
-
Page 17: Getting Started
Phantom Power Voltage +48V +48V The AudioFuse also powers the USB hub up to 1A per USB plug, and your phantom 48V powered microphones. USB hub functionality is disabled when AUDIOFUSE is only usb- powered. We recommend to use DC powered for best performance, and save your laptop battery. It is also recommended to use phantom power only when powered on DC. -
Page 18: Setting Your Operating System
3.2. Setting your Operating System 3.2.1. Set up on Macintosh Connect your AudioFuse to the USB Port, your AudioFuse simply show up in Audio MIDI Setup immediately. To set it up as your default device: • Select it in the Audio MIDI Settings left panel, •... - Page 19 AudioFuse Control Center installer. You can get it on www.arturia.com/audiofuse-start Once this is installed, simply connect AudioFuse to the USB ports, using the provided double- USB cable, it will automatically appear in your audio devices. Open “Manage Audio Device”.
- Page 20 3.2.3. Set up on Linux AudioFuse is USB class compliant so it will be compatible with a Linux platform. It should work with ALSA, PulseAudio and Jack. 3.2.4. Set up on iPad/iPhone Connect AudioFuse to the DC adaptor (required) and to the iPad/iPhone through a camera connection kit.
-
Page 21: Inputs And Outputs
3.3. Inputs and Outputs 3.3.1. Inputs 1 & 2 AudioFuse offers two real parallel preamplifiers for microphone and line/instrument inputs. The input Channels 1 and 2 offer full control of mic preamp on the interface with 48V : Phantom power activation •... - Page 22 Note on Phantom Power: The phantom power is rated 14 mA per channel. Input channel 1&2 path Arturia - User Manual AudioFuse - Getting started...
- Page 23 3.3.2. Inserts 1 & 2 On the back of the AudioFuse you can find an insert section featuring 2 TRS Jack (tip=send, ring=receive). These can be used to insert your favourite processing unit before the converters and directly after the DiscretePRO® pre-amplifiers of inputs 1 & 2. When not used, these connectors do not need to be patched.
- Page 24 3.3.3. Inputs 3 & 4 AudioFuse also provides two additional line inputs and two phono inputs labelled 3 & 4. By default the line input 3 & 4 are selected. A 20db pad can be activated in AudioFuse Control Center.
- Page 25 Input channel 3&4 path Arturia - User Manual AudioFuse - Getting started...
- Page 26 3.3.4. Digital inputs AudioFuse provides up to 8 digital inputs on S/PDIF or ADAT. You can switch between ADAT and S/PDIF using the AudioFuse Control Center. Arturia - User Manual AudioFuse - Getting started...
- Page 27 3.3.5. Main Output AudioFuse offers 4 stereo outputs : Phones 1 / Phones 2 / Speaker A / Speaker B On each of these you can listen to Main, Cue 1 or Cue 2 buses, by using the selectors available on the interface.
- Page 28 • OUTPUT LEVEL : output level knob • A special feature allow to send phone 2 in the speaker B output. (Refer to phone outputs below). This function inhibit Speaker A/B function. Arturia - User Manual AudioFuse - Getting started...
- Page 29 Phone output is similar to main output. You can select your source and mix down to mono. Phone 2 output has a secondary function. You can send it to speaker B outputs. By activating the Phone 2 to Speaker B function in the AudioFuse control Center, you send the phone 2 signal to speaker B output.
-
Page 30: Audiofuse Mixer And Routing
3.4. AudioFuse Mixer and Routing AudioFuse offers 3 output buses: main, Cue 1 and Cue 2 plus one internal mixer. These three output buses are available in your audio driver. Each output is sourced from any of these buses with a selector on the device, by pressing the button to switch between them. - Page 31 Arturia - User Manual AudioFuse - Getting started...
-
Page 32: Usb Audio Mapping
ADAT 5 IN 11 OUT 11 ADAT 5 ADAT 6 IN 12 OUT 12 ADAT 6 ADAT 7 IN 13 OUT 13 ADAT 7 ADAT 8 IN 14 OUT 14 ADAT 8 Arturia - User Manual AudioFuse - Getting started... -
Page 33: Clock Synchronisation
96kHz is the maximum samples rate clock for ADAT. The internal clock of the AudioFuse can be set to 44.1 kHz, 48 kHz, 88.2 kHz, 96 kHz, 176.4 and 192 kHz from your DAW, your audio device settings, or in the AudioFuse Control Center. -
Page 34: Re-Amping
"multiple or divided" rate sample rate. 3.7. Re-Amping AudioFuse has a great Re-Amping function. Re-Amping is also called reverse D-I and is used to play a direct guitar track in an amplifier. You can now re-record the amplified sound. For this, you need a track with a direct guitar sound. -
Page 35: Talkback
The level of the talkback and the selected outputs can be set in the AudioFuse Control Center. 3.9. MIDI Interface MIDI In and MIDI Out ports are available at back of the AudioFuse. The Jack to DIN adapter is included in your package. -
Page 36: The Audiofuse Control Center
• Update the firmware version • Change the Monitor Mix The software is compatible with Windows 7+ and Mac OSX 10.8+. In order to use the software, you must connect the AudioFuse. Arturia - User Manual AudioFuse - Getting started... -
Page 37: The Audiofuse Switch
3.11. The AudioFuse switch Pressing the Arturia switch will automatically wake up the AudioFuse Control Center on your computer. Arturia - User Manual AudioFuse - Getting started... -
Page 38: How To Use The Audiofuse
4. HOW TO USE THE AUDIOFUSE 4.1. Using an external effect on inputs 1 and 2 with inserts Record your mic and process it using an external processing unit before recording. Arturia - User Manual AudioFuse - How to use the AudioFuse... -
Page 39: How To Record A Microphone
If you need to record microphones, simply use the inputs 1 or 2 on the front. Connect your microphone with a XLR. The AudioFuse will auto-detect that you are using a microphone input. Set your phantom power (if needed) and your gain. -
Page 40: How To Record A Guitar Or An Instrument
“Inst” button of the input section to light the “Inst” input mode. You can use Input 3 in the same way by setting it in the AudioFuse Control Center. Arturia - User Manual AudioFuse - How to use the AudioFuse... -
Page 41: Use One Phone For Cue, And One For Main
You can use 2 different sets of headphones and use each one to listen to a different mix. Use the Main/Cue bus selector above the Headphone plug to set which mix you want to listen Arturia - User Manual AudioFuse - How to use the AudioFuse... -
Page 42: Use Audiofuse To Switch Between 2 Sets Of Speakers
4.5. Use AudioFuse to switch between 2 sets of speakers With the Speaker A/Speaker B function on the AudioFuse, you can easily switch the master output between 2 different sets of speakers. This will allow for quick monitor referencing to check your mix. -
Page 43: Use The Audiofuse Without A Computer
Connect your outputs. Connect the AudioFuse to the computer In the AudioFuse Control Center set the mix you want for your output. Set the Direct Monitor knob on the right of the AudioFuse to “Direct”. Now you can unplug the computer, this mix setup will work without it. -
Page 44: Software License Agreement
The License is not a sale of the original SOFTWARE. 2. Grant of License Arturia grants you a non-exclusive license for the use of the software according to the terms and conditions of this Agreement. You may not lease, loan or sub- license the software. - Page 45 3. Activation of the Software Arturia may use a compulsory activation of the software and a compulsory registration of the OEM software for license control to protect the software against unlawful copying. If you do not accept the terms and conditions of this Agreement, the software will not work.
- Page 46 (a) return of the purchase price or (b) replacement of the disk that does not meet the Limited Warranty and which is returned to Arturia with a copy of your receipt. This limited Warranty is void if failure of the software has resulted from accident, abuse, modification, or misapplication.
- Page 47 (including without limitation, damages for loss of business profits, business interruption, loss of business information and the like) even if Arturia was previously advised of the possibility of such damages. Some states do not allow limitations on the length of an implied warranty or the exclusion or limitation of incidental or 0consequential damages, so the above limitation or exclusions may not apply to you.
-
Page 48: Fcc Information
Important notice: DO NOT MODIFY THE UNIT! This product, when installed as indicate in the instructions contained in this manual, meets FCC requirement. Modifications not expressly approved by Arturia may avoid your authority, granted by the FCC, to use the product. - Page 49 Canada. EUROPE This product complies with the requirements of European Directive 89/336/EEC This product may not work correctly by the influence of electro-static discharge; if it happens, simply restart the product. Arturia - User Manual AudioFuse - FCC Information...
Need help?
Do you have a question about the AUDIOFUSE and is the answer not in the manual?
Questions and answers