Table of Contents
Advertisement
Advertisement
Table of Contents

Related Manuals for Arturia MINILAB 3


Summary of Contents for Arturia MINILAB 3
- Page 1 USER MANUAL _MINILAB 3...
- Page 2 The manual is subject to change without notice and does not represent a commitment on the part of Arturia. Arturia reserves the right to change or modify any of the specifications without notice or obligation to update the hardware that has been purchased.
- Page 3 MiniLab 3 Cheat Sheet that you can find during the registration process. We're sure you will find MiniLab 3 a powerful tool in your setup and we hope you'll use it to its fullest potential.
- Page 4 Do not expose the instrument to hot sunlight. Do not use the instrument when there is a gas leak nearby. Arturia is not responsible for any damage or data loss caused by improper operation of the instrument.
-
Page 5: Table Of Contents
The Arpeggiator, Chord Mode and Hold Mode ............................17 4.9. Vegas Mode..................................... 17 4.10. Factory Reset..................................17 MiniLab 3 and Analog Lab ........................... 18 5.1. Important Note — It’s All Malleable .......................... 18 5.2. Audio and MIDI Setup..............................18 5.2.1. -
Page 6: Welcome To Minilab 3
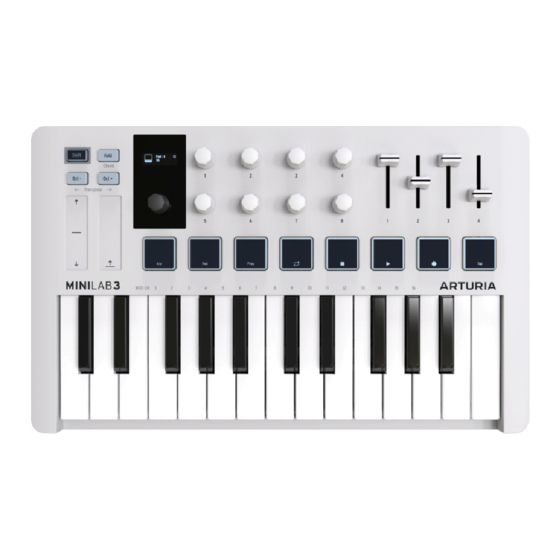
1. WELCOME TO MINILAB 3 1.1. What’s MiniLab 3? MiniLab 3 is a compact MIDI keyboard controller. But don’t let its small size fool you — it’s huge on features usually found on larger and more expensive keyboards. You’ll play MiniLab3 using its slim-key 25-note keyboard with velocity sensitivity and the eight backlit performance pads that sense velocity and aftertouch. -
Page 7: Minilab 3 Features Summary
For musicians on the go, laptop-based performers who have to squeeze into crowded DJ booths, home studio creators with limited desktop space, and many other sound explorers we haven’t even thought of yet, MiniLab 3 is simply the biggest little MIDI controller on the planet. -
Page 8: Installation
(search for MiniLab 3 ). 2. Launch the MIDI Control Center. 3. Please make sure MiniLab 3 is selected under Device in MIDI Control Center. Click on the box showing the firmware revision: 4. Click “Upgrade” in the dialogue box that follows, then navigate to the firmware file on your computer and select it. -
Page 9: Hardware Overview
3. HARDWARE OVERVIEW 3.1. Front Panel The controls on the front panel of MiniLab 3 are as follows. Number Name Description Shift Button Provides access to alternate functions [p.7]. Hold Button Sustains notes played from the keys (not the pads) when active. -
Page 10: Rear Panel
USB-C Port external hardware. ! Velocity sensitive: Both the MIDI keyboard and the pads on MiniLab 3 are sensitive to how hard you play them. Hit harder for higher volume. ! Pressure Sensitivity: Playing a pad and then pressing it harder will send out Pressure data that can trigger various modulation changes (filter, volume etc.). -
Page 11: Minilab 3 Operations
The pads send MIDI note numbers that may be edited in MIDI Control Center app. ! By pressing Oct+ and Oct- at the same time, any octave shift or transposition is reset. Arturia - User Manual MiniLab 3 - MiniLab 3 operations... -
Page 12: Touch Strips
“wheel” snaps back to the center. The bend range can be adjusted in the MIDI Control Center software (see separate manual). The MIDI Control Center app allows you to customize the function of almost every physical control on your MiniLab 3 or other Arturia controller. -
Page 13: Pads And Program Selection
51 (D#2) 4.4.2. Pads and Program Selection MiniLab 3 has several main operating modes: ARTURIA and DAWs plus the 5 custom User Programs you can create. Hold Shift and press Pad 3 to switch between them. ARTURIA mode: Automatically detects if Analog Lab is open. All controls are •... -
Page 14: Entering And Leaving Arpeggio Edit Mode
Arpeggiator doesn't automatically start just because you enter Arpeggiator Edit mode. Also, quitting arp menu doesn't turn off the Arpeggiator. Arturia - User Manual MiniLab 3 - MiniLab 3 operations... -
Page 15: Editing The Arpeggiator - Main Encoder Knob
Rate: Sets the Arpeggiator rate in beats per minute when Sync is set to Internal. • Sync: Selects MiniLab 3’s internal clock (Int) or an external source such as • connected software or hardware (Ext) as the source of master tempo. -
Page 16: Editing The Arpeggiator - Quick Access
Now let’s take each arpeggiator parameter in more detail. 4.5.5.1. On/Off Adjusting this menu item or moving Knob 1 has the same effect as holding Shift and tapping Pad 1. It simply turns the arpeggiator on and off. Arturia - User Manual MiniLab 3 - MiniLab 3 operations... - Page 17 ! With 1/8 division chosen, even eighth notes are played. With 1/8T, 3 eighth note triplets will play. This differs from Swing, where a Swing value of 67% will play eighth notes in a triple fashion. Arturia - User Manual MiniLab 3 - MiniLab 3 operations...
- Page 18 Sync parameter is set to Internal. If you turn this knob while external Sync is set, the message “Ext Sync selected” is displayed. You can also set the rate using Tap Tempo [p.15]. Arturia - User Manual MiniLab 3 - MiniLab 3 operations...
-
Page 19: Tap Tempo
Likewise if you’re controlling a hardware synth module from the 5-pin MIDI port. If Analog Lab or another instrument is a plug-in within a DAW session, then of course you’ll want to set MiniLab 3 to External and let your DAW direct tempo. -
Page 20: Hold Mode
Hold the Shift button and then press and hold the Hold button. Now, play the chord you want MiniLab 3 to memorize on the keyboard, either all at once or adding a note at a time. The display shows the following: Then, release the Shift and Hold buttons. -
Page 21: The Arpeggiator, Chord Mode And Hold Mode
! Remember that Hold can be activated by its own for long evolving pads, for instance. 4.9. Vegas Mode If left idle, MiniLab 3 will go into what we call “Vegas Mode,” which is akin to a computer screensaver. The OLED display will go dark and the pads will cycle through a rainbow of colors. -
Page 22: Minilab 3 And Analog Lab
So you will find only basic coverage of the various Analog Lab parameters that MiniLab 3 controls, although these apply to the full version of Analog V as well. For more details about Analog Lab Intro or other versions of Analog Lab, please refer to the appropriate user manual. -
Page 23: Analog Lab Midi Settings
If using Analog Lab as a plug-in inside your DAW, open the MIDI preferences and select Minilab 3 MIDI in the input list, then create an Analog Lab track and arm it: you will now be able to play and control Analog Lab into your favorite DAW. -
Page 24: Browsing Presets
Now make sure the ARTURIA program mode is selected by holding Shift and pressing Pad 5.3. Browsing Presets One of the first things MiniLab 3 can do in Analog Lab is browse and select sound Presets using the main black knob. -
Page 25: Knobs And Faders
Note: At this time, only Type browsing is supported. There is not currently a way to browse within Styles, Characteristics, or Designers directly from MiniLab 3. Of course, you can do this in the Analog Lab software, and MiniLab 3 will correctly display the chosen Preset and Sub-Type. -
Page 26: Knobs 1-4
5.4.1. Knobs 1-4 Knobs 1-4 are assigned to the Arturia instrument’s Macros. Since you can assign multiple parameters to a Macro, you can get a lot of mileage out of twisting a single knob on MiniLab 3. This is even more true if you own full versions of V Collection instruments, which you can then open inside of Analog Lab to map their internal parameters to Macros. -
Page 27: Faders
83 (General purpose 4) Treble 85 (Undefined) Master Volume 17 (General purpose) 5.4.4. Pads In Analog Lab, MiniLab 3’s pads send MIDI notes as outlined in the previous chapter. The default notes are: Pad Bank 36 (C2) 37 (C#2) 38 (D2) -
Page 28: Daw Control
! For all custom-controlled DAWs, be sure to disable the MiniLab 3 MCU MIDI port in the DAW’s MIDI preferences. This will avoid conflicts between the custom DAW mode and the Mackie Control Universal protocol. ! Of course you can use all other MiniLab 3 features – like Hold, Chord, Arpeggiator, Transpose etc. -
Page 29: Transport Control
6.2. DAW Control with Mackie Control Universal DAWs for which we do not have custom scripts as of MiniLab 3’s release (e.g. Steinberg's Cubase) may still be controlled using the Mackie Control Universal (MCU) protocol, which originated with the Mackie hardware control surface of the same name. -
Page 30: Analog Lab Mode
Almost any DAW on the planet will host third-party plug-in instruments, including Analog Lab V or the copy of Analog Lab Intro included with MiniLab 3. You can use MiniLab 3 to control Analog Lab inside your DAW (although not at the same time you’re controlling the DAW itself). -
Page 31: Declaration Of Conformity
Important notice: DO NOT MODIFY THE UNIT! This product, when installed as indicated in the instructions contained in this manual, meets FCC requirement. Modifications not expressly approved by Arturia may avoid your authority, granted by the FCC, to use the product. -
Page 32: Software License Agreement
The License is not a sale of the original SOFTWARE. 2. Grant of License Arturia grants you a non-exclusive license for the use of the software according to the terms and conditions of this Agreement. You may not lease, loan or sub-license the software. - Page 33 8. Limited Warranty Arturia warrants that the disks on which the software is furnished is free from defects in materials and workmanship under normal use for a period of thirty (30) days from the date of purchase.
- Page 34 Arturia was previously advised of the possibility of such damages. Some states do not allow limitations on the length of an implied warranty or the exclusion or limitation of incidental or 0consequential damages, so the above limitation or exclusions may not apply to you.
Need help?
Do you have a question about the MINILAB 3 and is the answer not in the manual?
Questions and answers