Table of Contents
Advertisement
Quick Links
Advertisement
Table of Contents

Related Manuals for Sunny Health & Fitness SF-B1516


Summary of Contents for Sunny Health & Fitness SF-B1516
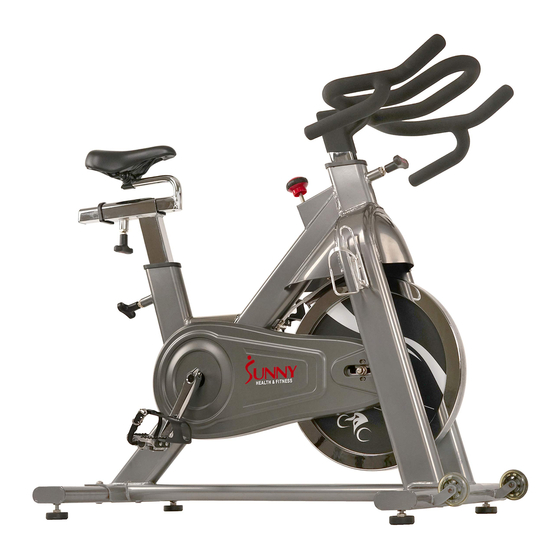
- Page 1 COMMERCIAL INDOOR CYCLING BIKE SF-B1516 USER MANUAL IMPORTANT! Please retain owner’s manual for maintenance and adjustment instructions. Your satisfaction is very important to us, PLEASE DO NOT RETURN UNTIL YOU HAVE CONTACTED US: support@sunnyhealthfitness.com or 1- 877 - 90SUNNY (877-907-8669).
-
Page 2: Important Safety Information
IMPORTANT SAFETY INFORMATION We thank you for choosing our product. To ensure your safety and health, please use this equipment correctly. It is important to read this entire manual before assembling and using the equipment. Safe and effective use can only be achieved if the equipment is assembled, maintained, and used properly. -
Page 3: Exploded Diagram
EXPLODED DIAGRAM 1 13 14 S13-14-15 #79 S10-13-17-19 1PC... -
Page 4: Hardware Package
EXPLODED DIAGRAM 2 HARDWARE PACKAGE #17 M10*25*S6 4PCS #33 S13-14-15 1PC #18 d10*Φ20*2.0 4PCS #34 S6 1PC #79 S10-13-17-19 1PC... -
Page 5: Parts List
PARTS LIST Description Spec. QTY. Description Spec. QTY. Handlebar Screw ST3.5*16 PT100*40*J60*30*1 32L/ Bushing Crank Arm Seat Spanner S13-14-15 Seat Slider Tube Allen Wrench Seat Post Bushing 20*20*69.5 PTB45*51*2.0*PTB Bushing Square Nut 16*16*25*M10 35*41*L198 D Shape End Cap M10*H7*S17 M6*H14*S10 T Shape Knob 1 Washer D6*Φ12*1.2... - Page 6 Description Spec. QTY. Description Spec. QTY. Outer Chain Cover Inertial Wheel Φ18*Φ12.2*5.5 Screw M5*20*Φ8.5 Spacer M12*1*H19.5*S19 Tension Control Knob Adjusting Screw M8*H5.5*S14 M8*H7.5*S13 Blanking Plate M12*1*H6*S19 Screw ST4.2*16 Bearing 6202-2RZ NBK 77L/R Nylon Nut 9/16*H8*S19 Φ20*Φ15.1*40 M42*1*Φ50*3.5 Septum Small Chain Wheel 16 teeth M42 tooth Spanner S10-13-17-19...
- Page 7 ASSEMBLY INSTRUCTIONS We value your experience using Sunny Health and Fitness products. For assistance with parts or troubleshooting, please contact us at support@sunnyhealthfitness.com or 1-877-90SUNNY (877- 907-8669). STEP 1: #34 S6 1PC Unscrew the 4 Screws (No. 26) with Allen Wrench (No.
- Page 8 We value your experience using Sunny Health and Fitness products. For assistance with parts or troubleshooting, please contact us at support@sunnyhealthfitness.com or 1-877-90SUNNY (877- 907-8669). STEP 3: #23 M5*16*Φ8.5 2PCS WARNING! Read instructions carefully #33 S13-14-15 1PC #11 d5*Φ13*1 2PCS improper assembly cause...
- Page 9 We value your experience using Sunny Health and Fitness products. For assistance with parts or troubleshooting, please contact us at support@sunnyhealthfitness.com or 1-877-90SUNNY (877- 907-8669). STEP 4: Loosen and pull out the [seat] T Shape Knob 2 (No. 10). Insert the Seat Post (No. 5) into the tube #33 S13-14-15 1PC located on the back of the Main Frame (No.
-
Page 10: Adjustments Guide
ADJUSTMENTS GUIDE ADJUSTING THE HEIGHT AND BALANCE In order to achieve a smooth and comfortable ride, you must ensure that the stability of the bike is secured. If you notice that the bike is unbalanced during use, you should adjust the Foot Levelers (No. - Page 11 PEDAL STRAP ADJUSTMENT Your feet should be secured in the toe clips during exercise. Place your feet as far forward into the toe clips as you can. With your feet in place, turn the crank to bring one foot to within arm’s reach, grasp the pedal strap and pull it upward to tighten the toe clip cage.
- Page 12 MOVING THE BIKE & BRAKING/DISMOUNTING REMOVING THE CRANK ARM TO REMOVE THE CRANK ARM Unscrew 2 Screws (No. 52) counter-clockwise with the Allen Wrench (No. 34). Remove the 2 Screws (No. 52) and pull out the Left & Right Crank Arms (No. 32L & No. 32R). NOTE: The hexagonal hole on the middle axle and the crank arm should be aligned when assembling.
- Page 13 SPD TECHNICAL SERVICE INSTRUCTIONS Caution! Before use, read these instructions carefully. ⚫ Practice engaging and disengaging from the pedals several times in a stationary position before riding. ⚫ Before using, lubricate the concave area of the clip. ⚫ Keep the cleat and pedal clean to ensure proper usage. ⚫...
- Page 14 Note: 1. The cleat has an adjustment range of 5 mm right to left. After tightening the cleat, practice engaging and releasing one shoe at a time. Readjust to determine the best cleat position. After you have determined the best cleat position, firmly tighten the cleat mounting bolts with a 4 mm Allen Wrench 2.
-
Page 15: Maintenance Instructions
MAINTENANCE INSTRUCTIONS This is general information for daily, weekly and monthly maintenance to be performed on your bike. DAILY MAINTENANCE MONTHLY MAINTENANCE After each exercise session, wipe down all the 1. Check if all hardware is secure, such as: water equipment: seat, frame, and handlebars.
Need help?
Do you have a question about the SF-B1516 and is the answer not in the manual?
Questions and answers