Table of Contents
Advertisement
Quick Links
Advertisement
Table of Contents

Subscribe to Our Youtube Channel
Related Manuals for ADJ SABER BAR 6


Summary of Contents for ADJ SABER BAR 6
- Page 1 SABER BAR 6 user manual...
- Page 2 ADJ PRODUCTS LLC and all affiliated companies hereby disclaim any and all liabilities for property, equipment, building, and electrical damages, injuries to any persons, and direct or indirect economic...
-
Page 3: Table Of Contents
C O N T E N T S General Information Limited Warranty (USA Only) Safety Guidelines Maintenance Guidelines Fixture Overview DMX Setup Installation Instructions System Menu DMX Channels / Values / Functions Dimmer Curve Chart Remote Operating Instructions Multiple Unit Power Linking Master / Slave Set up Optional Lens / Fuse Replacement / Cleaning Trouble Shooting Tips and FAQ... -
Page 4: General Information
Items returned without a R.A. number clearly marked on the outside of the package will be refused and returned at customer’s expense. You may obtain a R.A. number by contacting customer support. CUSTOMER SUPPORT Contact ADJ Service for any product related service and support needs. Please visit forums.adj.com with questions, comments or suggestions. -
Page 5: Limited Warranty (Usa Only)
ADJ Products, LLC be liable for any loss or damage, direct or consequential, arising out of the use of, or inability to use, this product. -
Page 6: Safety Guidelines
To guarantee a smooth operation, it is important to follow all instructions and guidelines in this manual. ADJ PRODUCTS LLC is not responsible for injury and/or damages resulting from the misuse of these devices due to the disregard of the information printed in this manual. Only qualified and/or certified personnel should perform installation of these devices and only the original rigging parts included with these devices should be used for installation. - Page 7 S A F E T Y I N S T R U C T I O N S A N D G U I D E L I N E S DO NOT DISCONNECT ANY OF THE POWER CABLES FROM ANY OF THE 6 FIXTURES WHEN THE BAR IS POWERED ON.
-
Page 8: Maintenance Guidelines
Regular inspections are recommended to insure proper function and extended life. There are no user serviceable parts inside these devices, please refer all other service issues to an authorized ADJ service technician. Should you need any spare parts, please order genuine parts from your local ADJ dealer. -
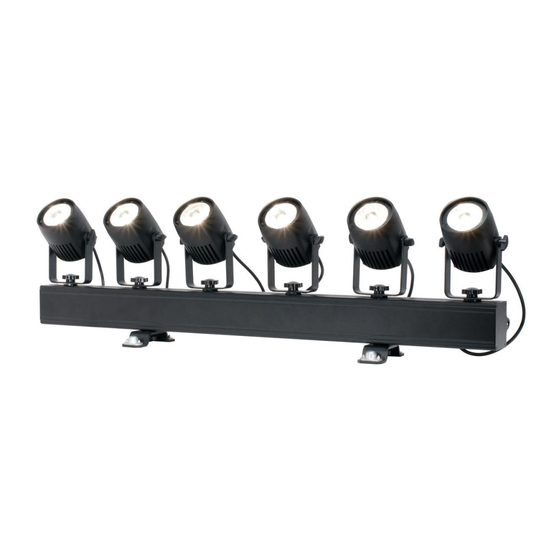
Page 9: Fixture Overview
O V E R V I E W FRONT Included items 1 – Saber Spot WW: 15W Warm White LED (x6) 2 – Frost Filter: 10° (x6) and 45° Filter (x6) 3 – Filter Retainer Ring: (x6) 4 – Omega Bracket: Top (x2) 5 –... - Page 10 O V E R V I E W REAR 12 – POWER IN 13 – POWER OUT 14 – DMX IN 15 – DMX OUT 16 – DMX IN 17 – DMX OUT 18 – FUSE: T2A/250V 19 – LED Display: Shows the various menus and the selected functions. MODE To select the programming functions To go backward in the selected functions...
-
Page 11: Dmx Setup
D M X S E T U P POWER SUPPLY The Saber Bar 6 contains an automatic voltage switch, which will auto sense the voltage when it is plugged into the power source. With this switch there is no need to worry about the correct power voltage, this unit can be plugged in anywhere. - Page 12 3 of a male XLR connector (DATA + and DATA -). This unit is inserted in the female XLR connector of the last unit in your daisy chain to terminate the line. Using a cable terminator (ADJ part number Z-DMX/T) will decrease the possibilities of erratic behavior.
-
Page 13: Installation Instructions
I N S T A L L A T I O N I N S T R U C T I O N S INSTALLATION This unit should be mounted using a mounting clamp (not provided), affixing it to the mounting bracket that is provided with the unit. -
Page 14: System Menu
S Y S T E M M E N U System Menu Supports Software Versions ≥ 1.01 Features are subject to change without any prior written notice Options/Values (Default Menu Sub Menu Description settings in BOLD) MENU Set ADDR 001 001-507 Address MENU... - Page 15 Last clear fixture running time (H) Password Clear 0: (Password = 050/060) Clear ON/OFF MENU TempInfo XXX C/F Info Err. Info None / Temp 1 ModelInf Saber Bar 6 1UV1.01 Software 2UV1.01 Dimmer/Dim Fine 000-255 MENU White1/White2/White3/ Manual White4/White5/White6/ 000-255 Strobe...
- Page 16 S Y S T E M M E N U LCD CONTROL PANEL LOCKOUT When Key Lock menu is set to ON, the LCD backlight will turn OFF after 30 seconds and the Control Panel will lock and the display will show LOCKED*****. Press and hold the MODE button for 5 seconds to unlock.
- Page 17 TempInfo: Displays the current temperature of the unit (Celsius or Fahrenheit). Err. Info: Displays any errors or high temperature. ModelInf: Displays the unit name (Saber Bar 6). Software: Current software version(s). MENU Manual: Adjust Dimmer or Dimmer Fine, White (1-6) values and Strobe.
-
Page 18: Dmx Channels / Values / Functions
D M X C H A N N E L S / V A L U E S / F U N C T I O N S Channel Modes Value Function 10Ch Head 1: 0-255 0~100% Head 2: 0-255 0~100% Head 3: 0-255... - Page 19 D M X C H A N N E L S / V A L U E S / F U N C T I O N S Channel Mode Value Function 10Ch Head 1: 0-255 0~100% Head 2: 0-255 0~100% Head 3: 0-255...
- Page 20 D M X C H A N N E L S / V A L U E S / F U N C T I O N S Channel Mode Value Function 12Ch Head 1: 0-255 0~100% 0-255 Head 1 Fine 16-bit Head 2: 0-255 0~100%...
- Page 21 D M X C H A N N E L S / V A L U E S / F U N C T I O N S Channel Channel Mode Value Function Mode Value Function 13Ch 13Ch Head 1: Auto programs: 0-255 0~100%...
-
Page 22: Dimmer Curve Chart
D I M M E R C U R V E C H A R T... -
Page 23: Remote Operating Instructions
The Dotz Par RF wireless remote has many different functions and allows you to control a variety of ADJ LED Pars from long distance. The remote can control your Saber Bar 6 up to 75 feet / 25 meters. To use the remote you must first activate the RFActive mode on the fixture. -
Page 24: Multiple Unit Power Linking
Multiple Unit Power Linking With this feature you can connect the fixtures to one another using the power cable input and output sockets. The maximum number of power linked units is 9 units @ 110V or 18 units @ 240V. NOTE: USE CAUTION WHEN POWER LINKING OTHER FIXTURES AS THE POWER CONSUMPTION OF OTHER MODEL FIXTURES MAY EXCEED THE MAX POWER OUTPUT ON THIS FIXTURE! CHECK SILK SCREEN FOR MAX AMPS. -
Page 25: Trouble Shooting Tips And Faq
• Confirm the AC power cord from the light is not damaged or cut. • Check the fuse and see if it needs to be replaced. • If none of these solutions work, please contact ADJ Customer Service. Unit does not respond to DMX: Check that the DMX cables are connected properly and are wired correctly (pin 3 is “hot”;... -
Page 26: Technical Specifications And Optional Accessories
Pro Series 3’ DMX cable with 5-pin male to 5-pin female connection.* S-Cable/60 Safety Cable with 60-pound weight rating O-CLAMP 360 degree clamp that wraps around truss tubing. PRO-CLAMP 360 degree aluminum clamp with a max rating of 1,100 lbs *Additional lengths available at www.adj.com... -
Page 27: Dimensions
D I M E N S I O N S 3.23” (82mm) 2.48” (63mm) 3.54” (90mm) 3.74” (95mm) 39.96” (1015mm)
Need help?
Do you have a question about the SABER BAR 6 and is the answer not in the manual?
Questions and answers