Table of Contents
Advertisement
Quick Links
IMPORTANT FOR FUTURE REFERENCE
Please complete this information and retain this manual
for the life of the equipment:
Model #: ___________________________
Serial #: ___________________________
Date Purchased: ____________________
Installation & Operation Manual
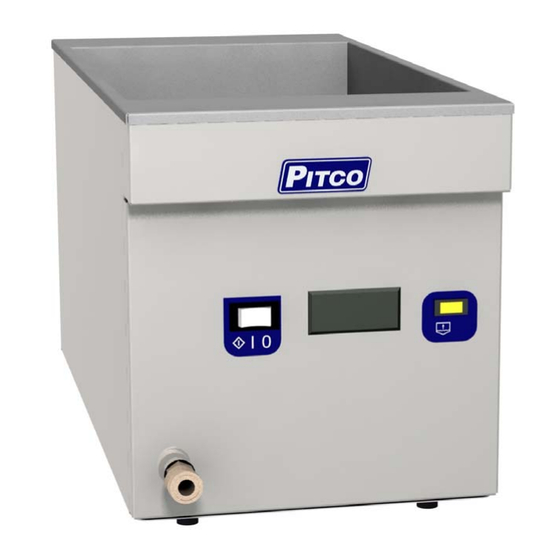
CRTE: Electric Counter Top Rethermalizer
U
L
C
U
R
L20-259, Rev 8 (04/15)
Advertisement
Table of Contents
Troubleshooting

Subscribe to Our Youtube Channel
Related Manuals for Pitco CRTE


Summary of Contents for Pitco CRTE
- Page 1 IMPORTANT FOR FUTURE REFERENCE Please complete this information and retain this manual for the life of the equipment: Model #: ___________________________ Serial #: ___________________________ Date Purchased: ____________________ Installation & Operation Manual CRTE: Electric Counter Top Rethermalizer L20-259, Rev 8 (04/15)
- Page 2 Pitco and/or its Authorized Service and Parts (ASAP) NOT turn the appliance on until the heating elements are fully companies, this warranty will be void. In addition, Pitco and covered with water at all times. Serious injury could result its affiliates will not be liable for any claims, damages or from hot steam vapors off the heating elements.
-
Page 3: Table Of Contents
INSTALLATION INSTALLATION ................... 2 1.1. CHECKING YOUR NEW APPLIANCE ..................2 1.2. INSTALLATION CLEARANCES ....................3 1.3. INSTALLATION TO COUNTER ..................... 3 1.4. DRAINAGE CONNECTIONS ......................3 1.5. ELECTRICAL CONNECTIONS ..................... -
Page 4: Installation
CRTE COUNTER TOP RETHERMAILZER 1. INSTALLATION 1.1. CHECKING YOUR NEW APPLIANCE Your new Pitco appliance has been carefully packed into one crate. Every effort has been made to ensure that it is delivered to you in perfect condition. As you unpack your new appliance, inspect each of the pieces for damage. -
Page 5: Installation Clearances
INSTALLATION 1.2. INSTALLATION CLEARANCES The clearances shown below are for combustible and non-combustible installations and will allow for safe and proper operation of your appliance. Combustible Construction Non Combustible Construction Inches (centimeters) Inches (centimeters) Back 6.0" (15.24cm) 0.0" (0.0cm) Sides 6.0"... -
Page 6: Electrical Connections
INSTALLATION CRTE COUNTER TOP RETHERMAILZER 1.5. ELECTRICAL CONNECTIONS It is advised that this power supply be plugged into a wall receptacle that is controlled by the ventilation control. This will prevent the appliance from being operated without the ventilator on. The power requirements for your appliance are listed below. - Page 7 INSTALLATION Available Power Cords # Description Standard Hubbell # Mates to 1 Twist Lock NEMA L6-30P HBL2621 HBL2620 2 Shrouded Twist Lock NEMA L6-30P HBL2621S HBL2626 3 Right Angle Straight Blade NEMA 6-30P HBL9331 HBL9330 4 Pin & Sleeve IEC 309-1 or HBL330P6W HBL330C6W or IEC 309-2...
-
Page 8: Ventilation And Fire Safety Systems
INSTALLATION CRTE COUNTER TOP RETHERMAILZER 1.6. VENTILATION AND FIRE SAFETY SYSTEMS Your new appliance must have proper ventilation to function safely and properly. It is very important to install a fire safety system. Your ventilation system should be designed to allow for easy cleaning. -
Page 9: Initial Cleaning
INSTALLATION 1.8. INITIAL CLEANING When your appliance is shipped, many of its parts are covered with a thin coat of oil for protection. Before the appliance is ready for cooking it must be cleaned. This will remove the oil coating and any foreign matter that may have accumulated during storage and shipment. -
Page 10: Operation
OPERATION CRTE COUNTER TOP RETHERMAILZER 2. OPERATION 2.1. FILLING THE APPLIANCE 2.1.1. FILLING THE COOKER TANK It is recommended that the cooker tank is filled with hot water. This will greatly decrease the time it takes for the appliance to reach operating temperature. Refer to the following procedure to fill the cook tank prior to operation. -
Page 11: Cooking
OPERATION 2.3. COOKING It is important to keep the cook tank full of water to minimize the chance of boiling the appliance dry and to keep the water at a level that will provide optimum cooking performance. To ensure the quality of the food you cook in this appliance, follow the preparation instructions from the food manufacturer. -
Page 12: Preventative Maintenance
PREVENTATIVE MAINTENANCE CRTE COUNTER TOP RETHERMAILZER 3. PREVENTATIVE MAINTENANCE 3.1. DAILY PREVENTATIVE MAINTENANCE Performing the preventative maintenance steps below on a daily basis will keep your equipment safe and at peak performance. WARNING The power supply must be disconnected 3.1.1. -
Page 13: Annual/Periodic Preventative Maintenance And Inspection
This section should ONLY be performed by a qualified service technician as part of a regular kitchen maintenance program. This inspection should take place a minimum of once a year by an Authorized Service Technician recommended by Pitco. WARNING The power supply must be disconnected before cleaning and servicing this appliance! 3.3.1. -
Page 14: Troubleshooting
TROUBLESHOOTING CRTE COUNTER TOP RETHERMAILZER 4. TROUBLESHOOTING 4.1. POWER FAILURE If electric power is removed for any reason, the appliance will shut down. To restart the appliance, follow the appliance start up procedure in section 2.2. CAUTION DO NOT attempt to operate this appliance during a power outage. -
Page 15: Troubleshooting Chart
TROUBLESHOOTING 4.4. TROUBLESHOOTING CHART Problem Probable Cause Corrective Action No power to appliance Check main building power supply Circuit breaker tripped Reset power supply Circuit Breaker Press the power switch to the start Position I/O swich in the O (off) position and release Control does not Power cord disconnected... -
Page 16: Programming Instructions
TROUBLESHOOTING CRTE COUNTER TOP RETHERMAILZER 4.6. PROGRAMMING INSTRUCTIONS L20-259, rev. 8 (04/15) - Page 17 TROUBLESHOOTING PROGRAMMING, Cont’d L20-259, rev. 8 (04/15)
- Page 18 TROUBLESHOOTING CRTE COUNTER TOP RETHERMAILZER THIS PAGE INTENTIONALLY LEFT BLANK L20-259, rev. 8 (04/15)
- Page 19 TROUBLESHOOTING THIS PAGE INTENTIONALLY LEFT BLANK L20-259, rev. 8 (04/15)
- Page 20 Pitco Frialator Authorized Service and Parts (603) 225-6684 World Wide representative (ASAP) covering your area, or Website Address: www.pitco.com contact Pitco at the numbers listed to the left. MAILING ADDRESS – P.O. BOX 501, CONCORD, NH 03302-0501 L20-259, Rev. 8 (04/15)
Need help?
Do you have a question about the CRTE and is the answer not in the manual?
Questions and answers