
Subscribe to Our Youtube Channel
Related Manuals for Kuzma XL AIR KIT


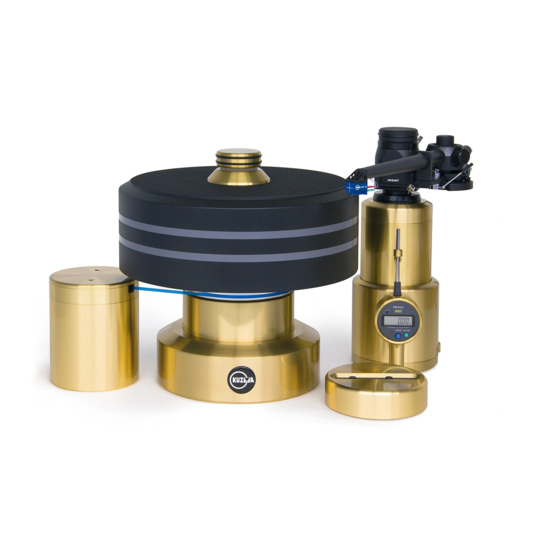
Summary of Contents for Kuzma XL AIR KIT
- Page 1 INSTRUCTION MANUAL KUZMA XL AIR KIT for STABI XL DC Turntable S/N:……..Air pressure:....2019-06...
-
Page 2: Table Of Contents
7.0. Troubleshooting 8.0. Transport 1.0.0.0. GENERAL: 1.1.0.0. PRODUCT REGISTRATION AND WARRANTY: Kuzma products have a non transferable 2 year limited warranty on parts and labour. 1.2.0.0. TECHNICAL DATA: Mass (total w/o PS and compressor) : 120 kg Bronze platter- lower... -
Page 3: Description
Fig. 1. XL AIR kit parts without compressor and silver filters 2.0.0.0. DESCRIPTION: The XL Air turntable uses an air bearing instead of a coventional bearing which allows improvement of two important parameters in turntable design. Air bearings have almost zero friction and thus no vibration in the bearing itself, so no noise reaches the cartridge. - Page 4 2.2.0.0. AIR PRESSURE SUPPLY: This consists of the compressor, silver filters and tubes. 2.2.1.0. Air pressure line NOTE: The air supply line is under high pressure 4-8 bar so do not disassemble any parts under pressure. Turn off the compressor and release pressure from the air supply line. Pressurised air flow comes from the compressor via the black PVC tube to the silver filters.
- Page 5 Locate the new upper base with air bearing (Fig. 4.) and position it over the lower base ( Fig. 5.). See that the air indicator is in the front position above the Kuzma label. Insert one screw at a time and fix them gently.
- Page 6 3.1.3.0. Base with fitted air bearing Position base back in the same position as was before. Fig. 6. Base with air bearing-for now ignore silver filters NOTE: Before you proceed further with motor tower or platters you need to set up the air supply first!
-
Page 7: Air Supply Set Up
Compressor Instruction Manual. (See label at the side of the cover!) NOTE: Everything is set and checked by Kuzma Ltd. The only item to be added is compressor’s oil and air intake filter. If the compressor is in an upright position, it can be moved safely. - Page 8 Fig. 8. Compressor parts- front Fig. 8.a. Compressor-rear Fig. 9. Oil filling from side of the compressor Fig. 10. Double PVC bottles At the rear of the compressor is a glass bubble which will show the correct level of oil, which is half the bubble.
- Page 9 4.2.0.0. SILVER FILTERS: NOTE: Keep the silver filters in an upright position. They might leak otherwise. NOTE: Keep valve closed between compressor and silver filters until pressure is raised in the compressor.Fig.13. NOTE: Keep valve closed between silver filters and turntable. NOTE: Open the same valve to put pressure into the silver filters.
- Page 10 4.4.1.0. Compressor Plug the compressor into the mains. The main switch is under the cover on the top. It has two positions. When the main switch is turned ON, pressure will start to build up (working time) and this will be shown on the pressure gauge on the left side of the compressor.
- Page 11 Fig. 14. Base with airbearing Fig. 15. Air pressure indicator...
-
Page 12: Platters
5.0.0.0. PLATTERS SET UP: 5.1.0.0. AIR BEARING SET UP: 5.1.1.0. Inserting the subplatter into the air bearing IMPORTANT: Do not assemble or operate air bearing without air pressure flow! NOTE: Before inserting the subplatter with shaft into the air bearing be sure that it is clean and that the indicator shows pressure at 3,5- 4 bar. - Page 13 5.2.0.0. MOTOR TOWER AND BELT: NOTE: If needed consult XL DC manual Fig. 18. Motor tower and belt fitted 5.2.1.0. Motor tower Position the motor tower back close to the base as before, no need to be precise yet (the actual distance from the centre the platter to the centre of the motor tower is 191 mm).
- Page 14 Fig. 19. Bronze platter Fig. 20. Top platter fitted on top of the bronze platter Place the bronze platter on a clean table (load will be 50 kg) with foam from box. Fig 19. This is best is done by 4 hands and 4 eyes. Then position the top platter above the bronze platter, center it above the lip while keeping it parallel.
-
Page 15: Platters
NOTE: You can close the valve at the turntable, only if the platter is not rotating at all! The compressor will go on standby. Every few hours or so air release noises can be heard and the compressor will switch on a few times per day when the compressor is resting in the standby position. -
Page 16: Maintenance
6.0.0.0. MAINTENANCE: 6.1.0.0. AIR SUPPLY: NOTE: If you go away for a long period of time, switch off the mains switch at compressor. NOTE: Check our web site at FAQ, regarding air supply issues for Air Line tonearm. 6.1.1.0. Compressor When air is consumed, the compressor works automatically i.e. -
Page 17: Troubleshooting
7.0.0.0. TROUBLESHOOTING: IMPORTANT: Do not assemble or operate air bearing without air pressure flow! 7.1.0.0. PLATTER NOT ROTATING: NOTE: check compressor and motor power supply. 7.1.1.0. Check pressure level at the base indicator or air flow. If no air pressure- check air supply. If yes, then try to rotate platter with hand. -
Page 18: Transport
Ensure that the sealing ring is correctly positioned. More info is in the compressor instruction manual. Use original packing and fit parts into appropriate slots. 8.2.3.0. Silver filters Air pressure must be OFF and then disconnect air tubes, Kuzma Ltd Hotemaze 17A SI-4205 PREDDVOR SLOVENIJA...
Need help?
Do you have a question about the XL AIR KIT and is the answer not in the manual?
Questions and answers