
Related Manuals for Kuzma 4POINT 9


Summary of Contents for Kuzma 4POINT 9
- Page 1 KUZMA 4POINT 9 TONEARM Serial Number: ….. Instruction manual 2019-09 KUZMA LTD INSTRUCTION MANUAL FOR 4POINT 9 tonearm...
-
Page 2: Table Of Contents
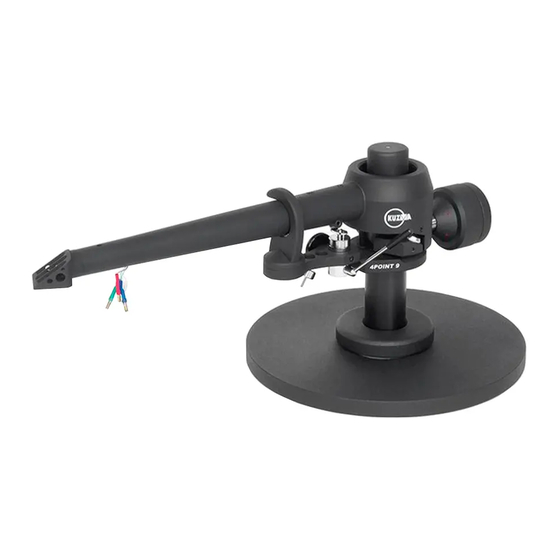
The 4POINT 9 tonearm is a very precisely engineered piece of equipment, however, the construction is robust and requires minimal maintenance for optimal performance. Fig. 1. General parts and features CONTENTS: Page General description Product registration and warranty extension 1. Technical data and unpacking 2. -
Page 3: General Description
General description The Kuzma 4Point 9 tonearm is similar in construction to the 4Point tonearm with the same 4 point bearing configuration. We made this tonearm shorter ( 9 inch) than the existing arm 4Point ( 11 inch) and lighter by omitting the VTA tower enabling 4Point tonearm quality to be experienced on a greater number of turntables with smaller footprint or lighter suspension, etc. -
Page 4: Technical Data And Unpacking
VTA adjustment: Azimuth adjustment: Bias adjustment: Detachable headshell: Cables: silver Arm mount: Kuzma arm base 212 mm Accessories: Allen key 1,5 mm bias, cueing device Allen screwdriver 1,5 mm Allen key 2,0 mm azimuth, headshell Allen T key 2,5 mm... -
Page 5: Basic Set Up
( Fig. 3&4) Due to the special bearing construction, there is only a limited arc in which the arm tube can travel in a horizontal way. Fig. 3. Kuzma arm base Fig. 4. Arm base on arm board Arm tower: Insert the arm tower into the arm base. - Page 6 Fig. 6. Arm tower-removing bearing protection foam Remove the fixing foam on the horizontal bearing assembly ( Fig. 6). Check that the bias thread is fixed and gently rotate the horizontal bearing assembly from one to another extreme. It is only possible to make approximately ¼...
-
Page 7: Setting Up The Tonearm
3. Setting up the tonearm: Remark: On our web site look for KAA 2016 download ( Kuzma Analogue Academy 2016) where you will find theoretical and practical information how to optimally set up tonearm and cartridge! Connecting tonearm: Check the horizontal movement of the tube to ensure that the headshell will reach the inner grooves (approximately to the edge of record label), but will not travel to the centre of the record due bearing construction. -
Page 8: Adjustment Of Tracking Force
Fig. 9d. Headshell’s fingerlift Fig. 9c. Removing headshell Balancing of the tonearm: Fix cartridge clips. Rotate the counterweight and aim for roughly zero balance. The tonearm's centre of gravity is chosen to be around the height of vertical rotation, therefore balancing the tonearm to zero is very difficult. -
Page 9: Adjustment Of Vta
Fig. 11. Pivot point 6. VTA adjustment ( height) Set up VTA on this tonearm by releasing the screw in arm base. The VTA screw will prevent the tonearm dropping down after the locking screw in the arm base is released. Fig. -
Page 10: Adjustment Of Azimuth
You might find that extreme VTA height cause problems with the cueing device height ( See Paragraph 9). In some extreme VTA situations the tube arm rest height can be readjusted. Release the tube lock screw and pull up arm rest. (Fig. 5&13) You will notice that below the arm rest is thin plastic plate. This can be either removed, thus lowering arm rest height, or another added to raise it. - Page 11 Fig.14b. Azimuth 0° Fig. 14c. Azimuth left Fig. 14d. Azimuth right...
-
Page 12: Adjustment Of Bias
8. Bias adjustment: The bias should be adjusted roughly according to the tracking force. Using Allen key 1.5 mm, unlock the screw on the bias weight and position it to the equivalent of gap X of your chosen tracking force. Lock the screw back, when in position. ( Fig. 15) 1.00 1.50 2.00... -
Page 13: Troubleshooting
- Headshell cannot be removed- check that the screw is adequately released with Allen key. (Fig. 10c) - Headshell identification: Different length 4Points use different headshells due to different offset angles. 4Point 9 is marked with 3 holes. (Fig. 17) Fig. 17. 4Point 9 headshell-3holes Kuzma Ltd... - Page 14 APPENDIX 1 Tangential Cartridge geometry adjustment Once the cartridge has been mounted, it is necessary to ensure that the cartridge is tangential to the record grooves in order to minimize tracking distortion during playing. As the cartridge moves in an arc across the record, tracking distortion occurs and is minimized by the tonearm geometry and the angle of the cartridge in the headshell.
-
Page 15: Technical Appendixes-Set Up Cartridge
6. Recheck alignment at position A and continue adjustment until line described in point 3 is achieved. 7. Alignment at zero point 121 mm (B): Reposition protractor and check alignment at position B. Fig. 15 Alignment at B 8. If the cantilever is not in alignment then rotate protractor until it is in alignment somewhere along the line “x-y”... - Page 16 11. Recheck alignment of the cantilever at zero point B. If cantilever is not aligned here, rotate protractor to find where on line “x- y” the cantilever is aligned again. (Fig.18&15) Fig. 18 Alongside line “X-Y” alignment at B If the stylus is still in front of zero point B on the line “x-y” as before, but nearer to point B, then again pull cartridge slightly forward for distance “S”...
- Page 17 Appendix 2 Fine Azimuth Adjustment This can be done using an oscilloscope and a test record or by using good records in a good system and listening to the sound. Cartridges with fine profiles (VDH, Microline etc.) are more sensitive to this adjustment.
- Page 18 Appendix 3 Fine bias adjustment 1. Set bias and tracking force as previously described and listen to mistracking on highly Modulated tracking bands on test record. On higher modulated bands mistracking can be heard as impure tones and there will be more overtones. (See instructions on test record) 2.
- Page 19 Cartridge Protractor ( Not in correct scale) Tonearm mounting protractor...
Need help?
Do you have a question about the 4POINT 9 and is the answer not in the manual?
Questions and answers