Table of Contents
Advertisement
Quick Links
Advertisement
Table of Contents

Related Manuals for Arturia mini v


Summary of Contents for Arturia mini v
- Page 1 USER’S MANUAL...
- Page 2 Houston Haynes Noritaka Ubukata Tom Healy Antoine Back Xavier Oudin Sound-designers: Jean-Michel Blanchet Clay Duncan Celmar Engel Mateo Lupo Chris Pittman Klaus Peter Rausch Klaus Schulze Scot Solida Noritaka Ubukata Katsunori Ujiie Thomas Koot ARTURIA – Mini V – User’s Manual...
- Page 3 Information contained in this manual is subject to change without notice and does not represent a commitment on the part of Arturia. The software described in this manual is provided under the terms of a license agreement or non- disclosure agreement. The software license agreement specifies the terms and conditions for its lawful use. No part of this manual may be produced or transmitted in any form or by any purpose other than purchaser’s personal use,...
-
Page 4: Table Of Contents
HE FILTER AND ITS ENVELOPE ......................48 HE OUTPUT VOLUME AND ITS ENVELOPE ..................... 49 HE POLYPHONIC MODE THE PLAYING MODES ......................50 HE PITCH BEND AND MODULATION WHEELS ............................51 OTION ECORDER ARTURIA – Mini V – USER’S MANUAL... - Page 5 Rescan the plug-in directory in Cubase ......................81 8.7.3 Saving of presets ............................81 (RTAS) ..........................81 SING IN OOLS 8.8.1 Opening of the plug-in ..........................81 8.8.2 Saving the presets ............................82 8.8.3 Automation under Pro Tools ......................... 82 ARTURIA – Mini V – USER’S MANUAL...
- Page 6 OS X (AU)........................83 SING IN OGIC 8.10 VST) ......................83 SING IN BLETON MINI V END USER LICENSE AGREEMENT ....................85 ARTURIA – Mini V – USER’S MANUAL...
-
Page 7: From The First Bob Moog's Synthesizers Up To Tae
“Switched-On Bach” by W. Carlos. This album, where classical music is played on a synthesizer of the brand, sold over one million copies and won 3 Grammy awards. ARTURIA – Mini V – USER’S MANUAL... - Page 8 4 prototypes, before leading to the commercial model. More than 12,000 units were sold until 1981. They were quite far from the 10 modular units per month that the company produced in the late 60’s. ARTURIA – Mini V – USER’S MANUAL...
- Page 9 *: In 2003, Arturia has released a software emulation of the famous modular synthesizers designed by Bob Moog under the name of Modular V. Bob Moog’s synthesizers sales figures - 1967-1971 Courtesy of Roger Luther, MoogArchives.com The very first prototype was called Model A. Three other versions, B, C and D, followed. This last model is the final and most common incarnation of this synthesizer and the only one that was put into production in large numbers.
- Page 10 1971 monosynth. With the arrival of computer music technologies, it has been very often mimicked as a virtual instrument, with little success. Arturia Mini V is the latest avatar, and thanks to the TAE ...
-
Page 11: A Better Emulation Thanks To Tae
- standing for True Analog Emulation - is a new technology dedicated to the digital reproduction of analog circuits. When implemented in software code, TAE ® algorithms guaranty the respect of hardware specifications. This is why the Mini V offers an unparalleled quality of sound. In detail, TAE ® means: 1.2.1 Aliasing-free oscillators: Standard digital synthesizers produce aliasing in high frequencies, and also when using Pulse Width Modulation or FM. - Page 12 Temporal representation of a waveform on a 1971 monosynth Temporal representation of the waveform from a common emulation Temporal representation of the Mini V waveform thanks to TAE ® In addition, original analog oscillators were unstable. Actually, their wave shape was always slightly different from one period to another.
-
Page 13: Better Reproduction Of Analog Filters
Standard 24dB digital low-pass resonant filter from typical software synthesizer Very selective 24dB resonance filter of the original model TAE made resonance filter: first 24dB resonant filter to be that selective Comparative response filters ARTURIA – Mini V – USER’S MANUAL... -
Page 14: Implementation Of The Soft Clipping
It also allows filters to enter self-oscillation like original hardware synthesizers do. Current limiting emulation Low-pass resonant filter Input Output -0,5 -1,5 Soft-clipping transfer function ARTURIA – Mini V – USER’S MANUAL... -
Page 15: Activation & First Start
ACTIVATION & FIRST START Mini V works on computers equipped with Windows 7 or 8 and Mac OS X 10.7 or later. You can use the stand-alone version or use Mini V as an Audio Units, AAX, VST2 or VST3 instrument. -
Page 16: Using The Presets
To get to know a few of the different sounds contained in the Mini V, we will select a simple bass preset. To do this, click on button aside the “BANK” LCD display (this display shows the name of the current bank in use). -
Page 17: Modifying This Preset
Select the preset JMB_Classic1 The Mini V comes with 400 presets, which will familiarize you with the sounds of the synthesizer. A bank called “Templates” offers a selection of presets with a basic configuration (or template) to start programming a sound. -
Page 18: The Playing Modes
“new sub bank…” and “new preset…” appear in their respective menu locations. Click on each of them to change the names. Saving a preset 3.2 T HE PLAYING MODES The Mini V offers 2 playing modes: ARTURIA – Mini V – USER’S MANUAL... - Page 19 To access the “Extended” mode, click on the wooden crosspiece situated above the synthesis settings or on the “Open” button on the right of the toolbar. To return to the “Classic” mode, simply click again on the wooden crosspiece or on the “Close” button. ARTURIA – Mini V – USER’S MANUAL...
-
Page 20: Overview Of The "Classic " Mode
Opening the extension panel To use the Mini V exactly like the original model, you must also deactivate the chorus and delay effects on the toolbar and switch off the polyphony toggle in the output section. 3.3 O “C ”... -
Page 21: The "Extended Mode
XTENDED MODE When the Mini V is at the “Extended” position, you access an extension panel to the parameters of synthesis. It is displayed in the form of a modulation matrix, a Low Frequency Oscillator (LFO) which was brought in be substituted for oscillator 3 which was being used to this effect. -
Page 22: The Lfo
Between the LCD displays can be found the “Amount” knob. You can set the modulation level by applying positive (turn to the right) or negative (turn to the left) values. For this example, take a value of 0.0480. ARTURIA – Mini V – USER’S MANUAL... -
Page 23: The Arpeggiator Section
The Chorus effect enables to double and slightly detune your sound in order to make it deeper and livelier. 3 types of stereo chorus are available. Activate the “ON/OFF” button for Chorus, on the right side of the menu bar. ARTURIA – Mini V – USER’S MANUAL... -
Page 24: The Delay
MIDI HE REAL TIME CONTROLLERS AND ASSIGN Mini V has been improved in order to provide easier access to MIDI assignment, possibility to save and select multiple configurations. A default configuration matching Arturia Analog Experience keyboards is loaded at startup. - Page 25 Click button Learn and select LEARN entry to switch off Learn mode. Click button Learn and select Save As to save your configuration Save As popup ARTURIA – Mini V – USER’S MANUAL...
- Page 26 Now you can find and quickly reload your newly created configuration in Learn menu “Learn” menu, recall newly created configuration ARTURIA – Mini V – USER’S MANUAL...
-
Page 27: The Interface
Each sub-bank contains within itself a certain number of presets. The Mini V is shipped with several “factory” banks. But it is possible to create new “user” banks of sounds, each containing a number of sub-banks and presets. For security, the “factory”... - Page 28 This function is particularly useful to quickly see all of the presets of the same type. Choice of preset regardless of bank ARTURIA – Mini V – USER’S MANUAL...
-
Page 29: Creation Of A Bank, Sub-Bank, Preset
4.1.4 Import/ Export of a bank of presets It is possible to import new banks of presets conceived for the Mini V. To import a new bank of presets, click on the preset bank import button on the tool bar: Preset bank import button on the tool bar ARTURIA –... -
Page 30: The Sound Map
“Open”. The new bank of presets will automatically appear among the available banks. The Mini V equally offers the possibility to export your own sounds to save them, to use them on another machine, or to make them available to other users. - Page 31 The Presets list: this page offers a more classical interface to classify the presets using lists and filters to find the desired sound. The List interface The Morphing interface (COMPASS): this page allows creating new sounds in real time thanks to a morphing result between 4 presets. ARTURIA – Mini V – USER’S MANUAL...
-
Page 32: Opening The Sound Map
4.2.1 Opening the sound map To open the main Sound Map interface, click on the “SOUND MAP” button located on the tool bar. A new window appears over the Mini V main interface. Open the main Sound Map interface ... -
Page 33: The Sound Map Interfaces
4.2.2 The sound map interfaces 4.2.2.1 The sound map main interface The sound map interface shows a map where are shared out all the presets of the Mini V organized for their types of sound and their own audio characteristics. -
Page 34: The Sound Map Overview
When you release the left mouse button, you can play the resulted sound and, if you wish, you can save it on a User bank of the Mini V memory. By this way it is very easy to quickly get some new and exiting sounds without programming anything on the synthesizer interface. -
Page 35: The Instrument Type Filter Window
On the right of the map main interface, an instrument type filter window allows you to choose which type of preset you want to see (or to hide) on the map. By default, all types of presets are selected. The instrument type filter ARTURIA – Mini V – USER’S MANUAL... -
Page 36: Preset Snap Shot Memories
The “Morphing” page is an independent module allowing you to quickly create some new sounds thanks to a real time morphing from the four selected presets saved on the snap memories. The four presets are placed on the four cardinal points of the compass. ARTURIA – Mini V – USER’S MANUAL... - Page 37 Hold the left button of your mouse and drag the convergence point until having the good sound. The green arrow shows you the starting point of your motion. ARTURIA – Mini V – USER’S MANUAL...
-
Page 38: The List Preset Manager
Create a new sound If you wish, you can save it on a User bank of the Mini V memory. 4.2.2.6 The list preset manager The list preset manager offers a more classical way to explore the presets using a list interface in which the Presets are classified and filtered in order to simplify preset management. -
Page 39: Use Of Controllers
, for example, this choice can be found via the “Edit/Preferences” menu, and is found in the “General” tab of the window. 4.3.2 Switches The Mini V has several types of switches. Simply click on these switches to change their state. Switches 4.3.3 Pitch Bend wheel... -
Page 40: Virtual Keyboard
4.3.5 MIDI control Most of the knobs, sliders and switches on the Mini V can be manipulated with external MIDI controllers. Before anything else, make sure that the MIDI device that you wish to use is correctly connected to the computer, and that the sequencer or the Mini V application is correctly configured to receive MIDI events coming from the device. -
Page 41: Manage Configurations
Support for NRPN In addition to MIDI Control Change messages, NRPNs are now supported: either send NRPN MIDI control messages to Mini V, or check NRPN, then select LSB# and MSB# numbers: MIDI assignment popup, NRPN activated ... -
Page 42: Minimum And Maximum Bounds
Tweak control to assign it (optionally setup minimum and maximum) Select a second parameter And tweak the same control Deactivate “Learn” mode Tweaking assigned control should modify both parameters with regards to assignment setup (Min, Max). ARTURIA – Mini V – USER’S MANUAL... -
Page 43: Tricks
Oscillator 2 and 3 tune control 2 parameters: FINE and COARSE. If “Learn” mode is ON, clicking on control provide access to assignment of FINE parameter, shift+clicking on control provides access to assignment of COARSE parameter. ARTURIA – Mini V – USER’S MANUAL... -
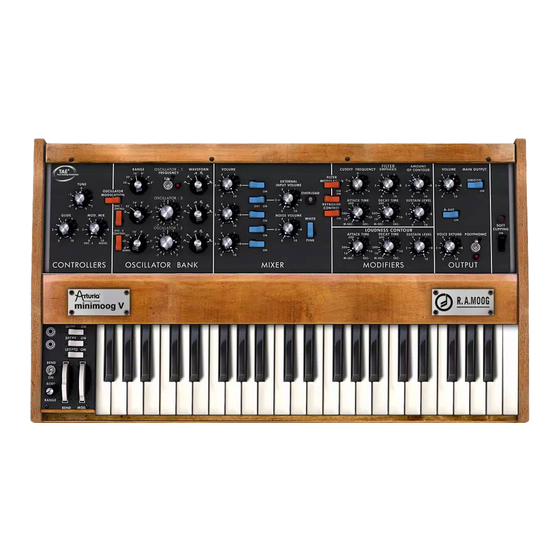
Page 44: The Synthesizer
Oscillators, Mixer, Filter and Envelopes. View of the Mini V in “Classic” mode By clicking on the “Open” button of the toolbar or the upper wooden bar, the Mini V will open and reveal the extension panel. The effects, an arpeggiator and a modulation matrix are contained here. -
Page 45: The Oscillators
View of the Mini V in “Extended” mode 5.1 T HE OSCILLATORS The Mini V has three independent oscillators which can be found in the “Oscillator Bank” section in the synthesis panel. Oscillators Each of these oscillators can produce different waveforms which are selected using the knob on the right. -
Page 46: The Mixer
The level of the three oscillators is set with each of the “Volume” knobs, the external signal level with the “External Input Volume” knob, the noise level with the “Noise Volume” knob. The five vertically aligned switches allow the quick ARTURIA – Mini V – USER’S MANUAL... -
Page 47: The Filter And Its Envelope
The switch corresponding to the external signal has three positions. The first disconnects this input from the mixer. The second position connects the output of the Mini V to the mixer. This allows, thanks to the particular distortion brought by the overload circuit, to obtain a typical sound. -
Page 48: The Output Volume And Its Envelope
5.4 T HE OUTPUT VOLUME AND ITS ENVELOPE The output level of the Mini V is managed by a voltage controlled amplifier (VCA) where the setting changes are made with the “Volume” knob in the “Output” group of the synthesis panel. -
Page 49: He Polyphonic Mode The Playing Modes
The “Polyphonic” switch: activates or deactivates the polyphonic playing mode. When deactivated, the Mini V is in monophonic mode. When more than one note is played on the keyboard, the note that will be heard depends on the mode of playing selected in the “playing mode”... -
Page 50: The Pitch Bend And Modulation Wheels
We can thus, through the modulation matrix, use the bend wheel to modify a parameter of synthesis, without modifying the frequency of the oscillator. The “RANGE” potentiometer sets the amplitude of the bend wheel, more or less four octaves per semi-tone. ARTURIA – Mini V – USER’S MANUAL... -
Page 51: The Motion Recorder
“OFF” option in the automation track. The motion automation curves are re-trigged each time a note will be played. Finally, they can be equivalent to “super envelopes” that are drawn by the user! ARTURIA – Mini V – USER’S MANUAL... -
Page 52: Recording A Parameter Motion Curve In Real Time
Activate the live recording mode by clicking on the “ ” button, situated on the Mini V tool bar. (This button is now highlighted). Play a note on your MIDI keyboard and hold it during the recording time. The recording is now starting. -
Page 53: Setting The Modulation Amount Of A Motion Curve
Mod.Wheel ....Amount of internal modulations only (oscillator and filter) VCA AM ....VCA output level LFO FM ....LFO speed LFO AM ....LFO amplitude Noise AM ....Output level of noise generator (available in the Mixer) ARTURIA – Mini V – USER’S MANUAL... -
Page 54: Editing A Motion Curve
5.7.8.1 The Edit tools Drawing tool ... Tool for drawing a freehand curve. Eraser tool ....Tool for erasing an existing curve. Line tool ....Tool for drawing a straight line. ARTURIA – Mini V – USER’S MANUAL... -
Page 55: The Curve Editor Screen
THE VOCAL FILTER The Vocal Filter is a formant filter which can be applied to the output signal of the Mini V or to an external audio signal. The main interface of the Vocal filter, located on the central TV style screen, shows an ensemble of five vowels (A, E, I, O and U). - Page 56 From left to right: Gain ...... Sets the balance between the dry signal coming from the Mini V (or from an external audio source) and the vocal filter signal. Q ......Sets the band width of the 5 band pass filters of the Vocal Filter.
-
Page 57: The Low Frequency Generator
5.9 T HE LOW FREQUENCY GENERATOR The Mini V brings a new module which allows the generation of a very low frequency to modulate any off the synthesis parameters. It is situated in the extension panel which appears the Mini V is in open position. -
Page 58: The Arpeggiator
Off ......No destination of modulation 5.11 HE ARPEGGIATOR Situated in the Mini V extension panel which appears when in “Extended” mode, the arpeggiator allows for each note the activation of an arpeggio. Arpeggiator The “Speed” knob sets the speed of the arpeggio. -
Page 59: The Chorus And Stereo Delay
5.12 HE CHORUS AND STEREO DELAY In the Mini V extension panel which appears when it is in open position, we find two effects, chorus and stereo delay. Chorus and stereo delay The chorus has three knobs: “Rate” “Depth” and “Dry/Wet” which respectively set the speed, the depth and the relationship between the original signal and the modified signal. -
Page 60: The Basics Of Subtractive Synthesis
Secondly, the detune setting (“FREQUENCY”) lets you tune the oscillator more precisely. On the Mini V, the ”RANGE” and “FREQUENCY” buttons are placed in the “OSCILLATOR BANK” panel. The waveform, which determines the harmonic richness of the audio signal. On... -
Page 61: Triangle
The saw tooth presents the richest audio signal of the 4 waveforms (it contains all of the harmonics at decreasing volume levels in high frequencies). Its sound is ideal for brass sounds, percussive bass sounds or rich accompaniments. Time and spectral representations of the sawtooth waveform ARTURIA – Mini V – USER’S MANUAL... -
Page 62: Square
LFO). This pulse width variation translates to a spectrum modification, resembling a waveform change. Unlike classic analog synthesizers, the Mini V lets you change the impulse width not only for the square waveform but also for the triangle. This brings a large number of additional sound possibilities to compliment the base signal. -
Page 63: Frequency Modulation
On the Mini V, if you turn the modulation rate ring, you will obtain a sound richer in harmonics. If you introduce a square or sawtooth signal, the result can be quickly distorted…... -
Page 64: The Mixer
On the Mini V, you will find the noise generator amongst the settings in the mixer panel. A switch allows you to choose between the white and the pink noise. -
Page 65: The Resonance
(below the cut-off frequency) or reduced (above the cut- off frequency). On the Mini V, you can increase the rate of resonance through the “emphasis” knob. When you increase the resonance, the filter becomes more selective, the cut-off frequency is amplified, and the sound begins to “whistle”. -
Page 66: Other Modules
The key position provides a control voltage that tells the oscillator what pitch level to play when the gate opens. If you don’t have a MIDI keyboard, you can also play on the virtual keyboard of the Mini V to audition sounds while editing voices on your computer. -
Page 67: The Low Frequency Oscillator
The Release is the time that the sound will take to fade once the key has been released. The two envelopes of the Mini V (Contour) contain only 3 parameters: Attack, Decay and Sustain. You can get the Release thanks to the “Decay” button located on top of the modulation wheels. The release time is thus identical to the decay time of the envelope. - Page 68 A complete Mini V synthesis voice ARTURIA – Mini V – USER’S MANUAL...
-
Page 69: Few Elements In Sound Design
To begin we will see how to program a bass sound. As we saw in chapter 3 (Quick Start), the Mini V uses 3 oscillators. We will only use the first for this example. It will be composed of: ... - Page 70 Increase the decay time for the filter envelope (“Decay”) to a value somewhere around 400ms so that the cut-off frequency progressively decays when you press a key. You will thus obtain a simple yet efficient bass sound. ARTURIA – Mini V – USER’S MANUAL...
-
Page 71: A 3 Oscillators Lead Sound
Here is how, in a few seconds, to transform a simple base sound into the kind of powerful lead preset that made the 1971 Bob Moog’s monosynth so famous. Save the preset with the “Save As” button in the toolbar. ARTURIA – Mini V – USER’S MANUAL... -
Page 72: A Polyphonic Accompaniment
7.1.3 A polyphonic accompaniment Unlike the original synthesizer which offered just a monophonic playing (one note at a time), the Mini V allows you to play chords with the “Polyphonic” playing mode located in the “Output” module on the right of the synthesizer. -
Page 73: The Modulation Matrix
You will obtain a rich accompaniment sound. 7.2 T HE MODULATION MATRIX We will discover a few of the many additions to the Mini V: the modulation matrix, the LFO and the velocity. For this, let’s again use the preset “Tp_EG_Ampl_Long” in the “Templates” bank, sub-bank “Temp_Synth”. - Page 74 Lower the tuning to –48 ( -4 octaves) by turning the central knob to the left with a right click on the mouse. This oscillator will not produce audible sound (if only light ARTURIA – Mini V – USER’S MANUAL...
-
Page 75: Using The Arpeggiator
It is now possible to simultaneously play (or record) a bass part on the first octave of your keyboard, accompaniments on the 2 following octaves all while having an arpeggio which develops on the latter two. 7.3 T HE EFFECTS OF THE ARTURIA – Mini V – USER’S MANUAL... -
Page 76: The Stereo Chorus
The Mini V offers two additional effects letting you add another color and more space to your sound. The Chorus and Delay effects 7.3.1 The stereo chorus For this example, take the sound of the accompaniments from the previous paragraph 8.1.3. -
Page 77: The Stereo Delay
These different examples, as you will have noticed, presented different levels of difficulty. We hope that they will have allowed you to see a few of the possibilities offered by the Mini V. But don’t hesitate to try your own settings, this is the best way to progress and have more originality. -
Page 78: Modes Of Operation
8.1.1 Launch the application To launch the Mini V application, on Windows, go to the menu Start > Programs > Arturia > Mini V, and choose “Mini V”. on Macintosh, open the finder > Applications > Arturia and double-click on the Mini V application icon. -
Page 79: Vst 2
Pro, Mainstage, Ardour, Ableton Live, REAPER and Digital Performer. 8.6 64 BIT COMPATIBILITY Mini V is optimized for both 32-bit and 64-bit modes. If you have a 64-bit operating system and a 64-bit digital audio workstation, you should use 64-bit version of the plug-in (for Windows). -
Page 80: Use In Cubase /Nuendo (Vst)
UENDO 8.7.1 Instrument use in VST mode The opening of a Mini V VST plug-in is the same as opening all other VST plug-ins. Please consult the instruction manual of your host sequencer for more specific information. Under Cubase/Nuendo, create a new “Instrument” track, and choose Mini V in the rack. -
Page 81: Rescan The Plug-In Directory In Cubase
8.7.2 Rescan the plug-in directory in Cubase If the Mini V does not appear in the list of VST plug-ins, you can perform a “rescan” of the plug-in directory. 8.7.3 Saving of presets When the session/project is saved, Mini V is saved in its last mode of operation, with all modifications intact. -
Page 82: Saving The Presets
8.8.2 Saving the presets When the session is saved, the status of Mini V is saved as it is, even if its programming does not correspond to the preset. For example, if you are working on a preset “P1” in which you have modified the parameters (without saving them in the plug-in itself), the next time you open the session, Mini V will load the “P1”... - Page 83 “AU Instruments > Arturia > Mini V > Stereo”. 8.10 U VST) SING IN BLETON From the plug-ins tab, simply double click on the Mini V VST or AU icon, or drag-and-drop the plug-in into a MIDI track: ARTURIA – Mini V – USER’S MANUAL...
- Page 84 If necessary, you can perform a rescan of the plug-in directory in the Preferences, “File Folder” tab: press the “Scan” button, or press “Scan” while holding the [Alt] key for a full rescan. ARTURIA – Mini V – USER’S MANUAL...
- Page 85 The Licensee must register the Product to Arturia to get access to client support, and to activate his Product. (An internet connection is required to register and activate the Product, either on the computer on which the Product is installed, either on another device able to exchange files with the computer on which the Product is installed).
- Page 86 The Licensee must register the Product to Arturia to get access to client support, and to activate his Product. (An internet connection is required to register and activate the Product, either on the computer on which the Product is installed, either on another device able to exchange files with the computer on which the Product is installed).
- Page 87 Privacy Policy at www.arturia.com/privacy. 7. Limited Warranty Arturia warrants that the physical media on which the software is provided is free from defects in materials and workmanship under normal use for a period of thirty (30) days from the date of purchase. The Licensee’s invoice shall be evidence of the date of purchase.
Need help?
Do you have a question about the mini v and is the answer not in the manual?
Questions and answers