Table of Contents
Advertisement
Advertisement
Table of Contents

Subscribe to Our Youtube Channel
Related Manuals for LONGER LK2


Summary of Contents for LONGER LK2
-
Page 2: Table Of Contents
目录 A. Product information........................3 (1) Model parameter........................3 (2) Machine introduction......................4 (3) Nozzle module exploded view....................4 (4) Machine assembly......................... 5 1. Gantry installation......................6 2. X-axis installation......................7 3. Mounting the x-axis beam.................... 10 4. Install the gantry upper beam..................10 5. Mounting screw......................10 6.Install Teflon tube......................11 7.Install the z-axis limit switch.................. - Page 3 Safety Precautions 1) The temperature of the nozzle parts can reach 250 °C during the operation of the machine. To ensure your safety, it is forbidden to touch the model and nozzle directly with your hand while the printer is printing or cooling.
- Page 4 The front end of the consumable should be fixed on the tray to avoid consumables and affect the next print. To use this printer, it is recommended to use the supplies provided by the company. At present, the quality of consumables sold in the retail market is uneven, and printing is prone to breakage.
-
Page 5: Product Information
A.Product information (1) Model parameter 402*382*655mm Model Machine size Material Aluminum alloy Consumable color Multi-color optional Printing Technology Package dimensions 467*412*187mm 8.6kg Extruder Packaging Weight Build Volume 220*220*250mm Power requirement Output 24V Layer thickness 0.1-0.4mm operating system Windows,Linux,MAC USB Cable of TF English Connection Interface language... -
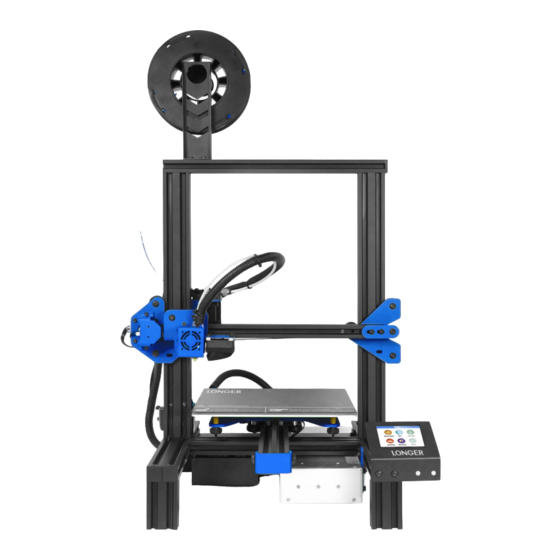
Page 6: Machine Introduction
(2) Machine introduction Rack Gantry Extruder module Nozzle module Hot bed Motherboard Foot power supply (3) Nozzle module exploded view 4010 fan Air guide Quick pneumatic joint 3010 fan Heat sink Sheet metal protective case Heating block Heater nozzle Thermistor... -
Page 7: Machine Assembly
(4) Machine assembly Upper packaging Lower packaging Assembled... -
Page 8: Gantry Installation
1. Gantry installation Two blue boxes in the picture, need to be in one direction The screw used is M5*20... -
Page 9: X-Axis Installation
2. X-axis installation Screws are all M4*16 If the nozzle block wheel cannot enter, use a wrench to adjust the eccentric nut. - Page 10 Box side up...
- Page 11 The tension of the belt can be adjusted by the two screws on the box...
-
Page 12: Mounting The X-Axis Beam
3. Mounting the x-axis beam If the wheel does not fit in, you can adjust the wheel with the eccentric nuts on both sides. Let the X-axis beam enter 4. Install the gantry upper beam Use 4 M5*20 5. Mounting screw Use 2 M4*16... -
Page 13: Install Teflon Tube
Let the lead screw snap into the coupling and the motor shaft is also aligned with the lead screw. Tighten the top wire Adjust screw movement adjusting these two screws. The two screws cannot be tightened too tightly. Turn the coupling by hand to adjust the movement of the lead screw. -
Page 14: Install The Z-Axis Limit Switch
7.Install the z-axis limit switch Z-axis limit opening installation is about 15mm from the base (this is adjustable) 8.Mounting aluminum substrate... -
Page 15: Wiring
9. Wiring 1. X motor line 2. X limit switch line 3. E-axis motor line 4. E-axis break detection 5. Z-axis motor line 6.Z-axis limit switch 10. Screen wiring... - Page 16 Next to the z-axis motor profile Next to the power profile The cable tie can't be too tight...
-
Page 17: Mounting Rack And Glass
11.Mounting rack and glass 12 .Assembly completed... -
Page 18: 5) Power Regulation
(5) Power regulation If the access voltage is 220V, please adjust the power supply in the control box to 220V, please be sure to confirm before powering on. Otherwise it will burn the power If the access voltage is 110V, please adjust the power supply control box to 110V, please... -
Page 19: 6)Leveling Method
(6)leveling method You can manually click the XY zero and Z zero in the Movement interface, then unlock, manually move the hot bed and the nozzle, and then adjust the leveling nut so that the distance from the nozzle to the hot bed is about one A4 paper thickness.。... -
Page 20: B. Machine Operation
B. Machine operation (1)Machine control ±X.±Y.±Z ( 正负移动) Nozzle temperature printing speed Discharge flow distance 暂停打印 Hotbed temperature speed of fan more return... -
Page 21: 2)Main Interface
Click on the file to enter More Refresh Return Save Page flip Recovery Power failure recovery 返回 (2)Main interface Controls the movement of Open the print file Controls the temperature and print interface. coordinates, whether the of the nozzle and the motor is locked, the moving heating platform,... -
Page 22: C. Cura Installation And Operation Software
C. Cura installation and operation software... -
Page 25: 1)Slice Software Offline Printing Instructions
(1)Slice software offline printing instructions... -
Page 28: 2)Software Parameter Setting
(2)Software parameter setting... - Page 29 Layer thickness:0.1~0.4mm available. 0.1mm high precision but long printing time, 0.4mm low precision but printing time is too short, in general select 0.2mm. Shell thickness: 0.4mm is very thin, in general select 1.2mm,that will increase printing time. Enable retraction: To prevent the wire from leaking when printing quickly, otherwise it will affect the appearance.
- Page 30 Nozzle size: 0.4mm. Retraction Speed: The speed of retraction when printing. Retraction distance: The length of material retraction, generally select 4.5~8mm. Initial layer thickness: The first layer thickness of printing. Select default option. Initial layer line width: 100% will be thicker and denser, Select default option. Cut off object bottom: The length of cutting off the bottom of model.
-
Page 31: D. Operation For Online Printing
D. Operation for online printing 1. Power on the printer, connect USB to a computer, the driver will be installed automatically. If it doesn't install automatically, find the driver under the driver folder and install it manually. - Page 32 2. Ctrl + "," opens the "Preferences" dialog. 3. Click on the menu "Model" "" Model Settings" to open Select the corresponding serial port (different computer serial ports may be different, generally choose the larger one), the baud rate is "AUTO", click "OK". Status shows that the connection has been...
- Page 33 2.After loading a file, click the status icon above or "Ctrl+P" to start printing, and the print window will pop up. We can click on the gray circle on the window to control the motion of the XYZE axis, respectively, 0.1, 10, 100 means the amount of each movement. The G-code control can be entered in the lower right corner text box.
-
Page 34: E. Resume Printing And Filament Run-Out Detection
E . Resume printing and filament run-out detection (1)Power outage recovery When printing for a period of time and the height of the print exceeds 0.5mm, the power-off icon will be displayed. At this time, the power is turned back on, and the icon can be clicked. -
Page 35: 2)Filament Run-Out Detection
(2)Filament run-out detection At this point, pull the Teflon tube out of the extruder end, remove the material, refill the consumables to the nozzle, and click the Recovery button to resume printing. -
Page 36: F. Faq
F. FAQ Question1: How to update the firmware? 1. Copy these two files to the SD card 2. Then restart the machine and wait for the machine progress bar to complete before the firmware is refreshed. 3. Then the user needs to delete the two files in the SD card to be used normally, otherwise the firmware will be refreshed every time the phone is turned on... -
Page 37: Question 3: When The Machine Returns The Filament, It Can't Be Returned. What Should I Do When Stuck In The Pneumatic Joint
Question 3: When the machine returns the filament, it can't be returned. What should I do when stuck in the pneumatic joint? 1. Before returning the material, please heat the nozzle first, and then withdraw the consumables as soon as possible. If you can't pump it, you can re-feed the material with the advanced material, and melt the extruded block formed at... -
Page 38: Adjusted To The Extreme Position, It Still Cannot Be Leveled. What Should I Do
Question 5: When the machine is leveling, the nozzle moves to the left, it can be leveled normally. When the nozzle moves to the right, it is found that the distance between the nozzle and the heated bed are very far or very close. If the spring is adjusted to the extreme position, it still cannot be leveled. - Page 39 Question 6:After the machine heats up, the filament is discharged normally. However, when the printing is performed for the first time, the curling occurs on the platform. After printing several layers, the filaments get out of the platform. What should I do? 1.
Need help?
Do you have a question about the LK2 and is the answer not in the manual?
Questions and answers