Table of Contents
Advertisement
LONGER LK4 X 3D Printer User Manual V1.0
Thank you for choosing our products.
Please read this manual carefully before use for more detailed operation
Welcome to join our FB Group to share: Longer 3D Official Group
Please feel free to email us support@longer3d.com with any questions
*Copyright © Shenzhen Longer 3D Technology Co., Ltd. All Rights Reserved
www.longer3d.com
I
support@longer3d.com
Advertisement
Table of Contents

Subscribe to Our Youtube Channel
Related Manuals for LONGER LK4 X


Summary of Contents for LONGER LK4 X
- Page 1 Thank you for choosing our products. Please read this manual carefully before use for more detailed operation Welcome to join our FB Group to share: Longer 3D Official Group Please feel free to email us support@longer3d.com with any questions *Copyright © Shenzhen Longer 3D Technology Co., Ltd. All Rights Reserved www.longer3d.com...
-
Page 2: Table Of Contents
3.8. Print interface ....................23 4. Installation and use of Cura software ..............24 4.1. Software installation ..................24 Add the LK4 X 3D printer to Cura ............... 25 4.3. Import the model ..................26 4.4. Slicing parameters ..................27 4.5. Slice and save Gcode files ................28 4.6. -
Page 3: Safety Precautions
Safety precautions 1) The temperature of the nozzle parts can reach 250 °C during the operation of the machine. To ensure your safety, it is forbidden to touch the model and nozzle directly with your hand while the printer is printing or cooling. - Page 4 LONGER for getting better printing quality. Some poor quality filaments of other brands are easy to cause clogging the printer nozzle and irreversible damage to the hot end, the extrusion motor and the extrusion gear. We will not guarantee the printer due to the use other brand filaments.
-
Page 5: Product Information
1. Product information 1.1. Printer parameters Model LK4 X Printing Tech Printing size 220*220*250mm Printing speed Up to 120mm/s Hot bed Temp. Up to 100°C Nozzle Temp. Up to 250°C Extrusion Direct drive Auto leveling Optional Method extruder Hot bed... -
Page 6: Packing List
1.2. Packing list Frame Base Touch screen Filament Sensor Holder Filament Auto level Test filament Auto level sensor holder holder sensor SD card & card Power cord Wrench Allen wrench reader Sealing strip Cable ties Spatula M5X25 screw M5X16 screw M3X12 screw M5X06 screw M3X06 screw... -
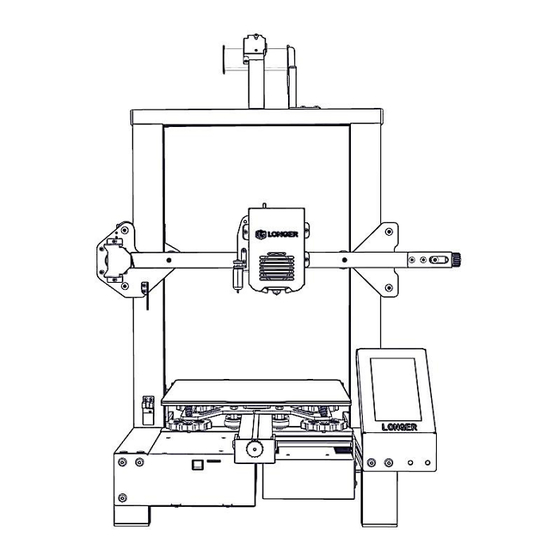
Page 7: Printer Overview
1.3. Printer overview ⑬ ⑭ ⑪ ⑮ ⑫ 1 Filament sensor holder 2 Filament holder 3 Extruder 4 X axis 5 Auto level sensor 6 X belt tensioner 7 Hot end 8 Hot bed 9 Touch screen 10 Hand twist nut... - Page 8 gap is too large, the filament cannot be fed. When loading the filament for the first time, press the handle to let the filament pass through the extruder to the nozzle, and rotate the handle to adjust the gear gap until the filament can be fed smoothly.
-
Page 9: Printer Assembly
2. Printer assembly 2.1. Unpacking the parts Open the package, take out the accessories and the whole cotton, erect the frame and rotate it, then take the cotton through the gantry to get the cotton out. Finally, take out the frame and the base. Please refer to the video in SD for detailed operation. -
Page 10: Install Frame And Base
2.2. Install frame and base Put the frame profile into the slot of the base, and then tighten 4 M5X25 screws to fix the gantry and the base. During installation, pay attention to the sharp corners of the profile to avoid injury. www.longer3d.com support@longer3d.com... -
Page 11: Install Holders Of Filament And Sensor
2.3. Install holders of filament and sensor Use M3x12 screws to fix the filament sensor holder, and use M5x16 screws to fix the filament holder. Filament Sensor Holder Filament holder 2 PCS M5X16 screw 2 PCS M3X12 screw M5X16 M3X12 www.longer3d.com support@longer3d.com... -
Page 12: Install Auto Level Sensor And Touch Screen
2.4. Install auto level sensor and touch screen The auto level sensor is optional for different version; please plug in the auto-leveling cable before installing and cable terminals facing inward. Use M3x06 screws to fix the auto level sensor holder, and use M5x06 screws to fix the touch screen. -
Page 13: Connect The Cables
2.5. Connect the cables All cables must be connected and inserted with power off, and filament sensor cable needs to be fixed within the outside groove of the profile by the sealing strip. X and Z motor cable Photoelectric ... -
Page 14: Check The X And Y Axis
2.6. Check the X and Y axis Cut the white cable ties that fix the extruder and the hot bed. Shake the print head and hot bed, if it wobbles, tighten the wheel by rotating the eccentric nut with open-end wrench until it does not wobble and moves smoothly. -
Page 15: Leveling
2.7. Leveling Before leveling, please make sure that the nozzle is clean and no residual filaments. 1) Manual leveling First adjust the platform to a lower position. Click Leveling, and then click the five points in turn to level. Turn the hand nut clockwise will increase the gap between the nozzle and the heated bed;... - Page 16 2) Automatic leveling Before auto-leveling, it is recommended to manually level the print bed first. Click LEVELING, select Automatic, put a piece of paper with a thickness of 0.1mm between the nozzle and the hot bed, fine-adjust the Z height manually, the nozzle height is ok when feel slight drag resistance when pull the paper, then click NEXT, the printer will automatically level the hot bed.
-
Page 17: Machine Operation
3. Machine operation 3.1. Machine control interface description Primary Secondary Function control Explain interface interface X, Y Move and home the X, Y axis Move and home the Z axis Load and unload the filaments Move Distance Moving distance Disable Unlock the motor Enable Lock motor... -
Page 18: Home Interface
Restore Restore default setting Step Nozzle flow step size Tune z-offset Fine-tune the distance from the nozzle to the hot bed Nozzle temp Display the temperature of nozzle Heatbed temp Display the temperature of hot bed Filament type Select the filament to preheat nozzle and hot bed Filament Cool Stop heating and cool the nozzle or hot bed... -
Page 19: Move Interface
3.3. Move interface Move the Y axis forward Moving distance per step Move the X Home the X axis to the left and Y axis Move the Y axis Dispaly X and Y aix backward coordinate Move the Z Load the filament axis Unlock... -
Page 20: Tune Interface
3.4. Tune interface Adjust the nozzle temp Adjust the hot bed temp Adjust the fan speed Adjust the printing Adjust the nozzle flow Adjust the nozzle gap www.longer3d.com support@longer3d.com... -
Page 21: Filament Interface
3.5. Filament interface Real-time temp Real-time temp of nozzle of hot bed Target temp of Target temp of nozzle hot bed Select the Cool the nozzle filament to heat the nozzle and Cool the hot bed hot bed Increase the Unload the filament temp of nozzle Decrease the... -
Page 22: Leveling Interface
3.6. Leveling interface Leveling is a key step in ensuring successful printing. Before leveling, please make sure that the nozzle is clean and no residual filaments to avoid affecting the leveling result. If the nozzle is close to the platform, the nozzle will not be able to extrude normally, and the PEI film will be easily scratched;... - Page 23 (2) Auto-leveling Before auto-leveling, it is strongly recommended to manually level the print bed first. Click LEVELING, select Automatic, after the nozzle moves to the center of the platform, fine-adjust the Z height manually, and then click NEXT, the printer will automatically level the hot bed. www.longer3d.com support@longer3d.com...
-
Page 24: File Interface
3.7. File interface List of printable files in SD card and the file name will turn red when it is selected. Click the Open to print the selected file. www.longer3d.com support@longer3d.com... -
Page 25: Print Interface
3.8. Print interface Real-time temp Real-time temp of nozzle of hot bed Target temp of Target temp of nozzle hot bed The file name Time consumed The height of Z Printing progress Pause printing Cancel printing Adjust settings Change filament www.longer3d.com support@longer3d.com... -
Page 26: Installation And Use Of Cura Software
4. Installation and use of Cura software 4.1. Software installation It is necessary to convert 3D files (such as STL files) into Gcode files before printing. Software that converts the 3D file into Gcode files is called slicing software. Double-click the installation file and follow the instructions to finish the installation. -
Page 27: Add The Lk4 X 3D Printer To Cura
4.2. Add the LK4 X 3D printer to Cura Click Settings--Printer--Add Printer, and choose LK4 X from the list. LONGER LK4 X LONGER LK4 X www.longer3d.com support@longer3d.com... -
Page 28: Import The Model
4.3. Import the model In the Cura software interface, click the "Open File(s)" to import your own 3D model (such as ".stl" file). Move the model Scale the model Rotate the model Mirror the model Select mesh type Add unsupported area Note: as shown in the figure on the right, the gray color of the model indicates that the model is out of print range. -
Page 29: Slicing Parameters
4.4. Slicing parameters We recommend using the default parameters and LONGER filaments to get the best printing results. If you need to print other materials such as ABS, PETG, TPU, you can click custom, select the Material, and select the... -
Page 30: Slice And Save Gcode Files
Users can also customize the printing parameters according to individual needs. Click Print settings, choose Custom to show all parameters, and then adjust the parameter values that need to be modified. 4.5. Slice and save Gcode files Click Slice to generate G-code for printing. Save to removable drive (Save the gcode file to storage card). -
Page 31: Slice And Preview
4.6. Slice and preview Preview the sliced pictures Preview the nozzle moving path Click the "Slice" button in the lower right corner of the software. After the slicing is finished, click the "preview" to view the sliced data, such as support, nozzle moving path, etc. - Page 32 https://drive.google.com/drive/folders/1Sc-TKuez-mz--38Vp6DeL-pGmQ cQdHW4 After the parameters have been set up, you can print online via Cura. Click the arrow and select Print via USB to print online. If the printer is not connected properly, the interface will be blank. www.longer3d.com support@longer3d.com...
- Page 33 Note: After connecting the USB cable, Cura will automatically connect to the printer. After waiting for more than ten seconds, the operation panel will be displayed on the right side of the interface. User can control printer through the operation panel. (In the process of printing, does not plug the USB cable, or it will interrupt the printing).
-
Page 34: Faq Manual
5.2. How to solve a clogged nozzle? 1) First, preheat the nozzle to a high temperature, such as 200℃ for PLA, then push the Teflon tube until it can no longer be moved forward to ensure it is contacted with the nozzle;... -
Page 35: What To Do If The Hot Bed Can Not Be Leveled
3) Note:the nozzle will be clogged if the temperature of nozzle is too low or too high, or nozzle is too closed to the bed, or there is dirt in the filament. So please set a right temperature that matches the filament, level the hot bed properly or use the good filament. - Page 36 Leveling, and then click the five points in turn to level to make hot bed in a flat state. Then Click LEVELING again, select Automatic, put a piece of paper with a thickness of 0.1mm between the nozzle and the hot bed, fine-adjust the Z height manually, the nozzle height is ok when feel slight drag resistance when pull the paper, then click NEXT, the printer will automatically level...
-
Page 37: How To Solve Filament Does Not Adhered To The Hot Bed
3) If one side of the hot bed can not leveled properly, it may caused by the tilted X-axis beam.Then please level the X-axis beam by adjusting the eccentric nut with a wrench.First loosen the two eccentric nuts on the inner side of the X-axis with an open-end wrench, use two equal-height strips to put under the X-axis profile, first tighten the left eccentric nut, and then tighten the right eccentric nut to ensure that the X-axis does... -
Page 38: What To Do If The Printer Can Not Be Printed Online
2) Please refer to the video for operation in the link below and restart the software to print online. https://www.youtube.com/watch?v=KwmKZmtTOPw&t=6s Thank you for selecting Longer products! Please feel free to contact us by sending an email to support@longer3d.com if you encounter any problems.
Need help?
Do you have a question about the LK4 X and is the answer not in the manual?
Questions and answers