Table of Contents
Advertisement
Advertisement
Table of Contents

Related Manuals for LONGER LK1


Summary of Contents for LONGER LK1
- Page 1 LK1 instruction manual LONGER...
-
Page 2: Table Of Contents
catalog A. product information........................2 (1) Model parameter........................2 (2) Machine introduction......................3 (3) Nozzle module exploded view....................3 (4) Machine assembly......................... 4 1.Rack installation....................... 4 2.wiring..........................5 3.Power regulation......................1 4. Pre-use inspection and leveling..................1 5. Leveling method......................2 6. Place filament, feed......................3 B.... - Page 3 Safety Precautions 1) The temperature of the nozzle parts can reach 250°C during the operation of the machine. To ensure your safety, it is forbidden to touch the model and nozzle directly with your hand while the printer is printing or cooling.
-
Page 4: A. Product Information
A. product information (1) Model parameter Model parameter model Machine size 470*575*610MM Frame Classic aluminum Machine weight 10.6KG frame Molding Process Kit Package 635*518*290MM Size Number of nozzles Weight after 14.2KG packaging Molding size 300*300*400MM Power Output 24V requirements Layer thickness 0.1-0.4mm(adjustab Operating Windows,Linux,MAC... -
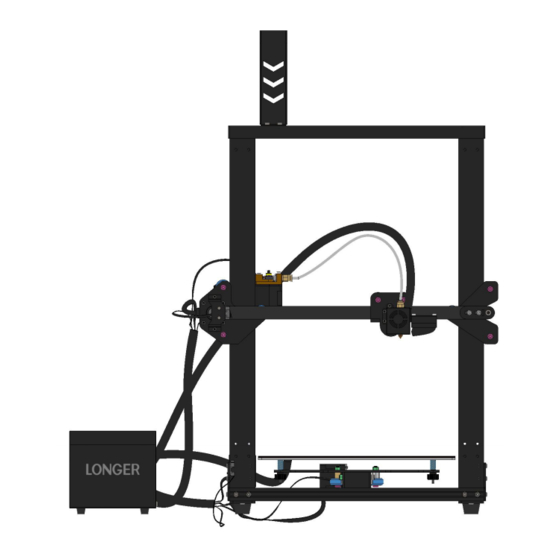
Page 5: Machine Introduction
(2) Machine introduction Filament Rack Gantry Teflon tube Extruder module Nozzle module Hot bed Control box Base Sheet metal fixed block (3) Nozzle module exploded view Big fan Air guide Quick pneumatic joint small fan Heat sink Sheet metal protective case Heating block Nozzle Thermistor... -
Page 6: Machine Assembly
(4) Machine assembly Gantry and base, M5*20 screw limit block and profile, M4*18 screw 1.Rack installation... -
Page 7: Wiring
2.wiring ④ ① ② ③ 1: X-axis motor 2: Y-axis motor 3: Z-axis left motor 4: E-axis extrusion motor X-axis limit switch②:Y-axis limit switch③: Z-axis limit switch ④:E-axis break detection switch... - Page 8 Note: For proper wiring, place the Y-axis motor and Y-axis limit switch cable under the base to prevent the moving parts from scratching the cable.
-
Page 9: Power Regulation
3.Power regulation f the access voltage is 220V, please adjust the power supply in the control box to 220V, please sure confirm before powering on. Otherwise it will burn the power If the access voltage is 110V, please adjust the power supply in the control box to 110V, please be sure to confirm before powering on. -
Page 10: Leveling Method
5. Leveling method You can manually click the XY zero and Z zero in the Movement interface, then unlock, manually move the hot bed and the nozzle, and then adjust the leveling nut so that the distance from the nozzle to the hot bed is about one A4 paper thickness。... -
Page 11: Place Filament, Feed
6. Place filament, feed... -
Page 12: B. Machine Operation
B. Machine operation (1) Machine control ±X.±Y.±Z Move Head X.Y.Z(return to zero) ±X.±Y.±Z ( 正负移动) Motor unlock Distance adjustment Nozzle temperature Return Print speed Start print Discharge 喷嘴温度 flow Files Page turning Distance Return Pause print 暂停打印 adjustment Adjustmen Adjust parament Hotbed temperature Stop print... - Page 13 Click on the file to enter More Refresh Reture Save Page turning Power failure Recovery recovery 返回 (2) Main interface...
-
Page 14: Installation And Use Of Changlang 3D Slicing Software
C. Installation and use of Changlang 3D slicing software (1) Software installation Double-click the LONGER 3D Slicer to enter the installation guide page Click to enter the next step, select the default C drive for installation, otherwise the software will not open... -
Page 15: Model Selection
(2) Model selection Open the software and choose the language you want According to the model of the machine purchased, select the corresponding model. Incorrect selection will cause the machine parameters to be incorrect and the printer will not work properly. If it is a machine of another brand, you can also choose other models for related settings or use it. -
Page 16: Software Usage Introduction
(3) Software usage introduction 3D printer supports gcode format files, so you need to import the STL format model into Changlang 3D slicing software for slicing operation. To print a fine model, you need to have a deep understanding of the slicing software that controls the print path. -
Page 17: Export Gcode Format For Printing
Diameter: 1.75mm Flow: 100% Nozzle aperture: 0.4mm. Retraction speed: the speed of retraction when printing the model. Retracted length: The length of the material withdrawn, generally 4.5 ~ 8mm. Initial layer thickness: Print the thickness of the first layer, which is the default. Initial layer line width: 100% will be thicker and denser, just default. -
Page 18: Instructions For Printing Online
D. Instructions for printing online Changlang 3D printers support online printing operations, but because the computer sends instructions continuously for a long time, there are many different settings on the personal computer (some computers will set the energy-saving mode or the screen mode, etc.) and the computer will freeze if it runs. -
Page 19: Online Printing
Open the Changlang 3D slicing software. The first step is to turn on the model. The second step is to open the model settings. The third step is to select the serial port number displayed by each computer. Generally, the larger serial port is selected. Normally select "AUTO" for the special rate. -
Page 20: Professional Settings
(4) Professional settings If you want to print a more professional page online, you can set it by the following steps. Select file in the first step, select parameter settings in the second step, and change the print window settings in the third step to professional. Then start printing the page online and it will become a professional page, you can send G codes, you can control the movement of each axis. -
Page 21: Description Of Power Failure And Break Detection Function
E. Description of power failure and break detection function. (1) Power failure When printing for a period of time and the height of the print exceeds 0.5mm, the power-off icon will be displayed. At this time, the power is turned back on, and the icon can be clicked. -
Page 22: Broken Material Detection
(2) Broken material detection At this point, pull the Teflon tube out of the extruder end, remove the material, refill the consumables to the nozzle, and click the Recovery button to resume printing. -
Page 23: Machine Usage Faq Guide
F. Machine Usage FAQ Guide Question 1: How to update the firmware? 1. Copy these two files to the SD card 2. Then restart the machine and wait for the machine progress bar to complete before the firmware is refreshed. Then the user needs to delete the two files in the SD card to be used normally, otherwise the firmware will... -
Page 24: Question 4: What Can I Do If I Can't Power Off
Question 3: What should I do if the machine does not retreat when the material is returned? 1. Before returning the material, please heat the nozzle first, and then withdraw the consumables as soon as possible. If you can't pump it, you can re-feed the material with the advanced material, and melt the extruded block formed at the end of the consumable in the nozzle. -
Page 25: Should I Do If It Is Off The Platform
Question 5: When the machine is leveled, when the nozzle moves to the left, it can be leveled normally. When the nozzle moves to the right, it is found that the nozzle and the hot bed are far apart or very close. What should I do if the spring is adjusted to the limit position? If this happens, the X-axis beam is generally loose.
Need help?
Do you have a question about the LK1 and is the answer not in the manual?
Questions and answers