Table of Contents
Advertisement
Quick Links
Advertisement
Table of Contents

Related Manuals for CHIEF MSP-TEQ9


Summary of Contents for CHIEF MSP-TEQ9
- Page 1 I N S T A L L A T I O N I N S T R U C T I O N S Telescoping Leg Interactive Whiteboard Mount with Hanger Bracket German Product Description Portuguese Product Description Italian Product Description Dutch Product Description French Product Description MSP-TEQ9...
-
Page 2: Installation Instructions
WARNING: Exceeding the weight capacity can result in serious personal injury or damage to equipment! It is the installer’s responsibility to make sure the combined weight of all components located on the MSP-TEQ9 does not exceed 125 lbs (56.7 kg). - Page 3 Installation Instructions MSP-TEQ9 DIMENSIONS 1.00 25.4 DIMENSIONS: INCHES [MILLIMETERS]...
- Page 4 MSP-TEQ9 Installation Instructions LEGEND Tighten Fastener Pencil Mark Apretar elemento de fijación Marcar con lápiz Befestigungsteil festziehen Stiftmarkierung Apertar fixador Marcar com lápis Serrare il fissaggio Segno a matita Bevestiging vastdraaien Potloodmerkteken Serrez les fixations Marquage au crayon Loosen Fastener Drill Hole Aflojar elemento de fijación...
-
Page 5: Tools Required For Installation
Installation Instructions MSP-TEQ9 TOOLS REQUIRED FOR INSTALLATION 7/16" 1/8" - wood stud 1/2" 1/4" - concrete, brick 5/32" 1/2" (included) PARTS B (4) F (2) [AF6 toggler] 1/4-20 x 3/8" E (1) D (2) A (4) 5/32" [Upright assembly] 1/4"... -
Page 6: Assembly And Installation
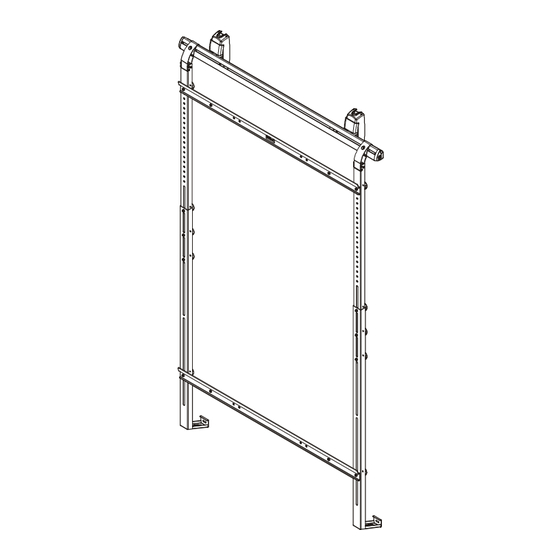
MSP-TEQ9 Installation Instructions ASSEMBLY AND INSTALLATION The MSP-TEQ9 will allow an interactive whiteboard to be installed over an existing chalkboard or whiteboard. The MSP- (R) x 2 TEQ9 has telescoping legs which allows it to be anchored above and below the existing chalkboard or whiteboard, or anchored above the existing chalkboard or whiteboard with the lower extension resting against the existing board. - Page 7 Use two 1/4-20 x 2-1/2" lag bolts (C) and two 1/4" flat washers mount is being attached is capable of supporting five times (A) to complete attaching wall assembly (K) to wall. (See the weight of the MSP-TEQ9 and all attached equipment not Figure 5) to exceed 125 lbs (56.7 kg).
- Page 8 (F) x 1 (S) x 1 Figure 7 Attaching Whiteboard to Mount Attach whiteboard to MSP-TEQ9 by hanging it on the upper whiteboard hanger bracket using bracket already located on (A) x 4 (C) x 4 back of whiteboard. (See Figure 8)
- Page 9 Installation Instructions MSP-TEQ9 After whiteboard and complete upright assembly is in place, loosen three knobs on each side of assembly and raise/ lower adjustable legs so that fastener holes in lower whiteboard hanger bracket (Z) match up with mounting holes in lower tabs of whiteboard. (See Figure 9) Tighten all knobs.
- Page 10 BEFORE completing attachment to wall. adjustment points. NOTE: The lower part of the MSP-TEQ9 must be attached to Lateral Movement the wall using the correct hardware for the wall type. It may be attached to a wood stud wall, or a concrete or Loosen, but do NOT remove, one button head cap screw at concrete block wall.
-
Page 11: Adding Covers
Installation Instructions MSP-TEQ9 Concrete or Concrete Block Wall Mark the wall through the adjustable leg (N) at the lower end of each upright assembly. (See Figure 13) Adjust lower part of leg upward, or slide upright assembly left or right (see Adjustments section) to allow room to drill pilot hole. - Page 12 Europe A Franklinstraat 14, 6003 DK Weert, Netherlands P +31 (0) 495 580 852 F +31 (0) 495 580 845 Chief Manufacturing, a products division Asia Pacific A Office No. 1 on 12/F, Shatin Galleria of Milestone AV Technologies 18-24 Shan Mei Street...
Need help?
Do you have a question about the MSP-TEQ9 and is the answer not in the manual?
Questions and answers