
Related Manuals for DAPAudio PSS-110 MKIII


Summary of Contents for DAPAudio PSS-110 MKIII
- Page 1 MANUAL ENGLISH PSS-110 MKIII Ordercode: D2611 Highlite International B.V. – Vestastraat 2 – 6468 EX – Kerkrade – the Netherlands...
-
Page 2: Table Of Contents
PSS-110 MKIII Table of contents Warning ....................................2 Safety Instructions ................................. 2 Operating Determinations ............................4 Connection with the mains............................4 Return Procedure ................................5 Claims ....................................5 Description of the device ..............................6 Overview ..................................7 Backside ..................................8 Top .................................... -
Page 3: Warning
Save the carton and all packing materials. In the event that a fixture must be returned to the factory, it is important that the fixture be returned in the original factory box and packing. Your shipment includes: ● DAP Audio PSS-110 MKIII ● 2 x antenna ●... - Page 4 PSS-110 MKIII IMPORTANT: The manufacturer will not accept liability for any resulting damages caused by the non-observance of this manual or any unauthorized modification to the system. ● Never let the power cord come into contact with other cables! Handle the power cord and all connections with the mains with particular caution! ●...
-
Page 5: Operating Determinations
PSS-110 MKIII ● To avoid or solve hum and buzzing troubles, try different combinations of lifting grounds on units that are supplied with ground lift switches or make sure all chassis are connected to earth ground, either through the AC power cord ground or by the front panel rack mount screws. -
Page 6: Return Procedure
PSS-110 MKIII Return Procedure Returned merchandise must be sent prepaid and in the original packing, call tags will not be issued. Package must be clearly labeled with a Return Authorization Number (RMA number). Products returned without an RMA number will be refused. Highlite will not accept the returned goods or any responsibility. -
Page 7: Description Of The Device
Description of the device Features The DAP Audio PSS-110 MKIII is the successor of the PSS series with a completely new design in a lightweight ABS housing. It is a portable PA system powered by an internal battery. When used on mains power, the battery will be charged automatically. -
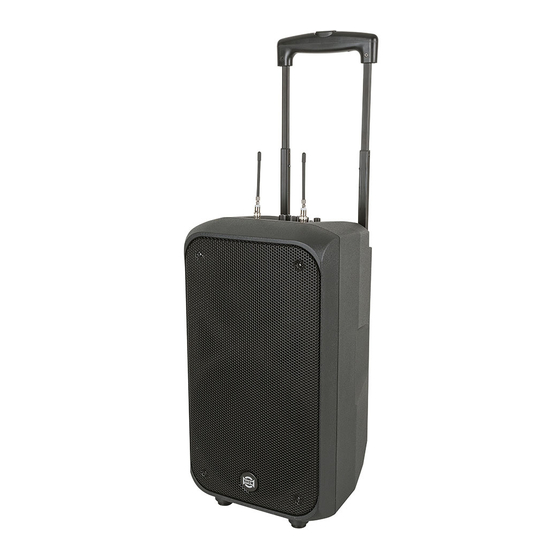
Page 8: Overview
PSS-110 MKIII Overview Fig. 01 01) Handle 02) Antenna 03) Tweeter 04) Woofer Ordercode: D2611... -
Page 9: Backside
PSS-110 MKIII Backside Fig. 02 05) UP button 06) SET button 07) DOWN button 08) Module eject button 09) LCD receiver display 10) Microphone clamp 11) Microphone holder 12) Power switch ON/OFF ● ON: Power on ● OFF: Power off ●... -
Page 10: Top
PSS-110 MKIII Fig. 03 14) LCD display 15) Antenna connector 16) Play/Pause button 17) Previous track button Press the button to skip to a previous track. Press and hold down the button to decrease the volume. 18) USB A connector IN Connect a USB flash drive containing music files (mp3). - Page 11 PSS-110 MKIII Fig. 04 24) CH2 volume control Turn the control to set the volume of CH2. 25) CH1 volume control Turn the control to set the volume of CH1. 26) CH1 Line/Mic button Select the input source for channel 1 (Line/Mic).
-
Page 12: Microphone
43) Plastic screwdriver 44) Battery housing Installation Remove all packing materials from the PSS-110 MKIII. Check that all foam and plastic padding is removed. Connect all cables. Always disconnect from electric mains power supply before cleaning or servicing. Damages caused by non-observance are not subject to warranty. -
Page 13: Inserting/Replacing The Microphone Battery
PSS-110 MKIII Inserting/Replacing the Microphone Battery Fig. 06 Fig. 07 01) Turn the battery cover clockwise, in order to loosen it. Remove the battery cover (Fig. 06). 02) Pull upwards on the holding pin and, at the same time, pull the battery holder down, in order to gain access to the battery housing (Fig. -
Page 14: Battery Operation
PSS-110 MKIII Battery Operation 01) When the battery level indicator (35) lights up red, the battery is almost flat and needs to be recharged. 02) Make sure that the power switch (12) is in OFF position and plug one end of the included IEC to Schuko power cable into the IEC input connector (13). - Page 15 PSS-110 MKIII 07) Once the microphone has been paired, the display (09) will show: 08) Replace the battery cover and turn it counterclockwise, in order to tighten it. 09) Press the SET button (06). The display will show: 10) Press the UP/DOWN buttons (05/07) in order to set the volume. The adjustment range is from OFF to loud.
-
Page 16: Frequency Range
74 – 631,775MHz 99 – 637,400MHz It is possible that the PSS-110 MKIII will not function properly within certain frequencies. It may be caused by the presence of other digital equipment producing interference. Try testing all the available frequency presets until you find the one which functions properly. -
Page 17: Usb Player Operation
PSS-110 MKIII USB Player Operation Fig. 12 01) Press and hold down the power/stop button (22) for 2 seconds in order to turn the USB player on. 02) Insert a USB flash drive into the USB slot (18). 03) The device will now search for the supported music files (mp3). -
Page 18: Connection Example
PSS-110 MKIII Connection Example Fig. 13 Ordercode: D2611... -
Page 19: Connection Cables
PSS-110 MKIII Connection Cables Take care of your cables, always holding them by the connectors and avoiding knots and twists when coiling them: This gives the advantage of increasing their life and reliability. Periodically check your cables. A great number of problems (faulty contacts, ground hum, discharges, etc.) are caused entirely by using unsuitable or faulty cables. -
Page 20: Maintenance
PSS-110 MKIII Maintenance The DAP Audio PSS-110 MKIII requires almost no maintenance. However, you should keep the unit clean. Disconnect the mains power supply, and then wipe the cover with a damp cloth. Do not immerse in liquid. Do not use alcohol or solvents. -
Page 21: Product Specifications
PSS-110 MKIII Product Specifications Power supply: 220-240V AC, 50/60Hz Battery: 22,2V (Lithium battery) System type: 2-Way Active Vented Speaker Transducer Low: 10" Woofer, 1,5" Voice coil Transducer driver: 1" Ferrite Driver, 1" Voice coil Horn coverage: 90ºH x 45ºV Frequency response(-6dB):... - Page 22 PSS-110 MKIII Ordercode: D2611...
-
Page 23: Notes
PSS-110 MKIII Notes Ordercode: D2611... - Page 24 ©2018 DAP Audio...
Need help?
Do you have a question about the PSS-110 MKIII and is the answer not in the manual?
Questions and answers