Jet JWL-1015VS Operating Instructions And Parts Manual
10x15-inch woodworking lathe
Hide thumbs
Also See for JWL-1015VS:
- Assembly instructions and parts list (2 pages) ,
- Assembly instructions and parts list (2 pages) ,
- Operating instructions manual (40 pages)
Table of Contents
Advertisement
Advertisement
Chapters
Table of Contents

Related Manuals for Jet JWL-1015VS


Summary of Contents for Jet JWL-1015VS
- Page 1 Operating Instructions and Parts Manual 10x15-inch Woodworking Lathe Models JWL-1015, JWL-1015VS model JWL-1015VS shown 427 New Sanford Road LaVergne, Tennessee 37086 Part No. M-719100 Ph.: 800-274-6848 Revision A1 02/2014 www.jettools.com Copyright © 2014 JET...
-
Page 2: Warranty And Service
JET sells through distributors only. The specifications listed in JET printed materials and on official JET website are given as general information and are not binding. JET reserves the right to effect at any time, without prior notice, those alterations to parts, fittings, and accessory equipment which they may deem necessary for any reason ®... -
Page 3: Table Of Contents
16.1.1 JWL-1015 Lathe – Exploded View ...................... 23 16.1.2 JWL-1015 Lathe – Parts List ....................... 24 16.2.1 JWL-1015VS Lathe – Exploded View ....................26 16.2.2 JWL-1015VS Lathe – Parts List ......................27 17.0 Electrical Connections ..........................29... -
Page 4: Safety Warnings
Do not turn materials other than wood on determine that it will operate properly and this lathe. If used for other purposes, JET perform its intended function. Check for disclaims any real or implied warranty and... -
Page 5: About This Manual
Additional knowledge can be obtained from experienced users or trade articles. Whatever accepted methods are used, always make personal safety a priority. If there are questions or comments, please contact your local supplier or JET. JET can also be reached at our web site: www.jettools.com. -
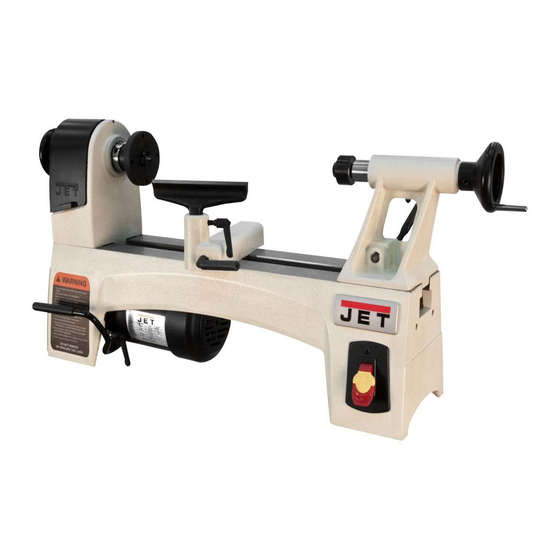
Page 6: Features And Nomenclature - Jwl-1015/1015Vs Lathes
5.0 Features and nomenclature – JWL-1015/1015VS lathes Figure 1: Variable speed model shown 1. Headstock 13. Live center 2. Headstock handwheel 14. Variable speed dial (potentiometer) 3. Index pin 15. On/Off switch with safety key 4. Speed chart 16. LED light 5. -
Page 7: Specifications
Shipping ..............82.5 lb (37.5 kg) ..........78 lb (35.5 kg) The specifications in this manual were current at time of publication, but because of our policy of continuous improvement, JET reserves the right to change specifications at any time and without prior notice, without incurring obligations. -
Page 8: Hole Pattern - Jwl-1015/1015Vs Lathes
6.1 Hole pattern – JWL-1015/1015VS lathes Figure 2 Clearance hole spacing for mounting lathe... -
Page 9: Setup And Assembly
7.2 Mounting lathe to stand/table 7.0 Setup and assembly For effective and safe operation, the lathe must be Open shipping container and check for shipping mounted to the optional stand (see section 14.0) or damage. Report any damage immediately to your a work table, using the four threaded holes in its distributor and shipping agent. -
Page 10: Installing/Removing Live Center
8.0 Electrical connections qualified electrician. This adapter is not permitted in Canada. The green-colored rigid ear, lug, and The JWL-1015/JWL-1015VS JET lathe is rated for the like, extending from the adapter must be 115 volt operation. It is supplied with a plug... -
Page 11: Extension Cords
9.1 Tool rest Refer to Figure 9. The tool rest assembly is designed to allow adjustment for height, position on the bed, and angle to the work. Loosen locking handle (A) on tool rest base by turning it upward. This allows you to slide base forward or back, and to angle it to the bed. -
Page 12: Speed Change
Figure 15), then pulling up lever (G). 9.3.1 Variable Speed Model 3. Move belt to desired pulley set. Make sure belt The JWL-1015VS variable speed lathe has three is properly seated in both pulleys, and both speed ranges, controlled by a combination of the pulleys are aligned (belt is vertical, not electronic variable speed dial (see section 10.0) -
Page 13: Index Pin
9.4 Index pin LED displays red due to overloading, push and pull switch to restart. [JWL-1015VS only] Refer to Figure 16. Indexing is used to create evenly spaced features Do not start lathe at maximum in a work piece, while keeping the lathe spindle speed. -
Page 14: Turning Tools
11.2 Turning Tools For safety and best performance, keep tools sharp. If a tool stops cutting or requires excessive If possible, select only quality, high-speed steel pressure to make a cut, it needs to be sharpened. turning tools. High-speed steel tools hold an edge A number of brand name sharpening jigs and and last longer than ordinary carbon steel. - Page 15 Put a dimple in the stock with an awl or nail, or 8. Advance tailstock spindle with use a spring-loaded automatic center punch. handwheel in order to seat the live center into the workpiece. Use enough pressure to secure 2. Extremely hard woods may require kerfs cut the workpiece between the centers so that it into the ends of the stock (Figure 20) using a won’t fly off, but do not use excessive...
- Page 16 Always cut down-hill, or from large diameter to small diameter. Always work toward the end of a work-piece, never start cutting at the end. Figure 24 2. Move the tool over the desired width of the Figure 23 cove. 5. Once the workpiece is roughed down to a 3.
-
Page 17: Face Plate And Bowl Turning
Parting Off 6. Glue the block to the workpiece. Avoid using brown paper or newspaper between the waste 1. Use parting tool. block and workpiece. It may work fine if you are using scrapers, but a slight catch with a 2. -
Page 18: Bowl Turning Techniques
Checks and Cracks 5. Start lathe at lowest speed and bring it up to the maximum safe speed for the size of work to be turned. If the machine starts to vibrate, Green wood will check and crack. For best results, leave logs in as long a length as you can handle. -
Page 19: Maintenance
and pointed toward the four o'clock position, as 3. Remove sanding dust with tack rags or shown in Figure 28. compressed air and, with lathe turned off, apply first coat of finish. Let stand for several minutes, wipe off excess. Allow to dry before sanding again with 320 or 400 grit sandpaper. -
Page 20: Belt Replacement
Never use a steel face hammer directly against the spindle. Figure 29 12.3 Belt replacement Figure 31 Refer to Figures 30 through 32. 9. Continue pulling spindle toward tailstock until it clears left hole in headstock and offers enough 1. Disconnect lathe from power. room to remove belt (Figure 32). -
Page 21: Recommended Lathe Speeds (Per Diameter Of Workpiece)
13.0 Recommended Lathe Speeds (per diameter of workpiece) Diameter of Work Roughing RPM General Cutting RPM Finishing RPM Under 2” 1520 3000 3000 2” to 4” 1600 2480 4” to 6” 1080 1650 6” to 8” 1240 8” to 10” 1000 Table 2 14.0 Troubleshooting the JWL-1015/1015VS Lathes... -
Page 22: Optional Accessories
15.0 Optional accessories These accessory items, purchased separately, can enhance the functionality of your lathe. Contact your dealer to order, or call JET at the phone number on the cover. # 719101 – Bed Extension (21”) for JWL-1015/1015VS Lathes # 719102 – Stand for JWL-1015/1015VS Lathes... -
Page 23: Replacement Parts
16.0 Replacement Parts Replacement parts are listed on the following pages. To order parts or reach our service department, call 1- 800-274-6848 Monday through Friday (see our website for business hours, www.jettools.com). Having the Model Number and Serial Number of your machine available when you call will allow us to serve you quickly and accurately. -
Page 24: Jwl-1015 Lathe - Parts List
26 ....JWL1015-126 .... I.D Label ......................1 27 ....TS-0267041 ....Socket Set Screw ............ 1/4”-20x3/8”....2 28 ....JET-92....... JET Logo with 3M Adhesive ........92x38mm ...... 1 29 ....TS-0051051 ....Hex Cap Screw ............5/16”-18x1”....1 30 .... - Page 25 Index No Part No Description Size 55 ....JWL1221VS-223 ..Handwheel ....................1 56 ....JML-63 ...... C-Ring..............STW-10 ......1 57 ....TS-0680031 ....Flat Washer ............. 5/16” ......1 58 ....708331 ...... Live Center Assembly (includes #59 thru #62) ..........1 59 ....
-
Page 26: Jwl-1015Vs Lathe - Exploded View
16.2.1 JWL-1015VS Lathe – Exploded View... -
Page 27: Jwl-1015Vs Lathe - Parts List
26 ....JWL1015VS-126 ..I.D Label ......................1 27 ....TS-0267041 ....Socket Set Screw ............ 1/4”-20x3/8”....2 28 ....JET-92....... JET Logo with 3M Adhesive ........92x38mm ...... 1 29 ....TS-0051051 ....Hex Cap Screw ............5/16”-18x1”....1 30 .... - Page 28 Index No Part No Description Size 55 ....JWL1221VS-223 ..Handwheel ....................1 56 ....JML-63 ...... C-Ring..............STW-10 ......1 57 ....TS-0680031 ....Flat Washer ............. 5/16” ......1 58 ....708331 ...... Live Center Assembly (includes #59 thru #62) ..........1 59 ....
-
Page 29: Electrical Connections
17.0 Electrical Connections JWL-1015 JWL-1015VS (variable speed model) LED Light... - Page 30 This page intentionally left blank...
- Page 31 This page intentionally left blank...
- Page 32 427 New Sanford Road LaVergne, Tennessee 37086 Phone: 800-274-6848 www.jettools.com...
- Page 33 DE - DEUTSCH Betriebsanleitung Sehr geehrter Kunde, vielen Dank für das Vertrauen, welches Sie uns beim Kauf Ihrer neuen JET-Maschine entgegengebracht haben. Diese Anleitung ist für den Eigentümer und die Bediener zum Zweck einer sicheren Inbetriebnahme, Bedienung und Wartung der Drechselbank JWL-1015, JWL-1015VS erstellt worden.
-
Page 34: Allgemeine Sicherheitshinweise
Die Maschine nur in technisch einwandfreiem Zustand Seien Sie aufmerksam und konzentriert. Gehen Sie mit benützen. Vernunft an die Arbeit. Betreiben Sie die Maschine nicht, wenn Sie müde sind. Beim Arbeiten an der Maschine müssen alle Sicherheitsvorrichtungen angebracht sein. Achten Sie auf ergonomische Körperhaltung. Sorgen Sie für sicheren Stand und halten Sie jederzeit das Neben den in der Gebrauchsanleitung enthaltenen Gleichgewicht. -
Page 35: Restrisiken
Stellen Sie sich nicht auf die Maschine. Arbeiten an der elektrischen Ausrüstung der Maschine dürfen nur durch eine Elektrofachkraft vorgenommen werden. Wechseln Sie beschädigte oder abgenutzte Netzkabel Fig 1 (JWL-1015VS abgebildet) unverzüglich aus. 1 Spindelstock Umrüst-, Einstell- und Reinigungsarbeiten nur im... -
Page 36: Schallemission
Anzahl mechanischer Geschwindigkeiten muss sie auf der Werkbank oder dem optional erhältlichen 400, 700, 1000, 1500, 2200, 3300 U/min Untersatz festgeschraubt sein. Nettogewicht 35 kg JWL-1015VS: Anzahl mechanischer Geschwindigkeiten Drehzahlbereich L 200 - 1050 U/min Drehzahlbereich M 300 - 1750 U/min... -
Page 37: Maschinenbetrieb
Fig 4 Zum Stillsetzen drücken Sie den Roten Aus-Taster (C). Warten Sie bis das Werkstück zum Stillstand kommt. Nur JWL-1015VS: Die gewünschte Drehzahl kann am Drehgriff (A) stufenlos eingestellt werden. Fig 6 Es stehen 3 Drehzahlbereiche durch Riemenumlegen zur Verfügung. -
Page 38: Drehzahlwahl
6.4 Drechseln zwischen Spitzen Markieren und körnen Sie die Werkstückmitte an beiden Enden. Bei harten Hölzern kann es spindelstockseitig erforderlich sein Einschnitte anzubringen (siehe Fig 11). Fig 8 Schaber (B, Fig 7) Wird verwendet zur Auß en- und Innenkalibrierung sowie zum Entfernen von Bearbeitungsriefen. -
Page 39: Drechseln Von Schalen Und Tellern
Bewegen Sie den Reitstock nach rechts, entfernen Sie Mitlaufkörnerspitze oder Bohrfutter um Verletzungen zu vermeiden. Drehen Sie das Werkstück von Hand und prüfen Sie die sichere Aufspannung und die freie Rotation. Fig 13 6.5 Drechseln von Schalen und Tellern Drechseln Sie die Auß enseite der Schale zwischen den Spitzen. -
Page 40: Rü St Und Einstellarbeiten
Riemenabdeckung. Fig 20 Den Riemen auf der gewünschten Drehzahlstufe auflegen (Drehzahlangabe siehe Riemendeckel). Die JWL-1015 hat 6 Geschwindigkeiten Die JWL-1015VS hat 3 Drehzahlbereiche, stufenlos Fig 18 Lösen Sie die Sicherungsschraube und öffnen Sie die obere Riemenabdeckung. - “hohes Drehmoment” (200~ 1050 U/min). -
Page 41: Spannmittel Montage
-”allgemeiner Gebrauch” (300~1750 U/min) -“hohe Drehzahl” (600~3600 U/min) Die korrekte Riemenlage beachten. Spannen Sie den Riemen. Bügel (G) nach unten drücken. Die Riemendeckel schließ en und mit Schraube sichern. ACHTUNG Die Riemendeckel während der Bearbeitung stets geschlossen halten. Fig 22 Zur Demontage den Ausstoß... -
Page 42: Anpassung Der Handstahlauflage
Die Teilung lässt sich durch Nummern an der Riemenscheibe 7.3 Anpassung der Handstahlauflage (H, Fig 27) leicht zuordnen. Stellen Sie die Handstahlauflage so nahe an das Werkstück Schrauben Sie dazu den Indexierstift (J) in den Spindelstock. als möglich und fixieren Sie die Position mit dem Hebel (A, Bis er in einem der Löcher (I) gut festsitzt. -
Page 43: Prüfung Der Motorbürsten
Fig 28 Reitstock hämmern. (Es kann auch ein Stück Hartholz oder Messingstück als Triebling verwendet werden). 8.2 Prü fung der Motorbü rsten (nur JWL-1015VS) Die Stromzufuhr durch Ziehen des Netzsteckers trennen. Eine stark verschlissene oder beschädigte Bürste kann zu Motorschaden führen. -
Page 44: Stö Rungsabhilfe
*Motor, Platine, Schalter oder Kabel defekt- Bitte entsorgen Sie es nur an einer spezialisierten Elektrofachkraft kontaktieren. Entsorgungsstelle. *Ü berlastschutz an Platine hat reagiert (nur JWL-1015VS)- Neustart nach Pause, niedrige Riemenstufe (200-1050 U/min) anwählen für mehr Drehmoment. 11. Verfü gbares Zubehö r... - Page 45 Fig 35 Artikel Nummer 719103 Maschinenuntersatz Verlängerung 530mm (Fig 36) Fig 36 Werkzeuge und Spannmittel siehe JET-Preisliste...
Need help?
Do you have a question about the JWL-1015VS and is the answer not in the manual?
Questions and answers