Jet JWL-1221VS Operating Instructions And Parts Manual
12x21-inch evs woodworking lathe
Hide thumbs
Also See for JWL-1221VS:
- Assembly instructions and parts list (2 pages) ,
- Operating instructions manual (44 pages) ,
- Operating instructions manual (15 pages)
Table of Contents
Advertisement
This .pdf document is bookmarked
Operating Instructions and Parts Manual
12x21-inch EVS Woodworking Lathe
Model JWL-1221VS
WALTER MEIER (Manufacturing) Inc.
427 New Sanford Road
LaVergne, Tennessee 37086
Part No. M-719200
Ph.: 800-274-6848
Revision B 03/2013
www.waltermeier.com
Copyright © 2013 Walter Meier (Manufacturing) Inc.
Advertisement
Table of Contents

Related Manuals for Jet JWL-1221VS


Summary of Contents for Jet JWL-1221VS
- Page 1 This .pdf document is bookmarked Operating Instructions and Parts Manual 12x21-inch EVS Woodworking Lathe Model JWL-1221VS WALTER MEIER (Manufacturing) Inc. 427 New Sanford Road LaVergne, Tennessee 37086 Part No. M-719200 Ph.: 800-274-6848 Revision B 03/2013 www.waltermeier.com Copyright © 2013 Walter Meier (Manufacturing) Inc.
-
Page 2: Warranty And Service
Walter Meier Authorized Service Centers can authorize warranty repair, assist you in obtaining parts, or perform routine maintenance and major repair on your JET® tools. For the name of an Authorized Service Center in your area call 1-800-274-6848. -
Page 3: Table Of Contents
3.0 Safety warnings .............................. 4 4.0 About this manual ............................5 5.0 Features and nomenclature – JWL-1221VS lathe ..................6 6.0 Specifications – JWL-1221VS lathe ....................... 7 6.1 Hole pattern – JWL-1221VS lathe ......................8 ... -
Page 4: Safety Warnings
9. Do not operate this machine while tired or under the influence of drugs, alcohol or any medication. 10. Make certain the switch is in the OFF position 3.0 Safety warnings before connecting the machine to the power supply. 1. Read and understand the entire owner's 11. -
Page 5: About This Manual
This manual is provided by Walter Meier (Manufacturing) Inc. covering the safe operation and maintenance procedures for a JET Model JWL-1221VS Lathe. This manual contains instructions on installation, safety precautions, general operating procedures, maintenance instructions and parts breakdown. Your machine has been designed and constructed to provide years of trouble-free operation if used in accordance with the instructions as set forth in this document. -
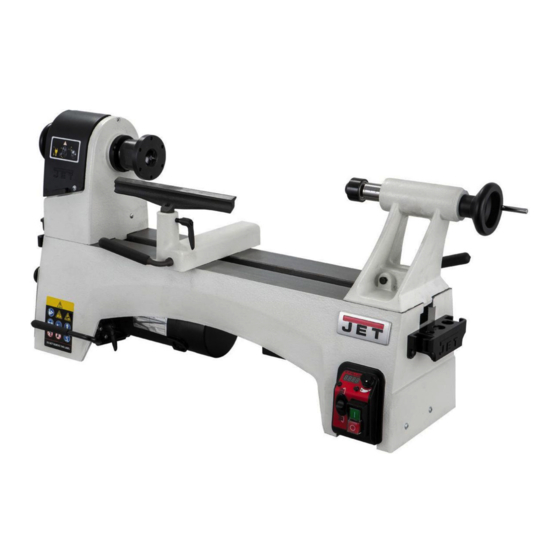
Page 6: Features And Nomenclature - Jwl-1221Vs Lathe
5.0 Features and nomenclature – JWL-1221VS lathe Figure 1 1. Spindle handwheel 14. Faceplate 2. Index pin 15. Spur center 3. Speed chart 16. Tool rest 4. Upper pulley access door 17. Tool rest locking handle 5. Headstock 18. Quill locking handle 6. -
Page 7: Specifications - Jwl-1221Vs Lathe
6.0 Specifications – JWL-1221VS lathe Model number ............................ JWL-1221VS Stock number .............................. 719200 Motor and electricals: Motor type ............................120V DC Horsepower ..............................1 HP Phase ................................ single Voltage ............................... 115V only Cycle ................................60Hz Listed FLA (full load amps) ........................... 6 A Power transfer .............................. -
Page 8: Hole Pattern - Jwl-1221Vs Lathe
6.1 Hole pattern – JWL-1221VS lathe Figure 2 Clearance hole spacing for mounting lathe... -
Page 9: Setup And Assembly
Tools required for assembly: 7.0 Setup and assembly 3/16” hex key (“Allen” wrench) Open shipping container and check for shipping damage. Report any damage immediately to your Exposed metal areas of the lathe, such as bed, distributor and shipping agent. Do not discard any spindle and quill, have been factory coated with a shipping material until the Lathe is assembled and protectant. -
Page 10: Installing/Removing Spur Center
Figure 7 7.6 Installing/removing live center Figure 5 Referring to Figure 8: To remove faceplate: 1. Rotate tailstock handwheel clockwise a few 6. Make sure both set screws have been backed times to advance quill. out. 2. Push live center into quill. 7. -
Page 11: Electrical Connections
Canada. The green-colored rigid ear, lug, and the like, extending from the adapter must be connected to a permanent ground such as a The JWL-1221VS JET lathe is rated for 115 volt properly grounded outlet box. operation. It is supplied with a plug designed for use on a circuit with a grounded outlet that looks like the one pictured in A, Figure 9. -
Page 12: Adjustments
9.0 Adjustments Make sure all levers and locking handles are tightened before operating the lathe. 9.1 Tool rest Referring to Figure 10: The tool rest assembly is designed to allow adjustment for height, position on the bed, and angle to the work. Figure 11 Loosen locking handle (A) on tool rest base to slide The clamping system has been properly adjusted... -
Page 13: Index Pin
2. Relieve belt tension by pulling handle (F, 4. Rotate knurled head counterclockwise until pin Figure 14) while pushing up lever (G). releases. Move pulley to next desired hole, and repeat. NOTE: A 3mm hex key (K, Figure 3. Move belt to desired pulley set. Make sure belt 15) can be inserted and turned in the hole of is properly seated in both pulleys, and both the knurled head, to help tighten or loosen the... -
Page 14: Operation
11.0 Operation The information which follows is general in nature and is not intended to be a complete course in wood turning. Nothing can replace the knowledge gained conversation with experienced woodturners, or consulting books or trade articles. Above all, simple trial and error will aid in developing proficiency in the craft. -
Page 15: Spindle Turning
3. Drive the spur center about 1/4” into the 11.3 Spindle Turning workpiece, using a wood mallet or dead blow hammer as shown in Figure 20. Be careful that Spindle turning takes place between the centers of you do not split the workpiece. Never use a the lathe. - Page 16 points of the skew to the spinning workpiece may cause a catch and ruin the workpiece). 6. Add details to the workpiece with skew, parting tool, scraper or spindle gouge. Beads 1. Make a parting cut for what is to be a bead to the desired depth.
-
Page 17: Face Plate And Bowl Turning
4. With the bevel parallel to the right side of the 1. Select stock at least 1/8" to 1/4" larger than cut, raise the handle and push the tool in to the each dimension on the finished workpiece. desired depth, as shown in Figure 24. 2. -
Page 18: Bowl Turning Techniques
Faceplate or Chuck? be accomplished with a 3/8" or 1/2" bowl gouge. A 1/4" bowl gouge is best suited for smaller bowls and light finishing cuts. Larger 3/4" and 1" bowl While faceplates are the simplest, most reliable method of holding a block of wood for turning, gouges are only used for extremely large pieces. -
Page 19: Maintenance
(NOTE: If you plan to use a chuck, turn a ridges left, a light cut with a large domed tenon of the appropriate length and diameter scraper can even out the surface.) to fit your chuck.) 7. Develop wall thickness at the rim and maintain 9. -
Page 20: Motor Brushes
Bearings are permanently lubricated and sealed. They do not require further lubrication. 12.2 Motor Brushes Referring to Figure 28: Periodically inspect the two carbon brushes located at each side of the motor. If brushes need replacing, replace both at the same time. A heavily worn or damaged brush, if allowed to remain, may eventually cause damage to internal motor elements. -
Page 21: Recommended Lathe Speeds (Per Diameter Of Workpiece)
Figure 32 10. Remove belt through lower access door. 11. Reverse above procedure to install belt and re- position spindle. NOTE: Make sure to insert spindle lock with its spring before tightening cover. overtighten spindle handwheel when installing. 13.0 Recommended Lathe Speeds (per diameter of workpiece) Diameter of Work Roughing RPM... -
Page 22: Optional Accessories
These accessory items, purchased separately, can enhance the functionality of your lathe. Contact your dealer to order, or call Walter Meier at the phone number on the cover. # 719201 – Bed Extension (22-1/2”) for JWL-1221VS Lathe # 719202 – Stand for JWL-1221VS Lathe... -
Page 23: Troubleshooting The Jwl-1221Vs Lathe
15.0 Troubleshooting the JWL-1221VS Lathe Table 3 Trouble Probable Cause Remedy Motor fails to develop Power line overloaded Correct overload condition full power Undersize wires in power supply Increase supply wire size. system. Worn motor Replace motor Motor or spindle stalls... -
Page 24: Replacement Parts
Trouble Probable Cause Remedy E7 shown on digital Motor sensor not working Check connectors of motor sensor cord readout to switch box Readjust sensor closer to sensor collar Replace sensor collar (p/n JWL1221VS- 254) Replace sensor set (p/n JWL1221VS- 258) Spindle locked Release index pin or spindle lock E8 shown on digital... -
Page 25: Bed Assembly - Exploded View
16.1.1 Bed Assembly – Exploded View... -
Page 26: Bed Assembly - Parts List
16.1.2 Bed Assembly – Parts List Index No Part No Description Size Qty 1 ....JWL1221VS-201 ..Tool Caddy ....................2 2 ....TS-0255021 ....Socket Head Button Screw ........5/16”-18x1/2”....4 3 ....TS-0207071 ....Socket Head Cap Screw.......... 1/4”-20x1-1/4” ....4 4 .... - Page 27 69 ....JWL1221VS-269 ..Wrench (includes #70) ................... 1 70 ....JWL1221VS-270 ..Rubber Cover ....................1 71 ....JETPLATE-9238 ..JET Nameplate ............92x38mm ...... 1 72 ....TS-081C072 ....Pan Head Screw ............#10-24x1-14”....2 73 ....JWL1221VS-273 ..ID Label ......................1 74 ....
-
Page 28: Headstock Assembly - Exploded View
16.2.1 Headstock Assembly – Exploded View... -
Page 29: Headstock Assembly - Parts List
16.2.2 Headstock Assembly – Parts List Index No Part No Description Size Qty ....JWL1221VS-HA ..Headstock Assembly (includes #4 thru #34) ..........1 1 ....JWL1221VS-101 ..Faceplate ..............3” ........1 2 ....JWL1221VS-102 ..Nylon Insert Socket Set Screw ........ 1/4-20x1/4” ....2 3 .... -
Page 30: Controller Assembly - Exploded View
16.3.1 Controller Assembly – Exploded View 16.3.2 Controller Assembly – Parts List Index No Part No Description Size Qty ....JWL1221VS-CA ..Controller Assembly (includes #1 thru #15) ........... 1 1 ....JWL1221VS-301 ..Switch Box ..................... 1 2 ....JWL1221VS-302 ..Tapping Screw ............M3x19 ......4 3 .... -
Page 31: Electrical Connections
17.0 Electrical Connections SENSOR SPINDLE SENSOR MOTOR POTENTIOMETER FWD/REV BLUE(CW) Switch RED (V+) Digital Readout BLACK LI-SW WHITE Run/Stop Switch PRINTED CIRCUIT BOARD BLACK WHITE GREEN MOTOR GREEN GREEN... - Page 32 WALTER MEIER (Manufacturing) Inc. 427 New Sanford Road LaVergne, Tennessee 37086 Phone: 800-274-6848 www.jettools.com www.waltermeier.com...
Need help?
Do you have a question about the JWL-1221VS and is the answer not in the manual?
Questions and answers
ГДЕ ВЗЯТЬ АРТИКУЛЫ НА ЗАПЧАСТИ ДЛЯ ТОКАРНОГО СТАНКА JET JWL-1221VS, НУЖНА ЭЛЕКТРОННАЯ ПЛАТА УПРАВЛЕНИЯ JWL1221VS 318E
To find replacement parts for the Jet JWL-1221VS lathe, including the control board JWL1221VS 318E, contact the service department at 1-800-274-6848, Monday through Friday. Have the model number and serial number of your machine ready for faster service.
This answer is automatically generated