Advertisement
Quick Links
Sierra Wireless
This guide provides instructions for quickly getting your Sierra Wireless
For more information refer to the:
•
AirLink LX60 Hardware User Guide
•
AirLink LX60 Software Configuration Guide
Both are available for download from the Sierra Wireless web site (source.sierrawireless.com).
NOTE: Remote ACEmanager access is disabled by default for security. If required, enable it remotely using AirLink Management Service (ALMS) or locally using
ACEmanager (Services > ACEmanager) and change the default password (Admin > Change Password).
STEP 1 Install the SIM Cards
Use a #1 Phillips screwdriver to remove the SIM card cover.
1.
Orient the SIM card as shown (with the gold contacts facing down).
2.
Gently slide the SIM card into the slot until it clicks into place.
3.
Re-attach the cover.
4.
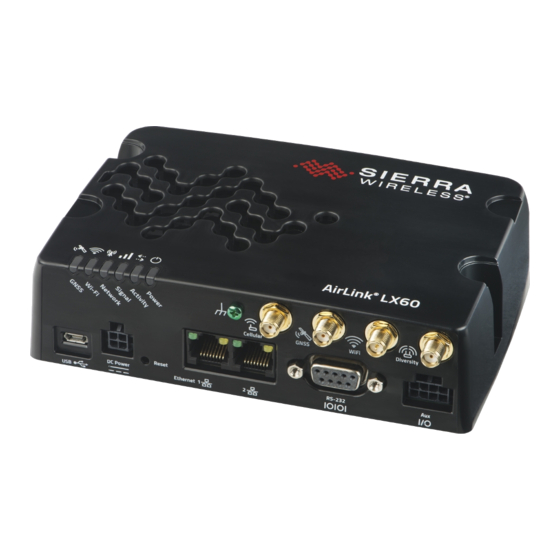
STEP 2 Connect and Turn On the Router
NOTE: If you want to configure all your routers at the same time using ALMS, follow the instructions
on page 2 to register your routers before applying power.
Sierra Wireless strongly recommends that you always ground the chassis using the grounding point
shown below. For more information, refer to the LX60 Hardware User Guide.
Grounding point
Green (GPIO) Optional
Black (GND)
** To operate the gateway, the Ignition Sense must be connected to 7–36 VDC
© 2018 Sierra Wireless All Rights Reserved
LX60 Quick Start Guide
®
White (Ignition Sense)**
Red (Power)
PN 5303051 Rev. 1
AirLink
LX60 router configured and connected.
®
®
Connect 9-36 VDC. To operate the router between 7 – 36 V, after
3.
startup, launch ACEmanager, go to Services > Power Management,
and adjust the low voltage standby settings.
Connect a Windows
4.
Ethernet cable. If applicable, connect devices
to the RS-232 port and / or the USB port.
Connect the Cellular and
1.
Diversity antennas.
Connect the GNSS and Wi-Fi
2.
antennas*
* Available only on LX60s
with GNSS and Wi-Fi.
computer to the router with an
®
Advertisement

Related Manuals for Sierra Wireless LX60


Summary of Contents for Sierra Wireless LX60
- Page 1 NOTE: If you want to configure all your routers at the same time using ALMS, follow the instructions on page 2 to register your routers before applying power. Sierra Wireless strongly recommends that you always ground the chassis using the grounding point shown below. For more information, refer to the LX60 Hardware User Guide.
- Page 2 AirLink LX60 Software Configuration Guide (WAN/Cellular chapter). STEP 4 Connect to ACEmanager™ On a Windows computer connected to the LX60, enter http:/ /192.168.13.31:9191 in the web browser. The ACEmanager login screen appears. The administrator user name is entered by default. Enter the default password (printed on the label on the base of the unit) and click Login.
Need help?
Do you have a question about the LX60 and is the answer not in the manual?
Questions and answers