
Subscribe to Our Youtube Channel
Related Manuals for BKI BLG-TC Series


Summary of Contents for BKI BLG-TC Series
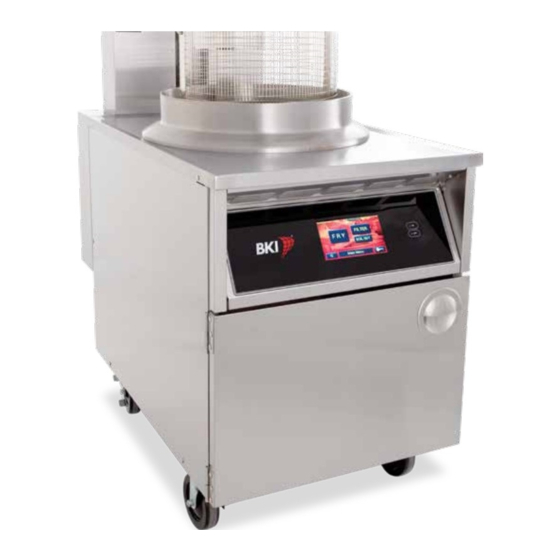
- Page 1 Extra-Large Gas Auto-Lift Fryer Series: BLG-TC with Training Central ™ Operation Manual...
- Page 2 U.S.A. COVERAGE PERIOD Warranty claims must be received in writing by BKI within one (1) year from date of installation or within one (1) year and three (3) months from data of shipment from the factory, whichever comes first.
-
Page 3: Table Of Contents
Gas Auto-Lift Fryer Table of Contents Table of Contents Table of Contents ..............................1 Introduction ................................2 Safety ..................................2 Safety Signs and Messages ..........................2 Specific Precautions ............................3 Equipotential ground plane ........................... 3 Full Disconnection ............................3 Safe Work Practices ............................4 Safety Labels .............................. -
Page 4: Introduction
BKI patented features and safety devices offer flexibility, efficiency and reliability plus PERFECTION IN FRYING! The BKI name and trademark on this unit assures you of the finest in design and engineering -- that it has been built with care and dedication -- using the best materials available. Attention to the operating instructions regarding proper installation, operation, and maintenance will result in long lasting dependability to insure the highest profitable return on your investment. -
Page 5: Specific Precautions
These sparks could cause serious injury, damage, or fire. BKI provides an Equipotential ground terminal for the connection of a bonding conductor after the installation of the appliance per lEC60417-1. This terminal is located on the inside of the Power Entry Supply box near the Earth connection and is marked with this symbol. -
Page 6: Safe Work Practices
Gas Auto-Lift Fryer Introduction Safe Work Practices Do Not Store Or Use Anything Flammable Near The Fryer Your pressure fryer is powered by either natural gas. Do not store or use gasoline or any flammable liquids or vapors near this or any other appliance. - Page 7 You received a pair of insulated mitts with your fryer. If you lose or damage your mitts, you can buy new ones at your local restaurant equipment supply store or from your local BKI Distributor. Always wear non-skid shoes when working around the fryer or any other...
- Page 8 Gas Auto-Lift Fryer Introduction neckties or scarves while operating your fryer. Keep loose hair tied back or in a hair net while operating your fryer. Always wear appropriate personal protection equipment during the filtering process to guard against possible injury from hot oil. Always wear appropriate personal protection equipment during the boil- out process to guard against possible injury from hot cleaning solution.
- Page 9 Gas Auto-Lift Fryer Introduction Be Prepared for Emergencies Be prepared for fires, injuries, or other emergencies. Keep a first aid kit and a fire extinguisher near the equipment. You must use a 40-pound Type BC fire extinguisher and keep it within 25 feet of your equipment.
-
Page 10: Safety Labels
Gas Auto-Lift Fryer Introduction Safety Labels... -
Page 11: Installation
Make sure a restraining device is used that complies with the Standard for Commercial Gas Ranges, • ANSI Z83.11/CGA 1.8 (such as BKI part number FT0279) to guard against transmission of strain to the connector. Retain the manual for future reference. -
Page 12: Location And Clearance
Failure to restrain the fryer could allow it to move, causing hot shortening to spill out, or a possible break in the gas line causing an explosive condition. 2. Install an ANSI Z83.11/CGA 1.8 compliant restraining device (such as BKI part number FT0279) per the instructions below: Mount the wall attachment according to the restraining device manufacturer instructions. - Page 13 Gas Auto-Lift Fryer Installation Use appliance connectors and quick-disconnect devices that are in compliance with the applicable ANSI and CSA standards. 3. Attach an appliance connector to the fryer according to the instructions provided by the appliance connector manufacturer. 4. Connect the gas supply to the fryer. 5.
-
Page 14: Initial Test And Adjustment
Gas Auto-Lift Fryer Installation Initial Test and Adjustment 1. Turn on the gas at the gas supply valve. 2. Place the DRAIN handle in the CLOSED position. 3. Fill pot with shortening to just above the oil level mark. Risk of fire exists if the oil level drops below the minimum oil level. The level of oil within the pot must not fall below 5mm of the maximum oil level. -
Page 15: Gas Conversion Instructions
Gas Auto-Lift Fryer Installation Gas Conversion Instructions To convert the gas system from a Natural Gas to LP Gas application or vice versa, contact the BKI Technical Service Department, toll free: 1-800-927-6887. Outside the U.S., call 1-864-963-3471. Care of the Shortening... -
Page 16: Operation
Gas Auto-Lift Fryer Operation Operation with Training Central™ Start-Up (BLG-TC 1. Turn fryer on by touching the ON button for 3 seconds. 2. Make sure the main drain valve is closed. 3. Fill pot with shortening to just below the oil level mark. - Page 17 Gas Auto-Lift Fryer Operation Risk of fire exists if the oil level drops below the minimum oil level. The level of oil within the pot must not fall below 5mm of the maximum oil level. Use of oil/shortening older than the manufacturers recommendations for life of the oil is prone to surge boiling and flash fires.
- Page 18 Gas Auto-Lift Fryer Operation 7. When the fryer is ready to cook the recipes will be activated. IMPORTANT! Before the first cooking operation each day, stir the shortening freely while it is heating to provide a balanced shortening temperature for excellent results with the first cooking. Failure to do this can result in a crusty skin on the product surface with an undercooked product internally.
-
Page 19: Cooking (Blg-Tc With Training Central™)
Gas Auto-Lift Fryer Operation with Training Central™ Cooking (BLG-TC 1. Ensure that the Start-Up procedures have been performed. 2. Press the menu item button for the desired cook. 3. When frying chicken, lower the basket into the shortening by depressing the basket down button. Hot shortening may splash out of the pot causing severe injury when dropping chicken into pot. - Page 20 Gas Auto-Lift Fryer Operation (To cancel the recipe press and hold the back button for 3 seconds.) 6. At the end of the frying cycle, the digital timer beeper will sound and the basket will automatically rise out of the pot. Press the green check mark button. 7.
-
Page 21: Product Programming
Gas Auto-Lift Fryer Operation Product Programming 1. Press the Key button to get into the settings menus. Enter code 1234 and then pres the green check mark. 3. Select the Edit Recipe button... - Page 22 Gas Auto-Lift Fryer Operation 4. Select the Recipe that needs edited. 5. In the Edit Recipe screen the name, cook time, temperarture, timing type, & picture can be edited. 6. Select Name to change the name and press the green check mark to save.
- Page 23 Gas Auto-Lift Fryer Operation 7. Select Frying to edit the time and temperature of the recipe. Press the green check mark to save. 8. Pressing the Next button will bring you to the second page where the shake/stir, alarm, if the program is active, and the filter weight can be edited.
- Page 24 Gas Auto-Lift Fryer Operation 10. Press the alarm time to edit the time. Press the green check mark to save. 11. Set the basket lift start position, make sure the program is active and set the filter weight (1.0-12.0 by 0.5 increments, if using global filtering).
-
Page 25: Set Oil Temp
Gas Auto-Lift Fryer Operation Set Oil Temp 1. Get into the supervisor menu and select the Set Oil Temp button 2. Set the oil temperature to the desired ready to cook temperature between 250° F and 375° F. 3. Press the green check mark to save. -
Page 26: Set Clock
Gas Auto-Lift Fryer Operation Set Clock 1. Get into the supervisor menu and select the Set Clock button 2. Set the date & time. 3. Press the green check mark to save. -
Page 27: Settings
Gas Auto-Lift Fryer Operation Settings 1. Get into the supervisor menu and select the Settings button 2. Set the Beeper Volume (Low or High), Pattern (1, 2, or 3), the Filter Lockout* can be turned off & on, the Filter Lockout Value can be set (2-20), and the Temperature Units can be set (C or F). *The filter lockout is a global counter used to determine when to force filter. -
Page 28: Frying Log
Gas Auto-Lift Fryer Operation Frying Log 1. Get into the supervisor menu and select the Frying Log button 2. The frying log will record the following events: Recipe Cooked with elapsed time and average temperature • Basic Filter with filtering time, refill time, and number of pump lockouts •... -
Page 29: Machine Log
Gas Auto-Lift Fryer Operation Machine Log 4. Get into the supervisor menu and select the Machine Log button 5. The machine log will record the following events: Touchscreen Error • Probe Error • Nonvolatile Memory read, write, or data errors •... -
Page 30: Import/Export
Gas Auto-Lift Fryer Operation Import/Export 1. Get into the supervisor menu and select the Import/Export button 2. Insert a USB drive. 3. Press the import/export recipes button to save the recipes to a USB or copy to the fryer. - Page 31 Gas Auto-Lift Fryer Operation 1. To add up to 8 additional Recipe Icons, press the Import Icons button with the USB inserted. 2. Importable Image Requirements: a. JPG images only, standard 24 bit color with any amount of image compression. b.
- Page 32 Gas Auto-Lift Fryer Operation 1. To copy any or all 8 Recipe Icons, press the Export Icons button with the USB inserted. 2. The eight button on the left side display all the imported user icons. Select or deselect any of the 8 images to be exported just by touching the icon buttons.
-
Page 33: Change Code
Gas Auto-Lift Fryer Operation Change Code 1. Get into the supervisor menu and select the Change Code button 2. Enter the new 4 digit access code. We recommend an easy to remember number, like the store number. 3. Press the green check mark to save. -
Page 34: Touchscreen
Gas Auto-Lift Fryer Operation Touchscreen 1. Get into the supervisor menu and select the Touchscreen button 2. Press the buttons to adjuste the screen sensitivity. Press the TEST button to verify the senitivity level. 3. Press the Calibrate button to re-calibrate the touchscreen 4. -
Page 35: Operation After Gas Or Power Outage
Gas Auto-Lift Fryer Operation Operation after Gas or Power Outage The fryer may shut off automatically if the gas supply is interrupted or the power goes out. If either of these conditions occur, you should perform the following procedure: For your safety, if the gas supply stops, or, if the power goes out, make sure to wait for at least five minutes before restarting your fryer. -
Page 36: Maintenance
Your fryer will need periodic maintenance and servicing. We strongly suggest that you use only a service company that is authorized by BKI to do this work. The BLG appliance is not intended to be cleaned with a water jet. -
Page 37: Filtering Procedure
Gas Auto-Lift Fryer Maintenance Filtering Procedure Breaded foods require frequent filtering. An excess amount of breading left in the fryer pot will reduce the life of the shortening. We recommend the shortening be filtered after every three frying cycle loads. If the shortening starts to show signs of foaming or has a bad taste, do not use it. - Page 38 Gas Auto-Lift Fryer Maintenance 4. Press the FILTER button to get the Filter Menu. 5. Press the FILTER or TUTORIALS button. 6. If you press the TUTORIALS button you can go through how to assemble the filter, how to do basic filter and how to filter with the rinse hose.
-
Page 39: Basic Filter
Gas Auto-Lift Fryer Maintenance Basic Filter 7. If you press the FILTER button you can do a basic filter or a filter with rinse hose. Below we will go through a basic filter. - Page 40 Gas Auto-Lift Fryer Maintenance Oil Over 250°F?
- Page 41 Gas Auto-Lift Fryer Maintenance 8. Open the pot drain slowly so that the shortening starts to flow evenly. This is to prevent excessive splashing of hot shortening. 9. Clean the pot, elements, & drain with the supplied brushes as the oil drains. 10.
- Page 42 Gas Auto-Lift Fryer Maintenance 11. The display will count up the time the pump is on to indicate the duration of the polishing. When done press the Off button to stop the pump and press the right arrow button. 12. To refill the pot close the pot drain and make sure the fill handle is THRU POT. Hot shortening may splash out of the pot causing severe injury when filling the pot.
- Page 43 Gas Auto-Lift Fryer Maintenance 14. The display will count up the time the pump is on to indicate the duration of refilling of the pot. Let the filter continue to pump the shortening until air starts bubbling through the shortening. When done press the Off button to stop the pump and press the right arrow button.
-
Page 44: Filter With Rinse Hose
Gas Auto-Lift Fryer Maintenance Filter with Rinse Hose 1. If you press the FILTER button you can do a basic filter or a filter with rinse hose. Below we will go through a filter with rinse hose. - Page 45 Gas Auto-Lift Fryer Maintenance Oil Over 250°F?
- Page 46 Gas Auto-Lift Fryer Maintenance 2. Open the pot drain slowly so that the shortening starts to flow evenly. This is to prevent excessive splashing of hot shortening. 3. Clean the pot, elements, & drain with the supplied brushes as the oil drains. 4.
- Page 47 Gas Auto-Lift Fryer Maintenance 5. Holding the hose by the handle, place hose nozzle inside the pot and press the ON button to start the pump. 6. Rinse the inside of the pot with the hose, press Off button when done. 7.
- Page 48 Gas Auto-Lift Fryer Maintenance Hot shortening may splash out of the pot causing severe injury when filling the pot. 8. Press the On button to start the pump and refill the pot. 9. The display will count up the time the pump is on to indicate the duration of refilling of the pot. Let the filter continue to pump the shortening until air starts bubbling through the shortening.
-
Page 49: Boil Out
Boil-outs remove microscopic particles of carbon that build up on the walls of the fryer pot. To avoid eventual carbon build-up, off flavors, and shortening breakdown, boil-outs should be done once a week on each fryer following these procedures. BKI recommends BKI Cleaner (P/N LC0006) or equivalent. Always wear appropriate personal protection equipment during the boil-out process to guard against possible injury from hot cleaning solution. - Page 50 Gas Auto-Lift Fryer Maintenance 3. Open the pot drain slowly so that the shortening starts to flow evenly. This is to prevent excessive splashing of hot shortening. 4. Close the pot drain, fill the pot with water to the fill line, & add the cleaning product. 5.
- Page 51 Gas Auto-Lift Fryer Maintenance 6. The water will heat up to 190° F. 7. Once the water has reached temperature and 2 minutes have passed the control will beep until the green check mark is pressed. Clean the pot with the brushes provided. 8.
- Page 52 Gas Auto-Lift Fryer Maintenance 9. Before draining the cleaning solution, remove the filter bag, screen and pipe connections from the filter vat. This must be done before draining the cleaning solution. NEVER pump water or detergent through the filter system. 10.
- Page 53 Gas Auto-Lift Fryer Maintenance 18. Confirm the oil level.
-
Page 54: Filter Pad Replacement
Gas Auto-Lift Fryer Maintenance Filter Pad Replacement The filter pad must be replaced daily. If the shortening has a milky color when it is pumped into the pot, the filter pad should be replaced immediately. If the filter pad is not properly closed, breading crumbs will get through the pad opening and clog the pump. - Page 55 Gas Auto-Lift Fryer Maintenance 3. Fold the open end of the envelope over and install the retaining clip. 4. Place the top screen over the assembly and check that the pickup hole is clear. 5. Install the pickup tube and hand tighten. Make sure the filter envelope is not torn.
- Page 56 Gas Auto-Lift Fryer Maintenance 6. Install the filter assembly into the filter vat. Place the filter vat lid on and slide the filter vat back into fryer.
-
Page 57: Troubleshooting
Refer to the table below for troubleshooting information. Problem Cause Possible Solution Shortening Heating Too Slowly Gas pressure is low or isn’t Contact an authorized BKI service agent adjusted properly for corrective action. Bad thermostat or loose Contact an authorized BKI service agent wires for corrective action. -
Page 58: Gas Alarm
If the fryer tries 3 times to light the burner without success the gas control system will lock out and a Gas Alarm will pop up on the screen. Press the green RESET button to reset the gas control system and try to light again. If the problem persists, contact an authorized BKI service agent for corrective action. Filter Pump Reset... - Page 59 Gas Auto-Lift Fryer Maintenance Once the pump has cooled, the screen will indicate that the pump is ready. Press the green Check Mark to start the pump back up.
-
Page 60: Notes
Gas Auto-Lift Fryer Notes Notes... - Page 61 2812 Grandview Dr., Simpsonville, S.C. 29680, USA http://www.bkideas.com Made and printed in the U.S.A SS-OM-062.03 Revised 09/18/2018...
- Page 62 REVISION HISTORY REVISION DATE REVISED BY DESCRIPTION 04/03/18 Initial Release-Supersedes all previous releases 05/14/18 Added Recipe Icon Import/Export (LCO 18-004) 09/18/18 Added additional Team Central info, updated filter process, and required Warning for California residents. (LCO 18- 007)
Need help?
Do you have a question about the BLG-TC Series and is the answer not in the manual?
Questions and answers