Table of Contents
Advertisement
Ri50
Contura
Wood Fireplace
Owners &
Installation Manual
French Manual: https://bit.ly/2FIEatU
Manuel en Français: https://bit.ly/2FIEatU
Tested by:
Installer: Please complete the details on the back cover
and leave this manual with the homeowner.
Homeowner: Please keep these instructions for future reference.
FPI FIREPLACE PRODUCTS INTERNATIONAL LTD. 6988 Venture St., Delta, BC Canada, V4G 1H4
12.13.18
919-835a
Advertisement
Table of Contents

Related Manuals for Regency Fireplace Products Contura Ri50


Summary of Contents for Regency Fireplace Products Contura Ri50
- Page 1 Ri50 Contura Wood Fireplace Owners & Installation Manual French Manual: https://bit.ly/2FIEatU Manuel en Français: https://bit.ly/2FIEatU Tested by: Installer: Please complete the details on the back cover and leave this manual with the homeowner. Homeowner: Please keep these instructions for future reference. FPI FIREPLACE PRODUCTS INTERNATIONAL LTD.
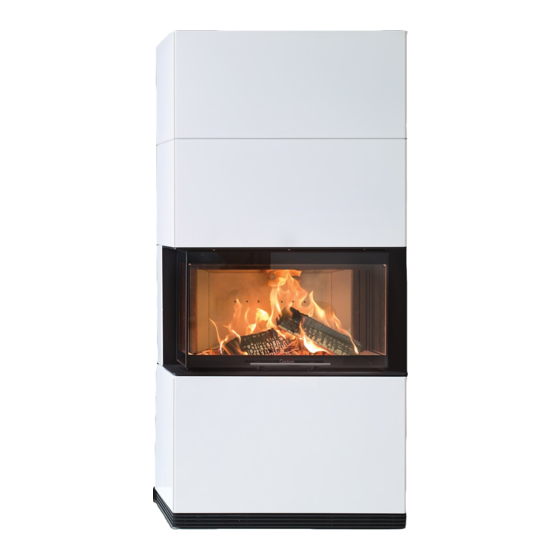
- Page 2 Read through the installation instructions carefully before installation. Read how to best light your fireplace in the lighting instructions. The Contura Ri50 features a smooth, quiet guillotine door and fire viewing from three sides. This fireplace combines technology, engineering and simple installation.
-
Page 3: Table Of Contents
Table of Contents Serial decal for Contura Ri50 .................... 5 Unit dimensions ......................... 6 Residential Installation ....................... 8 Room Air - Important ......................8 Minimum clearance to combustible materials ..............9 Combustible wall finishing material clearances ..............11 Prior to installation ...................... - Page 4 This manual contains instructions about how If the firebox is to be positioned on a wooden to assemble and install the Contura Ri50. Read joist, a structural engineer should evaluate the it carefully and keep it safe for future use. To load capacity of the floor.
-
Page 5: Serial Decal For Contura Ri50
Serial decal for Contura Ri50 This is a copy of the data badge that accompanies each Contura Ri50 Wood DO NOT REMOVE THIS LABEL Fireplace. We have included a NE PAS ENLEVER CETTE ÉTIQUETTE LISTED SOLID FUEL FIREPLACE FOYER À... -
Page 6: Unit Dimensions
dimensions Unit dimensions " 485 mm " " 420 mm 7 ½" 765 mm 190 mm " " " 270 mm 270 mm 670 mm 5 ½" 9 ½" 2 ¾" 10 ¼" 140 mm 240 mm Air Inlet 4" / 100mm Tilluftsstos Ø100 70 mm 260 mm... - Page 7 dimensions Unit components Heat Deflector Diffuser Counter Weight Smoke Shelf Grate 391 300 Hearth Cladding Handle Hook Adjustable Feet 398 960 Cold Touch Handle 391 326 Ashpan 391 085 Connector Serial Decal Bottom Insulation...
-
Page 8: Residential Installation
installation Residential Installation (203mm) to the sides and rear of the unit. Some areas may require a larger size floor protector. See your local inspector. For outside air installation refer to Mobile Home installation 1. Please read this entire manual before you install and use your instructions within this manual. -
Page 9: Minimum Clearance To Combustible Materials
installation Minimum clearance to combustible materials Please read the section below carefully as clearances are measured from rear heat deflector and side of unit above glass prior to installing facades. Measurements "From Unit" are from the top plate of the fireplace to a side wall or to a corner, and from the rear heat shield to a back wall. - Page 10 2" beyond each side for horizontal applications. Minimum Overall Depth of Floor Protector Unit Edge of Fuel door Edge of Fuel Door opening to edge of Opening hearth Contura Ri50 Canada 45-1/2" 18" 62-1/2" 18" 1156mm 457mm 1588mm 457mm 43-1/2"...
-
Page 11: Combustible Wall Finishing Material Clearances
installation Combustible wall finishing material clearances Please read the section below carefully as clearances are measured from rear heat deflector and side of optional trim or finishing panels. Combustible wall finishing clearances Contura from A - Sides B - Top* C - Material Thickness Ri50 Optional... -
Page 12: Prior To Installation
installation Prior to installation The fireplace is secured to the pallet by four anchoring cups, remove the screws and slide out the anchoring cups. Reinstall the screws on the legs before moving the fireplace from the pallet. Transport locking device Remove 2 bolts as shown below from both left/right side as shown. -
Page 13: Function Check
installation Function check Perform a function check on the fireplace as follows: Use the adjustable feet to level the fireplace. Check that the door can be opened and closed. The door runners are lubricated at the factory, with special grease that can withstand high temperatures. This type of grease is usually difficult to find on the market and we recommend contacting a Regency or Contura dealer to order this special grease when lubricating the runners. -
Page 14: Step-By-Step Chimney And
installation Step-by-step chimney and connector installation Note: These are a generic set of chimney installation Note: Increasing the chimney height above this minimum instructions. Always follow the manufacturers level will sometimes help your unit to “breathe” better own instructions explicitly. Verify the Minimum by allowing a greater draft to be created. - Page 15 installation 10. NOTE: Residential Close Clearance and Alcove installations 8. To complete your chimney installation, install the double wall connector pipe from the fireplace’s flue collar to the chimney require a listed double wall connector from the fireplace support device. collar to the ceiling level.
-
Page 16: Masonry Chimney
installation Fireclay ue liner with airspace Masonry Chimney Concrete Cap Flashing Rafter Ensure that a masonry chimney meets the minimum standards of the National Eave Ceiling Joist Fire Protection Association (NFPA) by 1 Inch Clearance having it inspected by a professional. I Inch Clearance with Fire Stop Make sure there are no cracks, loose Combustible Wall... -
Page 17: Combustible Wall Chimney Connector Pass-Throughs
installation Combustible wall chimney connector pass-throughs Method A: 12" (304.8 mm) Clearance to Combustible Wall Member: Using a minimum thickness 3.5" (89 mm) brick and a 5/8" (15.9 liner and wall combustibles. The clay liner shall run from the brick mm) minimum wall thickness clay liner, construct a wall pass- masonry outer surface to the inner surface of the chimney flue through. - Page 18 installation Method C: 6" (152.4 mm) Clearance to Combustible Wall Member: Starting with a minimum 24 gage (.024" [.61 mm]) 6" (152.4 mm) Support the wall thimble, and cover its opening with a 24-gage metal chimney connector, and a minimum 24 gage ventilated minimum sheet metal support.
-
Page 19: Recommended Heights For Fireplace Flue
installation Recommended heights for fireplace flue Simple rules on draft (refer to Table 1). At sea level minimum height is 12' straight. Add the following vertical height to compensate for: 45 deg. elbow = 1 ft. 90 deg. elbow = 2 ft. "T"... -
Page 20: Mobile Home Installation
installation Mobile home installation (USA ONLY, not approved in Canada) Once you have properly marked the position of your unit and the For Mobile Home units installed in the U.S. the unit must be floor protection as outlined in the Residential Installation items grounded using a #8 ground wire with approved termination and #1 through #8, a supply of fresh air has to be supplied to your star washer. - Page 21 installation CAUTION: At no time use unlabelled parts, or substitute parts made for another chimney system. Install as per chimney manufacturer's installation instructions. 1. Identify the position of the outside air damper by the orientation of the metal handle that rests outside the galvanized pipe.
-
Page 22: Supply Of Combustion Air
installation Supply of combustion air Supply of combustion air is recommended. Combustion air can be provided directly via a duct from outside, or indirectly via vent in the outer wall of the room where the fireplace is placed. Outside Air Kit: Part # 299009 Some installation alternatives are shown below. -
Page 23: Steel Surround Installation
installation Steel surround installation The fireplace can be positioned tight to the wall behind, if using a masonry chimney. When installing against non-vertical walls to facilitate installation it is recommended that a small gap is left between the wall and fireplace. Lay the floor section a slight Cross in floor distance from the wall behind, and align the position of the holes in the ceiling for the... - Page 24 installation Note : Ensure the floor base is secured prior to adjusting unit. See page 20 for details. 1/2" (13 mm) 1/2"(13 mm) ** IMPORTANT- Place a level on the moulding below the door, adjust the feet until the smallest dimension from the floor to the underneath of the moulding is 20"...
- Page 25 installation NOTE: For steel surround only Check that the transport locking device of the counterweight is removed according to the fireplace instructions before assembling the surround.
- Page 26 installation Pre-installation of lower cover - section 1. Nut M5 Tool 8 mm or 5/16" wrench Nut M5 Tool 8 mm or 5/16" wrench 90° Nut M5 Tool 8 mm or 5/16" wrench...
- Page 27 installation Pre-installation of side panels - section 2 M6 x 16 Allen screw 4mm or 5/32" Tool 10 mm wrench or crescent wrench Spacers Pre-installation of upper cover - section 3 Nut M5 Tool 8 mm or 5/16" wrench 90° M6 x 16 Allen screw 4mm or 5/32"...
- Page 28 installation Tool 10 mm wrench or crescent wrench M6 x 16 Allen screw 4mm or 5/32" Pre-installation of upper cover - section 4 Nut M5 Tool 8 mm or 5/16" wrench 90° M6 x 16 Allen screw 4mm or 5/32" Spacers...
- Page 29 installation M5 x 12 Nut M5 Allen screw 3mm Tool 8 mm or 3/32" or 5/16" wrench...
- Page 30 installation 8 mm wrench (or use crescent wrench)
- Page 31 installation 10 mm (or use crescent wrench) IMPORTANT! This adjustment is crucial to ensure side doors will open. Open both side doors to ensure it does open up freely prior to next step. See page on firebox maintenance in this manual for details.
- Page 32 installation M6 x 20 Tool wrench or crescent wrench Install hanger for door operation tool before sliding bottom façade into position.
- Page 33 installation Important: If installing the 3 inch finishing trim, install finishing trim prior to this step. See instruction in this manual for details. M6 x 20 Allen screw 4mm or 5/32"...
- Page 34 installation Optional Trim Installation Optional Trim Installation Ri50 1. Identify the left and right trim parts via the profile. Left Side Right Side 2. Line up the left and right trim with the keyhole brackets at the back of the unit. 3.
- Page 35 installation Assembling grate and top For rear connection M6 x 10 Allen screw 4mm or 5/32" Center and push downward to lock into place...
- Page 36 installation rear glass Gap must be maintained between perimeter glass and rear glass as shown. perimeter glass...
- Page 37 installation For top connection M6 x 10 Allen screw 4mm or 5/32" Ø 6" / 152 mm 9 " / 2 3 0 m m 8 ½ " / 2 1 5 m m Note: The remaining bars are inside of the manual package and are used when going to top connection.
- Page 38 installation rear glass Gap must be maintained between perimeter glass and rear glass as shown. perimeter glass...
-
Page 39: Disc Base
installation Disc base Adjust the rubber feet on the disc base so that the gap up to the stone is 3/16" (5 mm). -
Page 40: Installing The Firebox Cladding
installation Installing the firebox cladding... - Page 41 installation...
- Page 42 installation...
-
Page 43: Ash Disposal
operating instructions Ash disposal During constant use, ashes should be removed every few days. The 3. Never start a fire if the ash grate and ash drawer are not in place. fireplace features a convenient ash dump for easy removal of ash. This will cause over firing which can cause excessive warping of the fireplace. -
Page 44: Seasoned Firewood
operating instructions Creosote -- Formation and need for Removal Establish a routine for the fuel, wood burner and firing technique. Check daily for creosote build-up until experience When wood is burned slowly, it produces tar and other shows how often you need to clean to be safe. Be aware that organic vapors, which combine with expelled moisture to form the hotter the fire the less creosote is deposited, and weekly creosote. -
Page 45: Door Operation
Door operation The Contura Ri50 is supplied with a cool touch door operation tool which is stored on the side of the unit when not in use. Use the cool touch door tool when opening, closing and refueling the... -
Page 46: Lighting For The First Time
operating instructions Lighting in the right way It is important that the correct amount of wood is used, especially when lighting. Follow the kindling procedure below, after which the fireplace must be burnt with the door closed because of the risk of smoke entering the room. -
Page 47: Adding Wood
operating instructions Adding wood It is very important to build up the fire. Use small split pieces after the lighting stage to establish a hot coal bed. The first and second loads of wood after lighting, it is recommended to use 3 pieces of wood to build up a proper glowing bed of embers and get the fireplace to operating temperature. -
Page 48: Firebox Maintenance
maintenance Firebox maintenance The glass may become sooty with use, even if the fireplace is It is important from a combustion point of view to check gaskets, lit with dry wood with a moisture content of 15 – 20%. Regular as worn gaskets hinder combustion when the fireplace draws ”extra cleaning with dry paper is usually sufficient to keep it clean. -
Page 49: Service Manual: Inspections, Maintenance
maintenance Service Manual: Inspections, Maintenance Table of contents 1. Replace side glass 2. Replace front glass 3. Replace gasket door 4. Replace gasket back 5. Replace door 6. Replace Guillotine mechanism Replace side glass: Use only manufactured parts. See replacement parts list for glass replacement. NOTE: All glass is 4mm--Neoceramic glass. - Page 50 maintenance...
- Page 51 maintenance Replace front glass First: Remove side glass...
- Page 52 maintenance...
- Page 53 maintenance Replace gasket door First: Remove side glass Remove front glass...
- Page 54 maintenance...
- Page 55 maintenance...
- Page 56 maintenance...
- Page 57 maintenance P R E S S P R E S S...
- Page 58 maintenance...
- Page 59 maintenance Remove gasket back...
- Page 60 maintenance...
- Page 61 maintenance Remove door...
- Page 62 maintenance...
- Page 63 maintenance...
- Page 64 maintenance Replace Guillotine mechanism First: Remove side glass Remove gasket back Remove door...
- Page 65 maintenance...
- Page 66 maintenance...
-
Page 67: Replacement Parts
parts list Replacement parts 391697 Assembled Door (Spare part number) - Page 68 parts list Replacement parts (Left or Right)
- Page 69 parts list Replacement parts 391583 Assembled Side Box (right or left) (Spare part number) 391583 Assembled Side Box (right or left) (Spare part number)
- Page 70 parts list Replacement parts 803400 Thermotte kit Ri50 198941 (1x) 803400 Thermotte set (Spare part number) 803399 (1x) 803402 (1x) 803520 (1x) 803521 (1x) 803404 (1x) 803403 (1x) 298660 (1x) 803137 (1x) O36305 Insert Foot 434719 Adjustable Foot...
- Page 71 parts list 298491 Shelf Left 298490 Shelf Right 398834 Shelf Front 298965 Door Rail Right 298966 Door Rail Left...
- Page 72 parts list 603135 Plastic Air Hook Up Lower 803533 Plastic Air Hook Up Upper 298635 Hood Front 298638 Hood Side Right 298639 Hood Side Left 298641 Right Side Panel 298642 Left Side Panel...
- Page 73 parts list 298670 Air flow panel 398929 Radiation Shield Back 603144 Wire Door Opening...
- Page 74 warranty These conditions apply to the solid fuel Ri50 fireplace manufactured by NIBE AB under the Contura brand and distributed by FPI Fireplace Products International Ltd. (for Canadian customers) and Fireplace Products U.S., Inc. (for U.S. customers) (collectively referred to herein as “FPI”). FPI extends this Warranty to the original purchaser of this appliance provided the product remains in the original place of installation.
- Page 75 warranty All Local and National required codes must be met. The installer is responsible to ensure the unit is operating as designed at the time of installation. The original purchaser is responsible for annual maintenance of the unit, as outlined in the owner’s manual. As outlined below, the warranty may be voided due to problems caused by lack of maintenance.
- Page 76 warranty Limitations of Liability: The original purchaser’s exclusive remedy under this warranty, and FPI’s sole obligation under this warranty, express or implied, in contract or in tort, shall be limited to replacement, repair, or refund, as outlined above. IN NO EVENT WILL FPI BE LIABLE UNDER THIS WARRANTY FOR ANY INCIDENTAL OR CONSEQUENTIAL COMMERCIAL DAMAGES OR DAMAGES TO PROPERTY.
- Page 77 NOTES...
- Page 78 warranty Product Registration and Customer Support: Thank you for choosing a fireplace distributed by FPI. FPI strives to be a world leader in the design, manufacture, and marketing of hearth products. To provide the best support for your product, we request that you complete a product registration form found on our Web Site under Customer Care within ninety (90) days of purchase.
- Page 80 NOTES...
- Page 81 notes...
- Page 82 notes...
- Page 84 Installer: Please complete the following information: Dealer Name & Address: Installer: Phone #: Date Installed: Serial No.: XXXXXX IAV US Contura Ri50-0 2018-09-04 © Copyright 2018, FPI Fireplace Products International Ltd. All rights reserved.
Need help?
Do you have a question about the Contura Ri50 and is the answer not in the manual?
Questions and answers