Chapters
Table of Contents
Troubleshooting

Related Manuals for LSIS Master-K K200S


Summary of Contents for LSIS Master-K K200S
- Page 1 K200S MASTER-K K300S K1000S Programmable Logic Controller Read this manual carefully before installing, wiring, operating, servicing or inspecting this equipment. Keep this manual within easy reach for quick reference.
- Page 2 Chapter 1 Introduction Introduction......................1-1 Guide to the user’s manual ..................1-1 Features ........................1-2 Terminology....................... 1-3...
-
Page 3: Introduction
Chapter 1 Instruction MASTER-K 1 Introduction 1.1 Guide to the user’s manual This user’s manual contains specifications, performance, and handling instructions for each of unit of MASTER-K 200S/300S/1000S series PLC system. The following table shows the configuration of this user’s manual. Chapter Item Description... -
Page 4: Features
Chapter 1 Instruction MASTER-K 1.2 Features The features of MASTER-K 200S/300S/1000S series are as following; 1) Program compatibility with previous MASTER-K series 2) Support various and easy-to-use programming devices ① KGL-WIN : Graphic loader for Windows 95 / 98 ② KLD-150S : Hand-held loader 3) Open network by supporting communication protocol complying with international standard. -
Page 5: Terminology
Chapter 1 Instruction MASTER-K 1.3 Terminology The following table shows the definition of terms used in this manual. Terms Definition Remark Example) A standard element that has a specified function which CPU module, Module configures a system. Devices such as CPU or I/O, which Power module, mounted on the base board or base unit. - Page 6 Chapter 1 Instruction MASTER-K Terms Definition Remark Current flows in from the input switch to the input terminal of PLC when an input signal is turned on. Input Switch terminal Z: Input Sink input impedance Current Power – Common Current flows out from the input terminal of PLC to the input switch when an input signal is turned on.
-
Page 7: Table Of Contents
Chapter 2 System configuration 2 System configuration ................... 2-1 2.1 Overall configuration....................2-1 2.1.1 K200S series......................2-1 2.1.2 K300S / 1000S series .................... 2-2 2.2 Product list ........................ 2-3 2.2.1 K200S ........................2-3 2.2.2 K300S ........................2-5 2.2.3 K1000S ........................2-8 2.3 System configuration types................... -
Page 8: System Configuration
Chapter 2 System configuration MASTER-K 2 System configuration The MASTER-K 200S/300S/1000S series has various modules suitable to configuration from the basic to a large network system. This chapter describes the configuration and features of each systems. 2.1 Overall configuration 2.1.1 K200S series The overall system configuration of K200S series is as following;... -
Page 9: K300S / 1000S Series
Chapter 2 System configuration MASTER-K 2.1.2 K300S / 1000S series The overall system configuration of K300S/1000S series is as following; Battery RS232-C Cable IBM compatible PC KGL-WIN K7P-30AS Memory Module CPU Module Power Supply Module Fuse Main Base Input Module Output Module Expansion Cable Special Function Module... -
Page 10: Product List
Chapter 2 System configuration MASTER-K 2.2 Product list The product list of K200S/300S/1000S are as following; 2.2.1 K200S Items Model No. Description Remark Max. I/O points : 512 points K3P-07AS Special functions : RS-232C Max. I/O points : 512 points K3P-07BS modules Special functions : RS-422/485, RTC, PID control... - Page 11 Chapter 2 System configuration MASTER-K (continued) Items Model No. Description Remark Voltage / Current input, 4channels A/D conversion G6F-AD2A 1 ~ 5VDC / 0 ~ 10VDC / -10 ~ 10VDC modules DC 4 ~ 20mA Voltage output, 4 channels G6F-DA2V -10 ~ 10VDC D/A conversion modules...
-
Page 12: K300S
Chapter 2 System configuration MASTER-K 2.2.2 K300S Items Model No. Description Remark K4P-15AS Max. I/O points : 512 points modules G4I-D22A 12/24VDC input, 16 points (source/sink) G4I-D22B 12/24VDC input, 16 points (source) G4I-D22C 24VDC input, 16 points (source/sink) G4I-D24A 12/24VDC input, 32 points (source/sink) Digital input G4I-D24B... - Page 13 Chapter 2 System configuration MASTER-K (continued) Items Model No. Description Remark Voltage / Current input, 4channels G4F-AD2A -5 ~ 5VDC / -10 ~ 10VDC DC -20 ~ 20mA conversion Voltage / Current input, 8channels modules G4F-AD3A 1 ~ 5VDC / 0 ~ 10VDC DC 4 ~ 20mA Voltage / Current output, 2 channels G4F-DA1A...
- Page 14 Chapter 2 System configuration MASTER-K (continued) Items Model No. Description Remark Fnet I/F module G4L-FUEA 1Mbps base band, Twisted pair cable Fnet I/F module Install to the IBM G0L-FUEA compatible PC 1Mbps base band, Twisted pair cable Fnet remote I/F module G4L-RBEA 1Mbps base band, Twisted pair cable Fnet...
-
Page 15: K1000S
Chapter 2 System configuration MASTER-K 2.2.3 K1000S Items Model No. Description Remark K7P-30AS Max. I/O points : 1,024 points modules G3I-D22A 12/24VDC input, 16 points (source/sink) G3I-D24A 12/24VDC input, 32 points (source/sink) G3I-D24C 24VDC input, 32 points (source/sink) Digital G3I-D28A 12/24VDC input, 64 points (source/sink) input G3I-A12A... - Page 16 Chapter 2 System configuration MASTER-K (continued) Items Model No. Description Remark Voltage / Current input, 16 channels G3F-AD4A -5 ~ 5VDC / -10 ~ 10VDC DC -20 ~ 20mA Voltage / Current input, 16 channels conversion G3F-AD4B 1 ~ 5VDC / 0 ~ 10VDC modules DC 4 ~ 20mA Voltage / Current input, 8 channels...
- Page 17 Chapter 2 System configuration MASTER-K (continued) Items Model No. Description Remark Fnet I/F module G3L-FUEA 1Mbps base band, Twisted pair cable Fnet I/F module G3L-FUOA 1Mbps base band, Optical fiber cable Fnet I/F module Install to the IBM G0L-FUEA compatible PC 1Mbps base band, Twisted pair cable Fnet remote I/F module G3L-RBEA...
-
Page 18: System Configuration Types
Chapter 2 System configuration MASTER-K 2.3 System configuration types System configuration is classified into 3 types such as basic, computer link, and network system. 2.3.1 Basic system configuration The basic system consists of a main base and expansion base(s). The main and expansion base(s) are connected via expansion cable. -
Page 19: Computer Link System
Chapter 2 System configuration MASTER-K 2.3.2 Computer link system When a CPU module is connected with external devices (such as computer or printer, etc.) via RS-232C or RS-422/485 protocol by using computer link module, it is called as computer link system. For details about computer link system, please refer user’s manual of MK computer link modules. -
Page 20: Network System
Chapter 2 System configuration MASTER-K 2.3.3 Network system In network system, user can access and control I/O module of remote station through a network I/F and remote I/F module. MASTER-K series uses the Fnet system to consist a network system. Besides, in 3.0 or higher CPU O/S version and in 3.2 or higher KGL-WIN version, user who want to use other network system can use the Dnet I/F system or I/F to construct a network... - Page 21 Chapter 3 General specifications 3 General specifications................3-1...
- Page 22 Chapter 3 General specifications MASTER- 3 General specifications The following table shows the general specifications of MASTER-K series. Item Specifications Remark Operating ambient 0 ~ 55℃ (32 ~ 131 °F) temperature Storage ambient -25 ~ 70℃ (-13 ~ 158 °F) temperature Operating ambient 5 ~ 95%RH, non-condensing...
- Page 23 Chapter 4 CPU modules 4 CPU modules..................... 4-1 4.1 Performance specifications ..................4-1 4.2 Operation processing of CPU.................. 4-2 4.2.1 Operation method ....................4-2 4.2.2 The operation during momentary power failure............. 4-3 4.2.3 Scan time ....................... 4-4 4.2.4 Watchdog timer ...................... 4-4 4.2.5 Timers ........................
-
Page 24: Cpu Modules
Chapter 4 CPU modules MASTER- 4 CPU modules 4.1 Performance specifications The performance specification of K200S / 300S / 1000S series is shown as following table; Specifications K300S Item Remarks K200S K1000S 2.X or lower 3.X or higher CPU O/S version CPU O/S version Program control Cycle execution of stored program, Time-driven interrupt,... -
Page 25: Operation Processing Of Cpu
Chapter 4 CPU modules MASTER- 4.2 Operation processing of CPU 4.2.1 Operation method 1) The repetitive operation The repetitive operation method repeats execution of a series of operations. The CPU repeats the operation processing as following; Step Description Start of operation The preparation step to execute scan operation Executed only 1 time when power is turned on or CPU is reset. -
Page 26: The Operation During Momentary Power Failure
Chapter 4 CPU modules MASTER- 2) Interrupt operation When the CPU detects an interrupt signal, it stops the current operation and execute the corresponding interrupt routine. After the interrupt routine is completed, the CPU resumes to execute the previous operation from the stopped point. The MASTER-K 200S/300S/1000S has two interrupt types that are time-driven interrupt (TDI) and process-driven interrupt (PDI). -
Page 27: Scan Time
Chapter 4 CPU modules MASTER- 4.2.3 Scan time The series of steps from step 0 to the next step 0 or from an END instruction to the next END instruction is called a scan. The scan time is total time spent to execute a scan. 1) The calculation of scan time The scan time is calculated as a total of the processing time of sequence program (step 0 to the END), interrupt routine, and internal processing of CPU. -
Page 28: Timers
Chapter 4 CPU modules MASTER- 4.2.5 Timers The MASTER-K 200S/300S/1000S series uses upcount timers. There are 5 timer instructions such as on-delay (TON), off-delay (TOFF), integral (TMR), monostable (TMON), and re-triggerable (TRTG) timer. The measuring time range of 100msec timer is 0.1 ~ 6553.5 sec, and that of 10msec timer is 0.01 ~ 655.35 sec. - Page 29 Chapter 4 CPU modules MASTER- 3) Integral timer In general, its operation is same as on-delay timer. Only the difference is the current value will not be clear when the input condition of TMR instruction is turned off. It keeps the elapsed value and restart to increase when the input condition is turned on again.
- Page 30 Chapter 4 CPU modules MASTER- 5) Retriggerable timer The operation of retriggerable timer is same as that of monostable timer. Only difference is that the retriggerable timer is not ignore the input condition of TRTG instruction while the timer is operating (decreasing). The current value of retriggerable timer will be set as preset value whenever the input condition of TRTG instruction is turned on.
-
Page 31: Counter
Chapter 4 CPU modules MASTER- 4.2.6 Counter The counter counts the rising edges of pulses driving its input signal and counts once only when the input signal is switched from off to on. MASTER-K series have 4 counter instructions such as CTU, CTD, CTUD, and CTR. The maximum counter setting value is hFFFF ( = 65535). - Page 32 Chapter 4 CPU modules MASTER- 3) Up-down counter The current value is increased with the rising edge of up-count input signal, and decreased with the rising edge of down-count input signal. The counter output relay is turned on when the current value is equal or greater than the preset value. Cxxx <S>...
-
Page 33: Program Structure
Chapter 4 CPU modules MASTER- 4.3 Program structure 4.3.1 Classification of program All functional elements need to execute a certain control process are called as a ‘program’. In MASTER-K series, a program is stored in the RAM mounted on a CPU module or flash memory of a external memory module. -
Page 34: Interrupt Processing
Chapter 4 CPU modules MASTER- 4.3.3 Interrupt processing When an interrupt occurs, the CPU module will stop the current operation and execute the corresponding interrupt routine. After finish the interrupt routine, the CPU resume the sequence program from the stopped step. MASTER-K series provides 2 types of interrupt. - Page 35 Chapter 4 CPU modules MASTER- 1) Parameter setting K200S K300S K1000S Priority Type Period Priority Type Period Priority Type Period TDI0 10ms TDI0 10ms TDI0 10ms TDI2 25ms TDI2 25ms TDI2 25ms TDI5 100ms TDI5 100ms TDI5 100ms INT7 INT7 INT15 Remark Period is the interval of time driven interrupt occurring.
- Page 36 Chapter 4 CPU modules MASTER- 2) TDI (Time driven interrupt) TDI occurs periodically with the constant interval assigned in parameter setting. The interrupt routine of TDI starts with the TDINT instruction and ends with the IRET instruction. When multiple interrupt factors occur simultaneously, interrupt routines are executed according to the priority given to the each interrupt.
- Page 37 Chapter 4 CPU modules MASTER- 3) PDI (Process driven interrupt) PDI occurs when the input status of interrupt module is changed from OFF to ON or from ON to OFF. (Select by DIP switch setting) Since K200S does not have interrupt module, PDI will occur when the input assigned as interrupt input by parameter setting is changed from OFF to ON.
-
Page 38: Error Handling
Chapter 4 CPU modules MASTER- 4.3.4 Error handling 1) Error classification Error occurs due to various causes such as PLC system errors, system configuration fault or abnormal operation result. Errors are classified into fatal error that stops system operation for safety, and ordinary error that continue system operation with informing the user of error warning. -
Page 39: Operation Mode
Chapter 4 CPU modules MASTER- 4.4 Operation mode The operation mode of CPU module can be classified into 4 modes such as RUN, STOP, PAUSE, and DEBUG modes. 4.4.1 RUN mode In the RUN mode, the CPU process user programs normally. Start RUN mode Clear the non-latched memory area Check user program... -
Page 40: Stop Mode
Chapter 4 CPU modules MASTER- 4.4.2 Stop mode In the STOP mode, the CPU does not execute program. Program change through KGL- WIN is possible in the remote STOP mode only. External wiring check is also possible with the forced I/O on/off function. Start STOP mode Turn all outputs off Self-diagnosis... -
Page 41: Pause Mode
Chapter 4 CPU modules MASTER- 4.4.3 PAUSE mode In PAUSE mode, the CPU stops executing user program, but keeps the status of output and internal memory. When the mode is changed to RUN mode, the CPU restart executing user program from the step at which the user program is stopped. -
Page 42: Debug Mode
Chapter 4 CPU modules MASTER- 4.4.4 DEBUG mode For debugging of user program, the MASTER-K 200S/300S/1000S provides the DEBUG mode. In the DEBUG mode, the CPU executes user program according to the execution condition as following; ① Step over : Executes just an operation unit (one instruction) ②... -
Page 43: Operation Mode Change
Chapter 4 CPU modules MASTER- Remark It is forbidden to enter DEBUG mode from RUN or PAUSE mode. Remark In DEBUG mode, each interrupt program can be enabled / disabled separately. 4.4.5 Operation mode change 1) The operation mode of CPU can be change by following methods; ①... - Page 44 Chapter 4 CPU modules MASTER- 3) Remote mode change To change operation mode with KGL-WIN or KLD-150S, the mode key switch should be in the remote STOP mode. (Mode key setting : STOP PAU / REM) Mode key Mode change KGL-WIN FAM / Cnet switch...
-
Page 45: Special Functions Of Cpu Module
Chapter 4 CPU modules MASTER- 4.5 Special functions of CPU module 4.5.1 RTC (Real Time Clock) function MASTER-K 200S/300S/1000S series includes RTC function. (K200S-A does not have RTC function) Clock operation by the RTC function is continued with a battery or super capacitor when the CPU is powered off. - Page 46 Chapter 4 CPU modules MASTER- 3) Read / write RTC data ① Read RTC data The current RTC data Description Data Memory Area (Word) (BCD format) Upper byte Lower byte F053 Lower 2 digits of year Month h9812 F054 Hour h2219 F055 Minute...
- Page 47 Chapter 4 CPU modules MASTER- M1904 : RTC data change bit When the M1904 bit is switched on, the new data in D4990 ~ D4993 (K1000S : D9990 ~ D9993) will be moved to F53 ~ F56. After data is moved, M1904 has to be switched off immediately because current data will be updated every scan while M1904 is on.
-
Page 48: Forced I/O Setting
Chapter 4 CPU modules MASTER- 4.5.2 Forced I/O setting It is possible to output a designated data regardless of the result of operation. This function is useful to check operation of the output modules and wiring between the output modules and external devices. K200S K300S K1000S... -
Page 49: Program Edit In Run Mode
Chapter 4 CPU modules MASTER- Example 2) Switch On/Off the last bit of P07 word (K1000S) a) Write the forced I/O data (h0001) to the corresponding data word. P10 is matched to the D9807 word. <D9807 word> b) Write the forced I/O address (last bit = h0001) to the corresponding address word. Write h0001 to the D9707. -
Page 50: Self-Diagnosis
Chapter 4 CPU modules MASTER- 4.5.4 Self-diagnosis 1) WDT (Watch dog timer) function The watch dog timer is an internal timer of a PLC to detect the error of hardware and a sequence program. The default value is set as 200msec, and it is changeable with parameter setting. -
Page 51: Direct I/O Refresh
Chapter 4 CPU modules MASTER- 4.5.5 Direct I/O refresh To read or write the operation result immediately, MASTER-K 200S/300S/1000S provides ‘IORF’ instruction. When the IORF instruction is executed, the CPU refreshes I/O image data area immediately. Please refer the MASTER-K instruction manual for details. 4.5.6 System error history When the system is stopped by error occurrence, the CPU stores the error occurrence... -
Page 52: Memory Configuration
Chapter 4 CPU modules MASTER- 4.6 Memory configuration 4.6.1 Memory map of K200S / K300S Bit Data Area Word Data Area User Program Area 0000 FFFF D0000 I/O relay Data Register Parameter setting area “P” Word (See the remark “D” D4500 Reserved for special usage ∴... -
Page 53: The Memory Map Of K1000S
Chapter 4 CPU modules MASTER- 4.6.2 The memory map of K1000S Bit Data Area Word Data Area User Program Area 0000 FFFF D0000 I/O relay Data Register Parameter setting area Word “P” (1,024 points “D” D9500 Reserved for special usage M000 D9999 Auxiliary relay... -
Page 54: Assign I/O Address
Chapter 4 CPU modules MASTER- 4.7 Assign I/O address To read / write data I/O and special function modules, the CPU assigns I/O address (P area) to each modules according to the module type. I/O address starts from P00 (word), and it is assigned from left to right. -
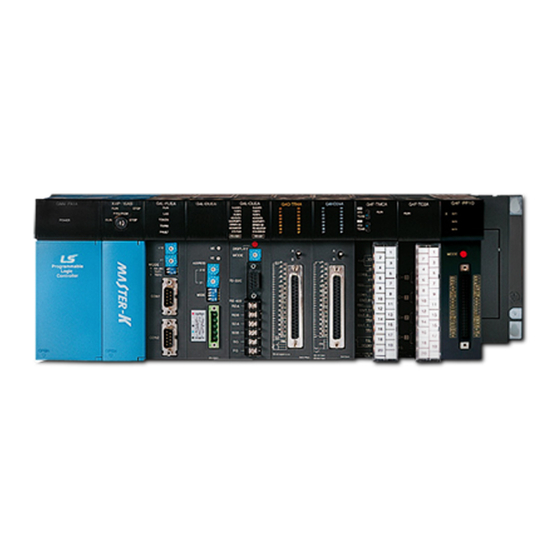
Page 55: Parts Names
Chapter 4 CPU modules MASTER- 4.8 Parts names K7P-30AS K4P-15AS MK300S MK200S MK1000S Name Description Shows the operation status of CPU module On : the CPU is on the Local RUN or remote RUN mode RUN LED Off : the CPU detects improper power supply the CPU is not on the RUN mode (STOP or PAUSE mode) the CPU detects an fatal error that stop the operation Shows the operation status of CPU module... - Page 56 Chapter 4 CPU modules MASTER- Name Description Set a operation mode of CPU module RUN : Executes user program Mode key switch STOP : Stop executing user program PAU / REM : Pause or remote mode Manual reset Restart the CPU module ( Available in K1000S only) switch Connector for peripheral devices uses RS-232C protocol.
- Page 57 Chapter 5 Battery 5 Battery......................5-1 5.1 Specifications......................5-1 5.2 Handling instructions ....................5-1 5.3 Replacement procedure ................... 5-2...
- Page 58 Chapter 5 Battery MASTER- 5 Battery 5.1 Specifications Item Description Rated voltage 3.0VDC Lifetime 5 years Purpose User program and data back-up, RTC operation during power-off Type Lithium battery, 3VDC φ 14.5 × 26 Dimension (mm) 5.2 Handling instructions 1) Do not heat or solder the terminals of battery. 2) Do not measure its voltage with a tester, or short circuit.
- Page 59 Chapter 5 Battery MASTER- 5.3 Replacement procedure Replacement battery Open the cover of CPU module Remove the battery from CPU module Connect a new battery Check the STOP LED of CPU module Is it flicking with 2sec period? The battery is defected. Done...
- Page 60 Chapter 6 Memory module 6 Memory module..................6-1 6.1 Structure ........................6-1 6.2 Specifications......................6-1 6.2.1 K300S / K1000S ....................6-1 6.2.2 K200S ........................6-2 6.3 How to use the memory module................6-2 6.3.1 Write a program into memory module ..............6-2 6.3.2 Execute the program of memory module...............
-
Page 61: Memory Module
Chapter 6 Memory module MASTER- 6 Memory module In this chapter, it is described how to store user program in the memory module and run a PLC system with memory module. The memory module of MASTER-K 200S/300S/1000S series uses flash memory. To read / write of memory module, insert a memory module into the memory module socket on the CPU module. -
Page 62: K200S
Chapter 6 Memory module MASTER- 6.2.2 K200S The K200S series includes a flash memory, and the operation mode (RAM mode / Flash memory mode) can be selected by setting DIP switch on the front of CPU module. DIP switch setting Description 1: Off, 2: Off ROM MODE... -
Page 63: Execute The Program Of Memory Module
Chapter 6 Memory module MASTER- 6.3.2 Execute the program of memory module The CPU module checks the memory module is mounted or not when the CPU starts RUN mode. Then, if the memory module is mounted, the CPU module reads the program and parameter of memory module and writes it to the internal RAM of CPU module to execute the program of memory module. - Page 64 Chapter 7 I/O modules 7 I/O modules....................7-1 7.1 Notes on selecting I/O modules ................7-1 7.2 Digital input modules....................7-2 7.2.1 8 points 12/24VDC input module (source / sink type)......... 7-2 7.2.2 16 points 12/24VDC input module (source/sink type)......... 7-3 7.2.3 16 points 12/24 VDC input module (source type) ..........
-
Page 65: O Modules
Chapter 7 I/O modules MASTER- 7 I/O modules 7.1 Notes on selecting I/O modules When selects I/O module for K200S/300S/1000S PLC system, please refer the following instructions. 1) The digital input module is classified as current sink input and current source input. The external wiring with input device is various according to the type of digital input module. -
Page 66: Digital Input Modules
Chapter 7 I/O modules MASTER- 7.2 Digital input modules 7.2.1 8 points 12/24VDC input module (source / sink type) Type K200S Specification G6I-D21A Input points 8 points Insulation method Photo coupler insulation Rated input voltage 12VDC 24VDC Rated input current 3 mA 7 mA Operating input voltage... -
Page 67: Points 12/24Vdc Input Module (Source/Sink Type)
Chapter 7 I/O modules MASTER- 7.2.2 16 points 12/24VDC input module (source/sink type) Type K200S K300S K1000S Specification G6I-D22A G4I-D22A G3I-D22A Input points 16 points Insulation method Photo coupler insulation Rated input voltage 12 / 24 VDC Rated input current 3 / 7 mA 5 / 11mA Operating input voltage... -
Page 68: Points 12/24 Vdc Input Module (Source Type)
Chapter 7 I/O modules MASTER- 7.2.3 16 points 12/24 VDC input module (source type) Type K200S K300S Specification G6I-D22B G4I-D22B Input points 16 points Insulation method Photo coupler insulation Rated input voltage 24 VDC 12 / 24 VDC Rated input current 7 mA 5 / 11mA Operating input voltage... -
Page 69: Points 24Vdc Input Module (Source/Sink Type)
Chapter 7 I/O modules MASTER- 7.2.4 16 points 24VDC input module (source/sink type) Type K300S Specification G4I-D22C Input points 16 points Insulation method Photo coupler insulation Rated input voltage 24 VDC Rated input current Operating input voltage 20.4 ~ 28.8 VDC ( ripple : 5% or less ) Max. - Page 70 Chapter 7 I/O modules MASTER- 7.2.5 32 points 12/24 VDC input module (source/sink type) Type K200S K300S K1000S Specification G6I-D24A G4I-D24A G3I-D24A Input points 32 points Insulation method Photo coupler insulation Rated input voltage 12 / 24 VDC Rated input current 3 / 7 mA 5 / 11mA Operating input voltage...
- Page 71 Chapter 7 I/O modules MASTER- 7.2.6 32 points 12/24 VDC input module (source type) Type K200S K300S Specification G6I-D24B G4I-D24B Input points 32 points Insulation method Photo coupler insulation Rated input voltage 24 VDC 12 / 24 VDC Rated input current 7 mA 3 / 7 mA Operating input voltage...
- Page 72 Chapter 7 I/O modules MASTER- 7.2.7 32 points 24VDC input module (source/sink type) Type K300S K1000S Specification G4I-D22C G3I-D24C Input points 32 points Insulation method Photo coupler insulation Rated input voltage 24 VDC Rated input current 11mA Operating input voltage 19.2 ~ 26.4 VDC (ripple: 5% or less ) Max.
-
Page 73: Points 12/24Vdc Input Module (Source/Sink Type)
Chapter 7 I/O modules MASTER- 7.2.8 64 points 12/24VDC input module (source/sink type) Type K1000S Specification G3I-D28A Input points 64 points Insulation method Photo coupler insulation Rated input voltage 12 / 24 VDC Rated input current 3 / 7 mA Operating input voltage 10.24 ~ 26.4 VDC ( ripple: 5% or less ) Max. - Page 74 Chapter 7 I/O modules MASTER- Type K300S Specification G4I-D28A Input points 64 points Insulation method Photo coupler insulation Rated input voltage 12 / 24 VDC Rated input current 3 / 6 mA Operating input voltage 10.2 ~ 26.4 VDC (ripple: 5% or less) Max.
-
Page 75: Points 110Vac Input Module
Chapter 7 I/O modules MASTER- 7.2.9 8 points 110VAC input module Type K200S Specification G6I-A11A Input points 8 points Insulation method Photo coupler insulation Rated input voltage 110VAC ( 50 / 60 Hz ) Rated input current 7 mA ( 110VAC, 60 Hz ) Operating input voltage 85 ~ 132 VAC ( 47 ~ 63 Hz ) Max. -
Page 76: Points 110Vac Input Module
Chapter 7 I/O modules MASTER- 7.2.10 16 points 110VAC input module Type K300S K1000S Specification G4I-A12A G3I-A12A Input points 16 points Insulation method Photo coupler insulation Rated input voltage 100-120VAC ( 50 / 60 Hz ) Rated input current 11 mA ( 110VAC, 60 Hz ) Operating input voltage 85 ~ 132 VAC ( 50/60 Hz±3 Hz ) Max. - Page 77 Chapter 7 I/O modules MASTER- 7.2.11 32 points 110VAC input module Type K1000S Specification G3I-A14A Input points 32 points Insulation method Photo coupler insulation Rated input voltage 110 VAC ( 50 / 60 Hz ) Rated input current 11 mA ( 110 VAC, 60 Hz ) Operating input voltage 85 ~ 132 VAC ( 47 ~ 63 Hz ) Max.
-
Page 78: Points 220Vac Input Module
Chapter 7 I/O modules MASTER- 7.2.12 8 points 220VAC input module Type K200S Specification G6I-A21A Input points 8 points Insulation method Photo coupler insulation Rated input voltage 200 ~ 240 VAC (50 / 60 Hz) Rated input current 11 mA (220VAC, 60 Hz) Operating input voltage 170 ~ 264 VAC (50/ 60±3Hz ) Max. -
Page 79: Points 220Vac Input Module
Chapter 7 I/O modules MASTER- 7.2.13 16 points 220VAC input module Type K300S K1000S Specification G4I-A22A G3I-A22A Input points 16 points Insulation method Photo coupler insulation Rated input voltage 220~240 VAC (50 / 60 Hz) Rated input current 11 mA (220VAC/ 60 Hz) Operating input voltage 170 ~ 264 VAC (50 ~ 60±3 Hz) Max. -
Page 80: Points 220Vac Input Module
Chapter 7 I/O modules MASTER- 7.2.14 32 points 220VAC input module Type K1000S Specification G3I-A24A Input points 32 points Insulation method Photo coupler insulation Rated input voltage 220 VAC ( 50 / 60 Hz ) Rated input current 10 mA ( 220 VAC, 60 Hz ) Operating input voltage 170 ~ 264 VAC ( 47 ~ 63 Hz ) Max. -
Page 81: Interrupt Input Module
Chapter 7 I/O modules MASTER- 7.2.15 Interrupt input module Type K300S K1000S Specification G4F-INTA G3F-INTA Input points 8 points 16 points Insulation method Photo coupler insulation Rated input voltage 24 VDC Rated input current 10 mA Operating input voltage 21.6 ~ 26.4 VDC Max. -
Page 82: Digital Output Modules
Chapter 7 I/O modules MASTER- 7.3 Digital output modules 7.3.1 8 points relay output module Type K200S Item G6Q-RY1A Output points 8 points Insulation method Photo coupler Rated load voltage / current 24 VDC / 2A (resistive load), 220 VAC / 2A (cosψ = 1) Minimum load voltage / current 5 VDC / 1mA Maximum load voltage... -
Page 83: Points Relay Output Module
Chapter 7 I/O modules MASTER- 7.3.2 16 points relay output module Type K200S K300S K1000S Item G3Q-RY2A G4Q-RY2A G3Q-RY2A Output points 16 points Insulation method Photo coupler Per 1 point 24 VDC / 2A (resistive load), 220 VAC / 2A (cosψ = 1) Rated load voltage / current Per 1 COM... - Page 84 Chapter 7 I/O modules MASTER- 7.3.3 32 points relay output module Type K1000S Item G3Q-RY4A Output points 32 points Insulation method Photo coupler Per 1 point 24 VDC / 2A (resistive load), 220 VAC / 2A (cosψ = 1) Rated load voltage / current Per 1 COM 5A / 1COM...
-
Page 85: Points Triac Output Module
Chapter 7 I/O modules MASTER- 7.3.4 8 points triac output module Type K200S Item G6Q-SS1A Output points 8 points Insulation method Photo coupler Rated load voltage 100 ~ 240 VAC ( 50 / 60 Hz ) Maximum load voltage 264 VAC Per 1point Maximum load current... -
Page 86: Points Triac Output Module
Chapter 7 I/O modules MASTER- 7.3.5 16 points triac output module Type K300S K1000S Item G4Q-SS2A G4Q-SS2B G3Q-SS2A Output points 16 points Insulation method Photo coupler Rated load voltage 100 ~ 240 VAC (50 / 60 Hz ) Maximum load voltage 264 VAC Per 1point 0.6 A... - Page 87 Chapter 7 I/O modules MASTER- 7.3.6 32 points triac output module Type K1000S Item G3Q-SS4A Output points 32 points Insulation method Photo coupler Rated load voltage 100 ~ 240 VAC ( 50 / 60 Hz ) Maximum load voltage 264 VAC Per 1point Maximum load current...
-
Page 88: Points Transistor Output Module (Sink Type)
Chapter 7 I/O modules MASTER- 7.3.7 16 points transistor output module (sink type) Type K200S K300S K1000S Item G6Q-TR2A G4Q-TR2A G3Q-TR2A Output points 16 points Insulation method Photo coupler Rated load voltage 12 / 24 VDC Per 1 point 0.5 A / 1 point 2 A / 1 point Maximum load current... -
Page 89: Points Transistor Output Module (Sink Type)
Chapter 7 I/O modules MASTER- 7.3.8 32 points transistor output module (sink type) Type K200S K300S K1000S Item G6Q-TR4A G4Q-TR4A G3Q-TR4A Output points 32 points Insulation method Photo coupler Rated load voltage 12 / 24 VDC Per 1 point 0.1 A / 1 point 0.1 A / 1 point 0.5 A / 1 point Maximum load... -
Page 90: Points Transistor Output Module (Sink Type)
Chapter 7 I/O modules MASTER- 7.3.9 64 points transistor output module (sink type) Type K1000S Item G3Q-TR8A Output points 64 points Insulation method Photo coupler Rated load voltage 12 / 24 VDC Operating load voltage 10.2 ~ 26.4 VDC Per 1 point 0.1 A / 1 point Maximum load current... - Page 91 Chapter 7 I/O modules MASTER- Type K300S Item G4Q-TR8A Output points 64 points Insulation method Photo coupler Rated load voltage 12 / 24 VDC Operating load voltage 10.2 ~ 26.4 VDC Per 1 point 0.1 A / 1 point Maximum load current Per 1 COM 2 A / 1COM...
-
Page 92: Points Transistor Output Module (Source Type)
Chapter 7 I/O modules MASTER- 7.3.10 16 points transistor output module (source type) Type K200S K300S Item G6Q-TR2B G4Q-TR2B Output points 16 points Insulation method Photo coupler Rated load voltage 12 / 24 VDC Operating load voltage 10.2 ~ 26,4 VDC Per 1 point 0.5 A / 1 point Maximum load... -
Page 93: Points Transistor Output Module (Source Type)
Chapter 7 I/O modules MASTER- 7.3.11 32 points transistor output module (source type) Type K200S K300S K1000S Item G6Q-TR4B G4Q-TR4B G3Q-TR4B Output points 32 points Insulation method Photo coupler Rated load voltage 12 / 24 VDC Per 1 point 0.1 A / 1 point 0.1 A / 1 point 0.5 A / 1 point Maximum load... -
Page 94: Points Transistor Output Module (Source Type)
Chapter 7 I/O modules MASTER- 7.3.12 64 points transistor output module (source type) Type K1000S Item G3Q-TR8B Output points 64 points Insulation method Photo coupler Rated load voltage 12 / 24 VDC Operating load voltage 10.2 ~ 26.4 VDC Per 1 point 0.1 A / 1 point Maximum load current... -
Page 95: Digital Input / Output Hybrid Modules
Chapter 7 I/O modules MASTER- 7.4 Digital input / output hybrid modules 7.4.1 8 points 12/24VDC input + 8 points relay output K200S G6H-DR2A Input Output Input point 8 points Output points 8 points Insulation method Photo coupler insulation Insulation method Relay insulation 24 VDC / 2A (resistive load), Rated input voltage... - Page 96 Chapter 7 I/O modules MASTER- K300S G4H-DR2A Input Output Input point 8 points Output points 8 points Insulation method Photo coupler insulation Insulation method Photo coupler insulation 24 VDC / 2A (resistive load), Rated input voltage 12 / 24VDC Rated load voltage / current 220 VAC / 2A (cosψ...
-
Page 97: Points 12/24Vdc Input + 8 Points Transistor Output
Chapter 7 I/O modules MASTER- 7.4.2 8 points 12/24VDC input + 8 points transistor output K300S G4H-DT2A Input Output Input point 8 points Output points 8 points Insulation method Photo coupler insulation Insulation method Photo coupler insulation Rated input voltage DC12 / 24V Rated load voltage DC12 / 24V... - Page 98 Chapter 8 Power supply modules 8 Power supply modules ................8-1 8.1 Selection of power supply module ................. 8-1 8.1.1 K200S ........................8-1 8.1.2 K300S ........................8-2 8.1.3 K1000S ........................8-3 8.2 Specifications......................8-4 8.2.1 K200S series......................8-4 8.2.2 K300S series......................8-5 8.2.3 K1000S series......................
-
Page 99: Power Supply Modules
Chapter 8 Power supply modules MASTER- 8 Power supply modules In this chapter, it will be described that the power supply modules of MASTER-K series. 8.1 Selection of power supply module When select a power supply module of PLC system, it should be considered that the total current consumption of CPU module, digital I/O modules, special purpose modules, and communication modules. -
Page 100: K300S
Chapter 8 Power supply modules MASTER- 8.1.2 K300S Current Current Module Catalog No. Module Catalog No. consumption consumption K4P-15AS G4F-AD2A A/D conversion G4I-D22A G4F-AD3A G4I-D22B G4F-DA1A 12/24VDC input G4I-D24A G4F-DV2A D/A conversion G4I-D24B G4F-DI2A G4I-D28A G4F-DV3A G4I-D22C G4F-DI3A 24VDC input G4I-D24C High speed counter G4F-HSCA... -
Page 101: K1000S
Chapter 8 Power supply modules MASTER- 8.1.3 K1000S Current Current Module Catalog No. Module Catalog No. consumption consumption K7P-30AS G3F-AD4A G3I-D22A A/D conversion G3F-AD4B 12/24VDC input G3I-D24A G3F-AD3A G3I-D24B G3F-DV4A 24VDC input G3I-D24C G3F-DI4A D/A conversion G3I-A12A G3F-DV3A 110VAC input G3I-A14A G3F-DI3A G3I-A22A... -
Page 102: Specifications
Chapter 8 Power supply modules MASTER- 8.2 Specifications 8.2.1 K200S series Item GM6-PAFA GM6-PAFB GM6-PAFC GM6-PDFA GM6-PDFB Rated 100 ~ 240 VAC 12 ~ 24 VDC voltage Rated 50 ~ 60 Hz frequency Rated 0.7 / 0.35 A (110 / 220 VAC) 0.8 / 0.4 A 1.5 / 0.7 A (12 / 24 VDC) current... -
Page 103: K300S Series
Chapter 8 Power supply modules MASTER- 8.2.2 K300S series Item GM4-PA1A GM4-PA2A GM4-PA1B GM4-PA2A GM4-PD3A Rated voltage 110VAC 220VAC 110VAC 220VAC 24VDC Rated frequency 50 ~ 60 Hz Rated current 1.3 A 0.8 A 0.65 A 0.35 A 1.2A Inrush current Max. -
Page 104: Parts Names And Descriptions
Chapter 8 Power supply modules MASTER- 8.3 Parts names and descriptions [ K1000S ] [ K300S ] [ K200S ] ① ③ ④ ⑥ ⑤ Name Descriptions Power LED Indicates the status of 5VDC output Fuse and fuse holder Protection fuse and holder ( K200S : mounted on the PCB ) Power input terminal Connect incoming power source ( AC or DC power ) LG terminal... - Page 105 Chapter 9 Base boards and cables 9 Base boards and cables ................9-1 9.1 Specifications......................9-1 9.1.1 Main base ......................9-1 9.1.2 Expansion base ..................... 9-2 9.1.3 Expansion cable..................... 9-2 9.2 Parts names and descriptions................. 9-3 9.2.1 Main base ......................9-3 9.2.2 Expansion base .....................
-
Page 106: Base Boards And Cables
Chapter 9 Base boards and cables MASTER- 9 Base boards and cables 9.1 Specifications 9.1.1 Main base 1) K200S series Type GM6-B04M GM6-B06M GM6-B08M GM6-B12M Item No. of slots 4 slots 6 slots 8 slots 12 slots 244 × 110 × 62 314 ×... -
Page 107: Expansion Base
Chapter 9 Base boards and cables MASTER- 9.1.2 Expansion base 1) K300S series Type GM4-B04E GM4-B06E GM4-B08E Item No. of slots 4 slots 6 slots 8 slots 297 × 135 × 17 367 × 135 × 17 437 × 135 × 17 Dimension (mm) φ... -
Page 108: Parts Names And Descriptions
Chapter 9 Base boards and cables MASTER- 9.2 Parts names and descriptions 9.2.1 Main base 1) K200S Guide hole for panel mounting Locking part for hook Guide rail I/O module connector CPU module connector Power supply module connector 2) K300S... - Page 109 Chapter 9 Base boards and cables MASTER- 3) K1000S...
-
Page 110: Expansion Base
Chapter 9 Base boards and cables MASTER- 9.2.2 Expansion base 1) K300S 2) K1000S... - Page 111 Chapter 10 Installation and wiring 10 Installation and wiring ..................10-1 10.1 Installation............................10-1 10.1.1 Installation environment .....................10-1 10.1.2 Precaution during installation ...................10-1 10.1.3 Heat protection design of control box................10-1 10.1.4 Calculation of the capacity of power supply..............10-2 10.1.5 Handling Instructions......................10-4 10.2 Mounting / dismounting of module ..................10-7 10.2.1...
-
Page 112: Installation And Wiring
Chapter 10 Installation and wiring MASTER- 10 Installation and wiring 10.1 Installation 10.1.1 Installation environment The MASTER-K series is designed to have good reliability and durability in any installation environment. However, please avoid installing the PLC at the following locations to assurance the reliability and durability of PLC system. -
Page 113: Calculation Of The Capacity Of Power Supply
Chapter 10 Installation and wiring MASTER- 10.1.4 Calculation of the capacity of power supply The following shows the procedure for calculating the PLC system power consumption. 1) PLC system power consumption block diagram 2) Power consumption of each part ① Power consumption of a power supply module Approximately 70% of the power supply module curr ent is converted into power and 30% of that 70% dissipated as heat, i.e., 3/7 of the output power is actually used. - Page 114 Chapter 10 Installation and wiring MASTER- ④ Average power consumption by voltage drop of output modules (with points simultaneously switched ON) • Wout = Iout × Vdrop × output points × the rate of points switched on simultaneously (W) Iout : output current (actual operating current) (A) Vdrop : voltage dropped across each output load (V) ⑤...
-
Page 115: Handling Instructions
Chapter 10 Installation and wiring MASTER- 10.1.5 Handling Instructions to installing the temperature-measuring resistor input module, be sure to check the following: • Do not drop it off, and make sure that strong shock should not be applied. • Do not unload the PCB from its case. It can cause faults. •... - Page 116 Chapter 10 Installation and wiring MASTER- ⑥ Terminal block Check its fixing. During drilling or wiring, do not allow any wire scraps to enter into the PLC. It can cause malfunction and fault. ⑦ Be cautious that strong shock does not appl ied to the I/O module. Do not separate the PCB from its case.
- Page 117 Chapter 10 Installation and wiring MASTER- [Fig.10.2] Clearance from the front device [Fig. 10.3] Vertical mounting [Fig 10.4] Horizontal mounting 10-6...
-
Page 118: Mounting / Dismounting Of Module
Chapter 10 Installation and wiring MASTER- 10.2 Mounting / dismounting of module 10.2.1 Mounting a module on a base 1) K200S Insert a module to an empty slot along the guide rail until the hook is locked with the base board. Check that the module is firmly locked into the base board. - Page 119 Chapter 10 Installation and wiring MASTER- 2) K300S Insert the module fixing projections in the upper part into the module fixing hole in the base board. Install the module onto the base board by pushing the bottom forward and fix it onto the base board with module fixing screws.
- Page 120 Chapter 10 Installation and wiring MASTER- 3) K1000S Insert the module fixing projections in the lower part into the module fixing hole in the base board. Install the module onto the base board by pushing the top forward. Check that the module is firmly mounted onto the base board by pulling the upper part of the module.
-
Page 121: Dismounting A Module From Base Board
Chapter 10 Installation and wiring MASTER- 10.2.2 Dismounting a module from base board 1) K200S Press the locking hook and pull a module as following figure. ② 10-10... - Page 122 Chapter 10 Installation and wiring MASTER- 2) K300S First, release the module fixing screws in the bottom from the base board. While pushing the hook latch, pull the upper part of the module toward you. While lifting the module upwards and remove the module hook from the module fixing hole.
- Page 123 Chapter 10 Installation and wiring MASTER- 3) K1000S First, push the hook latch fully. While pushing the hook latch, pull the upper part of the module toward you. Lift upwards and remove the module hook from the module fixing hole. 10-12...
-
Page 124: Wiring
Chapter 10 Installation and wiring MASTER- 10.3 Wiring The followings explains the wiring instructions for use of the system. 10.3.1 Power Supply Wiring 1) When voltage fluctuations are larger than the specified value, connect a constant-voltage transformer. 2) Use a power supply which generates minimal noise across wire and across PLC and ground. - Page 125 Chapter 10 Installation and wiring MASTER- 4) Notes on using 24 VDC output of the power supply module To protect the power supply modules, do not supply one I/O module with 24 VDDC from several power supply modules connected in parallel. If 24 VDC output capacity is sufficient for one power supply module, supply 24 VDC from the external 24 VDC power supply as shown below.
-
Page 126: Input And Output Devices Wiring
Chapter 10 Installation and wiring MASTER- 10.3.2 Input and Output Devices Wiring 1) Applicable size of wire for I/O wiring is 0.3 to 2 mm . However, it is recommended to use wire of 0.3mm for convenience. 2) Separate the input and output lines. 3) I/O signal wires must be at least 100 mm away from high voltage and large current main circuit wires. -
Page 127: Cable Specifications For Wiring
Chapter 10 Installation and wiring MASTER- (A) Independent grounding : Best (B) Joint grounding : Good (C) Joint grounding : Not allowed 4) Use 2 mm or more wire for grounding line. Make the distance as short as possible with the grounding point located to nearest to the PLC. - Page 128 Chapter 11 Maintenance 11 Maintenance .......................11-1 11.1 Maintenance and inspection ....................11-1 11.2 Daily inspection ..........................11-2 11.3 Periodic inspection ........................11-3...
-
Page 129: Maintenance
Chapter 11 Maintenance MASTER- 11 Maintenance Be sure to perform daily and periodic maintenance and inspection in order to keep the PLC system in the best conditions. 11.1 Maintenance and inspection The most of parts of PLC modules are consist of semiconductor devices, and their service life is semi-permanent. -
Page 130: Daily Inspection
Chapter 11 Maintenance MASTER- 11.2 Daily inspection Perform daily inspections everyday as following table; Corrective Check Items Check points Judgment Actions Base unit The base unit should be Retighten Check for loose mounting screws mounting securely mounted Screws conditions • Check if the hook is securely engaged Mounting Securely The hook should be... -
Page 131: Periodic Inspection
Chapter 11 Maintenance MASTER- 11.3 Periodic inspection Check the following items once or twice every six months, and perform the needed corrective actions. Check Items Checking Methods Judgment Corrective Actions temperature 0 to 55°C Measure with Ambient thermometer and 5 to 95% RH humidity hygrometer Measure corrosive gas... - Page 132 Chapter 12 Troubleshooting 12 Troubleshooting ....................12-1 12.1 Basic procedure for troubleshooting .................12-1 12.2 Troubleshooting ...........................12-2 12.2.1 The power L ED is turned off.....................12-2 12.2.2 The STOP LED is flickering ....................12-3 12.2.3 RUN and STOP LED are off.....................12-4 12.2.4 The load of the output module is not operating............12-5 12.2.5 Program download is unable ....................12-6 12.3...
-
Page 133: Troubleshooting
Chapter 12 Troubleshooting MASTER- 12 Troubleshooting This chapter explains the types of conditions that might cause an error to be reported and gives suggestions on how to resolve the problem. 12.1 Basic procedure for troubleshooting The reliability of PLC system not only depends on reliable equipment but also on fast and suitable corrective actions when an error occurs. -
Page 134: Troubleshooting
Chapter 12 Troubleshooting MASTER- 12.2 Troubleshooting 12.2.1 The power LED is turned off Power LED is off Is power supplied to Supply the power power module? Is power LED turned on? Is the line voltage Adjust the line voltage within the rated value? Is power LED turned on? -
Page 135: The Stop Led Is Flickering
Chapter 12 Troubleshooting MASTER- 12.2.2 The STOP LED is flickering STOP LED is flickering Read the error code from system error flag Is it a program Revise program error? Change the operation mode to STOP mode Download program to the PLC Perform a corrective action according to the error code Change the operation mode to... -
Page 136: Run And Stop Led Are Off
Chapter 12 Troubleshooting MASTER- 12.2.3 RUN and STOP LED are off RUN and STOP LED are off Check the power module of Is an expansion main base base connected? Disconnect an expansion base Is the power module and cycle the power of main of expansion base power module Check the power module of... -
Page 137: The Load Of The Output Module Is Not Operating
Chapter 12 Troubleshooting MASTER- 12.2.4 The load of the output module is not operating Load is not operating Monitor the internal status with Is the LED of output handy loader or KGL -WIN module turned on? Is the internal status Check the voltage Check the input condition between output and... -
Page 138: Program Download Is Unable
Chapter 12 Troubleshooting MASTER- 12.2.5 Program download is unabl e Program download is unable Set the key switch at the Is the key switch on remote stop mode and remote stop mode? download the program Contact the nearest LGIS Is the STOP LED representative flickering? Read the error flag and... -
Page 139: Troubleshooting Questionnaire
Chapter 12 Troubleshooting MASTER- 12.3 Troubleshooting questionnaire If you need to contact LGIS for assistance, please fill the following questionnaire form before call or fax to the nearest LGIS representative. If you have a problem with special function module or communication module, fill the questionnaire form included the module also. -
Page 140: Troubleshooting Examples
Chapter 12 Troubleshooting MASTER- 12.4 Troubleshooting examples This chapter shows some typical examples 12.4.1 Input circuit troubles and corrective actions Condition Cause Corrective Action • Connect an appropriate register and Input signal Leakage current of external device (such does as a drive by non-contact switch) capacity which will make the voltage across turn OFF the terminals of the input module lower than... -
Page 141: Output Circuit Troubles And Corrective Actions
Chapter 12 Troubleshooting MASTER- 12.4.2 Output circuit troubles and corrective actions Condition Cause Corrective Action • Load is half-wave rectified inside • Connect registers of tens to When the output is Off, excessive (in some cases, it is true of a solenoid) hundreds kΩ... - Page 142 Chapter 12 Troubleshooting MASTER- (Continued) Condition Cause Corrective Action • Sneak current due to the use of two • Use only one power supply The load does not turn OFF different power supplies • Connect a sneak current prevention diode(Figure below) •...
-
Page 143: Error Code List
Chapter 12 Troubleshooting MASTER- 12.5 Error code list Error Corrective Error CPU state Message Cause Code Actions Fault of some area of Internal SYSTEM Contact the service 0001h Stop operating ROM, or H/W system error ERROR center. defect OS ROM OS ROM Internal system ROM is Contact the service... - Page 144 Chapter 12 Troubleshooting MASTER- (Continued) Error Corrective Error CPU state Message Cause Code Actions FMM 2 I/F FMM 2 I/F Contact the 0015h Stop FMM 2 I/F Error error ERROR service center. FMM 3 I/F FMM 3 I/F Contact the 0016h Stop FMM 3 I/F Error...
- Page 145 Chapter 12 Troubleshooting MASTER- (Continued) Error Corrective Error CPU state Message Cause Code Actions CODE Code Check An instruction unreadable Correct the error 0040h Stop CHECK Error by the CPU is included. step. ERROR Missing the Insert the END MISS END The program does not instruction at the 0041h...
- Page 146 Chapter 13 RS-232C function of K200S 13 RS-232C function of K200S................13-1 13.1 Introduction............................ 13-1 13.2 System configuration.........................13-2 13.2.1 Connection with PC ( without handshake function )............ 13-2 13.2.2 Connection with monitoring unit ( with handshake function ) ........13-2 13.3 Pin assignment ..........................13-3 13.3.1 Pin -out of K200S RS-232C connector ................13-3...
-
Page 147: Rs-232C Function Of K200S
Chapter 13 RS-232C function of K200S MASTER- 13 RS-232C function of K200S 13.1 Introduction The K200S A and C type (K3P-07AS and K3P-07CS) have built-in RS -232C communication function and those CPU modules can perform RS-232C communication without external Cnet I/F module. -
Page 148: System Configuration
Chapter 13 RS-232C function of K200S MASTER- 13.2 System configuration The system configuration can be divided in 2 types as following; 13.2.1 Connection with PC ( without handshake function ) With this system configuration, a computer program for communication can be a user’s own program ( it may be written with C or other programming language ), or commercial MMI programs such as FAM, CIMON, or etc. -
Page 149: Pin Assignment
Chapter 13 RS-232C function of K200S MASTER- 13.3 Pin assignment 13.3.1 Pin-out of K200S RS-232C connector Function Function number number N.C. N.C. Rx for loader communication Tx for built - in Cnet function Tx for loader communication N.C. RX for built - in Cnet function N.C. -
Page 150: Frame Structure
Chapter 13 RS-232C function of K200S MASTER- 13.4 Frame structure 13.4.1 General structures 1) Request frame ( External devices à CPU ) (Max. 256byte) Frame Header Instruction Tail Data check (ENQ) type (EOT) (BCC) 2) ACK response frame (CPU à External devices, when normal data is received) (Max. -
Page 151: Instruction List
Chapter 13 RS-232C function of K200S MASTER- 13.5 Instruction list The following table shows instructions used in K200S dedicated built-in Cnet communication. Instruction Main instruction Instruction type Item Description ASCII ASCII Symbol Symbol code code Read a single bit or word from Single r (R) h5353... -
Page 152: Data Address Structure
Chapter 13 RS-232C function of K200S MASTER- 13.6 Data address structure This chapter describes how to assign the address of device when performs read / write function. [ Example of data structure ] Device number Data type Device type Start of data 13.6.1 Start of data The ‘%’... -
Page 153: Data Type
Chapter 13 RS-232C function of K200S MASTER- Remark When read or write S device, address should be assigned in word type although step controllers are handled as bit. See following examples for details. 1. Turn on S00.07 : Write 07 to the %SW0000 2. -
Page 154: Examples Of Command Execution
Chapter 13 RS-232C function of K200S MASTER- 13.7 Examples of command execution 13.7.1 Read single device ( RSS ) 1) Introduction This command is used for reading single devices. Max. 16 separated devices can be read with a command. See the chapter 13.6 for accessible device type. 2) Request format ( External device à... - Page 155 Chapter 13 RS-232C function of K200S MASTER- 3) Response format ( PLC à External device : ACK response ) Format Station Main Instruction Number of Length of Frame Header Data Tail name number instruction type blocks data check Frame R (r) hA9F3 …...
- Page 156 Chapter 13 RS-232C function of K200S MASTER- 4) Response format ( PLC à External device : NAK response ) Format Station Main Instruction Error code Header Tail Frame check name number instruction type (Hex 2 byte) Frame R (r) h2232 example ASCII value h3230...
-
Page 157: Read Continuous Devices (Rsb)
Chapter 13 RS-232C function of K200S MASTER- 13.7.2 Read continuous devices (RSB) 1) Introduction This command is used for reading continuous devices by assigning start address and word number. Only word data type is available for this command, and Max. 60 words can be read with one command. - Page 158 Chapter 13 RS-232C function of K200S MASTER- 3) Response frame (PLC à External device : ACK response) Format Station Main Instruction Number Frame Header Data Tail name number instruction type of data check Frame R (r) h12345678 example ASCII h3130 h52 (h72) h5342 h3034...
- Page 159 Chapter 13 RS-232C function of K200S MASTER- 5) Example Read the contents of 2 words from the first word of M area (M000), and the station number of PLC is 10 (h0A). Assume that the content of M000 is h1234 and M0001 is h5678.
-
Page 160: Write Single Device (Wss)
Chapter 13 RS-232C function of K200S MASTER- 13.7.3 Write single device (WSS) 1) Introduction This command is used for writing single devices. Max. 16 separated devices can be written with a command. 2) Request format ( External device à PLC ) Length of Format Station... - Page 161 Chapter 13 RS-232C function of K200S MASTER- Remark 1. The ‘h’ is added to show the numeric data is hexadecimal format. When you write frame, please do not add ‘h’ to actual numeric data. 2. All blocks in one frame should have same data type. If the data type of first block is bit and that of second is word, an error will occurs.
- Page 162 Chapter 13 RS-232C function of K200S MASTER- 5) Example Write h1234 to the first word of P area ( P000 ) of the PLC of that station number is h01. ( No BCC check ) ① Request format (External device à PLC) Length of Format Station...
-
Page 163: Write Continuous Device (Wsb)
Chapter 13 RS-232C function of K200S MASTER- 13.7.4 Write continuous device (WSB) 1) Introduction This command is used for writing continuous devices by assigning start address and word number. Only word data type is available for this command, and Max. 120 words can be written with one command. - Page 164 Chapter 13 RS-232C function of K200S MASTER- 3) Response format (PLC à External device : ACK response) Format Header Station number Main instruction Instruction type Tail Frame check name Frame W (w) example ASCII h3130 h57 (h77) h5342 value ① Station number, main instruction, and instruction type are same as the request format ②...
- Page 165 Chapter 13 RS-232C function of K200S MASTER- 5) Example Write hAA15 and h056F to the P000 and P001 of station number h01. (Without BCC) ① Request format (External device à PLC) Length of Format Station Main Instruction Device Number Header Data Tail device...
-
Page 166: Register Monitoring Number
Chapter 13 RS-232C function of K200S MASTER- 13.7.5 Register monitoring number 1) Introduction The monitoring number registration function is executed with the reading device command (RSS, RSB). User can register maximum 10 monitoring numbers, and execute registered monitoring number with the monitoring execution command. 2) Request format (External device à... - Page 167 Chapter 13 RS-232C function of K200S MASTER- 3) Response format (PLC à External device : ACK response) Format Station Main Registration Header Tail Frame check name number instruction number Frame X (x) example ASCII h3031 h58 (78) h3036 value ① Station number, main instruction, and registration number are same as the request format.
- Page 168 Chapter 13 RS-232C function of K200S MASTER- 5) Example Register monitoring number 1 (Read D000 of station number 1) ① Request format (External device à PLC) Registration format Format Station Main Registration Frame Length of Header Tail Number Device name number instruction number...
-
Page 169: Execute Monitoring
Chapter 13 RS-232C function of K200S MASTER- 13.7.6 Execute monitoring 1) Introduction This command used for executing the pre-registered monitoring number. When this command is executed, the PLC returns the contents of devices that are registered with monitoring number. 2) Request format (External device à PLC) Format Station Main... - Page 170 Chapter 13 RS-232C function of K200S MASTER- 4) Response format (PLC à External device : NAK response) Format Station Main Registration Fra me Header Error code Tail name number instruction number check Frame Y (y) h1132 example ASCII h3031 h59 (79) h3031 h31313332 value...
-
Page 171: Read The Status Of Plc (Rst)
Chapter 13 RS-232C function of K200S MASTER- 13.7.7 Read the status of PLC (RST) 1) Introduction This command is used for reading the status of PLC such as operation status, er ror information, etc. 2) Request format (External device à PLC) Format Main Instruction... - Page 172 Chapter 13 RS-232C function of K200S MASTER- [ Data configuration of status data ] à Byte Error Key / Not used Not used Not used mode Flash code version type CPU type CPU type Code K200S A (K3P-07AS) K200S B (K3P-07BS) K200S B (K3P-07CS) K300S A (K4P-15AS) K300S B (K4P-07AS)
- Page 173 Chapter 13 RS-232C function of K200S MASTER- 4) Response format (PLC à External device : NAK response) Format Main Instruction Frame Header Station number Error code Tail name instruction type check Frame R (r) h1132 example ASCII h3031 h52 (72) h5354 h31313332 value...
-
Page 174: Error Code List
Chapter 13 RS-232C function of K200S MASTER- 13.8 Error code list The following table shows the error code list that PLC returns when NAK error occurs. Error Error type Description Corrective action code h0001 PLC system error It is unable to interface with PLC Cycle the power of PLC Make sure that there is no characters other than... - Page 175 Chapter 13 RS-232C function of K200S MASTER- Error Error type Description Corrective action code Revise the frame not to h6040 Syntax error The size of frame is over 256 byte exceed 256 byte h6050 Syntax error BCC error Check the BCC value 13-29...
- Page 176 Chapter 14 RS-422/485 function of K200S 14 RS-422/485 function of K200S ..............14-1 14.1 Introduction............................ 14-1 14.2 Features ............................14-1 14.3 Specification ..........................14-1 14.4 Wiring ..............................14-2 14.4.1 Wiring diagram of RS-422 network..................14-2 14.4.2 Wiring diagram of RS-485 network..................14-2 14.5 Pin-out of RS-422/485 ........................14-3 14.6 Parameter setting ........................14-4...
-
Page 177: Rs-422/485 Function Of K200S
Chapter 14 RS-422/485C function of K200S MASTER- 14 RS-422/485 function of K200S This chapter will describe the built-in RS -422/485 communication function of K200S-B type. (A and C type don’t support RS-422/485 communication) 14.1 Introduction 1) The K200S B -type (K3P-07BS) includes the RS-422/485 communication function, and it supports 1:N (master : slave) network between PLCs and external devices such as PC. -
Page 178: Wiring
Chapter 14 RS-422/485C function of K200S MASTER- 14.4 Wiring When construct a RS-422/485 network using K200S B type CPU module, please connect a terminal resistor at the both ends of network. It prevent the signal from distortion by reflected wave. The resistance value of terminal resistor should be equal to the characteristic impedance of network cable (usually 120Ω, 1/2W resistor) 14.4.1 Wiring diagram of RS-422 network RS-422... - Page 179 Chapter 14 RS-422/485C function of K200S MASTER- 14.5 Pin-out of RS-422/485 The K200S B type CPU has 5-pin connector for RS -422/485 interface. The following table shows functions of each pin and connection with external device. 1) RS-422 network Signal direction External device number RDA + (receive signal)
-
Page 180: Parameter Setting
Chapter 14 RS-422/485C function of K200S MASTER- 14.6 Parameter setting 1) The CPU module should be K200S B type (K3P-07BS) 2) Set station number, baud rate, and etc. at the basic parameter setting window 3) Set parameters related to data access block at the high speed link setting window. 4) Download parameter to the CPU. -
Page 181: High Speed Link Parameter Setting
Chapter 14 RS-422/485C function of K200S MASTER- 14.6.2 High speed link parameter setting 1) The high speed link 1 is used for RS-422/485 communication. 2) Max. 64 data access blocks can be established, and remain block number as blank. 3) Data size can be set within 0 ~ 60 words, and do not set the period. 4) All device can be set as Tx or Rx device, but F area can not be Rx device. -
Page 182: Communication Status Flag
Chapter 14 RS-422/485C function of K200S MASTER- 14.7 Communication status flag The D4400 ~ D4454 (55 words) are reserved for special register and they contain the error code, error count, and error information. 14.7.1 Error code (D4400 ~ D4415) The error code of all stations (32 stations) are stored in the D4400 ~ D4415 (16 words). Each error code occupies 1 byte, and 1 word contains 2 error codes. - Page 183 Chapter 14 RS-422/485C function of K200S MASTER- 14.7.3 Error information of slave PLC (D4432 ~ D4447) The error information is stored in the special D area as following table. Station number Device Station number Device Remark 0, 1 D4432 16, 17 D4440 2, 3 D4433...
-
Page 184: Transmission Period (D4449 ~ D4454)
Chapter 14 RS-422/485C function of K200S MASTER- 14.7.5 Transmission period (D4449 ~ D4454) The maximum, minimum, and previous period time of the first parameter setting is stored in the D4449 ~ D4454. The period time means the interval from the start of previous transmission to the start of current transmission. - Page 185 Chapter 15 The PID function of K200S 15 The PID function of K200S ................15-1 15.1 Introduction............................ 15-1 15.2 Control actions ..........................15-2 15.2.1 Proportional oper ation (P operation) .................15-2 15.2.2 Integral operation (I action) ....................15-4 15.2.3 Derivative operation (D action) ....................15-6 15.2.4 PID action...........................15-7 15.2.5 Forward / reverse action......................15-8...
-
Page 186: The Pid Function Of K200S
Chapter 15 The PID function of K200S MASTER- 15 The PID function of K200S 15.1 Introduction This chapter provides information about the built-in PID (Proportional Integral Differential) control function of K200S B and C type CPU module (K3P -07BS and K3P-07CS). The K200S series does not have separated PID module like K300S and K1000S series, but the PID function is integrated into the CPU module B and C type. -
Page 187: Control Actions
Chapter 15 The PID function of K200S MASTER- 15.2 Control actions 15.2.1 Proportional operation (P operation) 1) P action means a control action that obtain a manipulate value which is proportional to the deviation (E: the difference between SV and PV) 2) The deviation (E) is obtained by multiplying a reference value to the actual difference between SV and PV. - Page 188 Chapter 15 The PID function of K200S MASTER- Fig. 15.2 When the proportional constant (Kp) is large Fig. 15.3 When the proportional constant (Kp) is small 15-3...
-
Page 189: Integral Operation (I Action)
Chapter 15 The PID function of K200S MASTER- 15.2.2 Integral operation (I action) 1) With integ ral operation, the manipulate value (MV) is increased or decreased continuously in accordance time in order to eliminate the deviation between the SV and PV. When the deviation is very small, the proportional operation can not produce a proper manipulate v alue and an offset remains between PV and SV. - Page 190 Chapter 15 The PID function of K200S MASTER- 5) Integral action is used in either PI action in which P action combines with I action or PID action in which P and D actions combines with I action. Figure 15.5 The system response when a long integration time given Fig.
-
Page 191: Derivative Operation (D Action)
Chapter 15 The PID function of K200S MASTER- 15.2.3 Derivative operation (D action) 1) When a deviation occurs due to alteration of SV or external disturbances, D action restrains the changes of the deviation by producing MV which is proportional with the change velocity (a velocity whose deviation changes at a constant interval) in order to eliminate the deviation. -
Page 192: Pid Action
Chapter 15 The PID function of K200S MASTER- 15.2.4 PID action 1) PID action controls the control object with the manipulation quantity produced by PID action (P + I + D). 2) PID action with a constant deviation is shown as the following figure 15.8. Fig. -
Page 193: Forward / Reverse Action
Chapter 15 The PID function of K200S MASTER- 15.2.5 Forward / reverse action 1) PID control has two kinds of action, forward action and reverse action. The forward action makes the PC reaches to SV by outputting a positive MV when the PV is less than SV. 2) A diagram is which forward and reverse actions are drawn using MV, PV, and SV is shown as figure 15.9. -
Page 194: Reference Value
Chapter 15 The PID function of K200S MASTER- 15.2.6 Reference value In general feedback control system shown as the figure 15.11, the deviation value is obtained by the difference of PV and SV. P, I, and D operations are performed based on this deviation value. -
Page 195: Integral Windup
Chapter 15 The PID function of K200S MASTER- The figure 15.12 shows the variation of PV according to the several different reference values ( b ). As shown in the figure 15.12, the small reference value produces small deviation value, and it makes the control system response be slow. In general, control system is required to be adaptable to various external or internal changes. - Page 196 Chapter 15 The PID function of K200S MASTER- The figure 15.13 shows the PV and MV of PI control system when the windup occurs. As shown as the figure 15.13, the actuator is saturated because of the large initial deviation. The integral term increase until the PV reaches to the SV (deviation = 0), and then start to decrease while the PC is larger than SV (deviation <...
- Page 197 Chapter 15 The PID function of K200S MASTER- There are several methods to avoid the windup of actuator. The most popular two methods are adding another feedback system to actuator, and modeling the actuator. The figure 15.14 shows the block diagram of the anti -windup control system using the model of actuator.
-
Page 198: Realization Of Pid Control On The Plc
Chapter 15 The PID function of K200S MASTER- 15.3 Realization of PID control on the PLC In this chapter, it will described that how to get the discrete formula of the P, I, and D terms. Then, the pseudo code of PIF control will be introduced. 15.3.1 P control The discrete formula of P control is as following;... -
Page 199: D Control
Chapter 15 The PID function of K200S MASTER- 15.3.3 D control The continuous formula of derivative term is as following; × − N : high frequency noise depression ration y : the object to be controlled (PV) The digitized formula is as following (Use Tustin approximation method) −... -
Page 200: Pid Control Instructions
Chapter 15 The PID function of K200S MASTER- 15.4 PID control instructions The MASTER-K series has 2 instructions for PID control as following table. Instruction Description PIDCAL Execute PID operation PIDTUN Execute auto tuning operation Remark The PID instructions (PIDCAL, PIDTUN) are available only K200S B and C type. (K3P-07BS and K3P-07CS) With the K200S A type (K3P-07AS), these instructions are ignored. - Page 201 Chapter 15 The PID function of K200S MASTER- (Continued) Device Name Description Range offset + 11 EN_I Enable / disable the integral operation 0 or 1 + 12 EN_P Enable / disable the proportional operation 0 or 1 + 13 BIAS The bias value for offset compensation 0 ~ 4000...
- Page 202 Chapter 15 The PID function of K200S MASTER- 2) MVMAN In this area, the data that are output when the manual operation is enabled. When the MAN is set as 1, the PIDCAL instruction output the MVMAN to MV regardless the PID operation result.
- Page 203 Chapter 15 The PID function of K200S MASTER- Remark The other control modes other than P, PI, PID, and On/off operation are not allowed. For example, PD or I operation is not available. 10) BIAS The BIAS data is used for the compensati on of offset in the proportional control. The range is 0 ~ 4000.
- Page 204 Chapter 15 The PID function of K200S MASTER- 15.4.2 PIDTUN (PID auto tuning) The PIDAUT instruction is used for getting PID parameters automatically. It calculates optimal K (proportional gain constant), Ti (Integral time constant), and Td (Derivative time constant), and returns the result. It occupies 19 words for its execution, so make sure the other instructions use those devices.
- Page 205 Chapter 15 The PID function of K200S MASTER- 2) SV (Set value) SV (setting value : the designated value) and PV (p rocess value : present value) of K200S PID operation have the range 0 ~ 4000. The range is set with the consideration of the resolution of A/D and D/A module of K200S series (12 bits) and offset value.
- Page 206 Chapter 15 The PID function of K200S MASTER- 15.4.3 Error code list 1) PIDCAL instruction ① Bit 0 : Done Turn on when the execution of PIDCAL instruction is completed. ② Bit 1 ~ Bit 5 : Not used ③ Bit 6 : Q_MIN Turn on when an error is detected with MV_MIN value.
- Page 207 Chapter 15 The PID function of K200S MASTER- 2) PIDAUT instruction ① Bit 0 ~ Bit 6 : Not used ② Bit 7 : Done Turns on when the auto -tuning operation is completed. ③ Bit 8 ~ Bit 15 : Error code (See following table for details) Error code Description Countermeasure...
-
Page 208: Example Of Programming
Chapter 15 The PID function of K200S MASTER- 15.5 Example of programming 15.5.1 System configuration GM6- K3P- Input Output Input Output PAFB 07BS module module module module module module K3P- +15V 07CS KGL-WIN (V1.3 or later) PV : DC4 ~ 20mA (1 ~ 5V) RS-232C MV : DC4 ~ 20mA... -
Page 209: Program Description
Chapter 15 The PID function of K200S MASTER- 3) A/D module setting ① Channel setting : use channel 0 ② Output data type : – 48 ~ 4047 ③ Input processing : Sampling 4) D/A module setting Channel setting : use channel 0 15.5.3 Program description 1) Use only PID operation (without auto-tuning function) ①... -
Page 210: Example Program For Pidcal Instruction
Chapter 15 The PID function of K200S MASTER- 15.5.4 Example program for PIDCAL instruction 01000 15-25... -
Page 211: Example Program For Pidcal And Pidtun Instructions
Chapter 15 The PID function of K200S MASTER- 15.5.5 Example program for PIDCAL and PIDTUN instructions 01000 15-26... - Page 212 Chapter 15 The PID function of K200S MASTER- 15-27...
- Page 213 C h a p ter 16 B u i l t- i n h i gh speed counter of K200S 16 B u i l t - in high speed counter of K200S ............16-1 16.1 Introduction.
-
Page 214: U I L T - In High Speed Counter Of K200S
C h a p t er 16 Bui l t-in high speed counter of K 2 0 0 S MASTER- 16 B u i l t -i n h i gh speed counter of K200S 16.1 Introduction This chapter describes the specification, handling, and programming of built-in high speed counter of K200S C type CPU module (K3P-07CS). -
Page 215: Input Specifications
C h a p t er 16 Bui l t-in high speed counter of K 2 0 0 S MASTER- 16.3 Input specifications 16.3.1 Pin -out of input term i nal Items Specifications Rated input 24VDC (13mA) A / B On voltage 14VDC or higher phase... -
Page 216: External Interface Circuit
C h a p t er 16 Bui l t-in high speed counter of K 2 0 0 S MASTER- 16.3.3 External i nterface circuit No. of Internal circuit Signal type Operation voltage terminal 14 ~ 26.4 VDC A-phase 3.3KΩ pulse input Less than 24VDC... -
Page 217: W Irin G
C h a p t er 16 Bui l t-in high speed counter of K 2 0 0 S MASTER- 16.4 W i r i n g 16.4.1 W irin g instructions A high speed pulse input is sensitive to the external noise and should be handled with special care. -
Page 218: H S C Instruction
C h a p t er 16 Bui l t-in high speed counter of K 2 0 0 S MASTER- 16.5 H S C instruction 16.5.1 Introduction When use the built-in high speed counter of K200S, the HSC instruction should be used. The instruction format of HSC is as following;... -
Page 219: Operation Mode (D4999)
C h a p t er 16 Bui l t-in high speed counter of K 2 0 0 S MASTER- 16.5.2 Operation m o d e ( D4999) Input terminal Multipli- Operation mode Description cation A phase B phase Preset U/D : Set by sequence program Pulse h1000... -
Page 220: Example Of Program
C h a p t er 16 Bui l t-in high speed counter of K 2 0 0 S MASTER- 16.6 Exam ple of program 16.6.1 1-phase operation m o d e (D4999 = h1010) 1) U/D : set by sequence program (M001) 2) PR : set by external PR input 3) Ladder diagram MOV h1010 D4999... -
Page 221: 1-Phase Operation Mode (D4999 = H1100)
C h a p t er 16 Bui l t-in high speed counter of K 2 0 0 S MASTER- 16.6.2 1-phase operation m o d e (D4999 = h1100) 1) U/D : set by external input (B-phase input) 2) PR : set by sequence program (M002) 3) Ladder diagram MOV h1100 D4999 M000... -
Page 222: 2-Phase Operation Mode (D4999 = H2011)
C h a p t er 16 Bui l t-in high speed counter of K 2 0 0 S MASTER- 16.6.3 2-phase operation m o d e (D4999 = h2011) 1) U/D : set automatically by the phase difference between A and B phase 2) PR : set by external PR input 3) Multiplication : 1 4) Ladder diagram... -
Page 223: 2-Phase Operation Mode (D4999 = 2012)
C h a p t er 16 Bui l t-in high speed counter of K 2 0 0 S MASTER- 16.6.4 2-phase operation m o d e ( D4999 = 2012) 1) U/D : set automatically by the phase difference between A and B phase 2) PR : set by external PR input 3) Multiplication : 2 times 4) Ladder diagram... -
Page 224: 2-Phase Operation Mode (D4999 = H2014)
C h a p t er 16 Bui l t-in high speed counter of K 2 0 0 S MASTER- 16.6.5 2-phase operation m o d e (D4999 = h2014) 1) U/D : set automatically by the phase difference between A and B phase 2) PR : set by external PR input 3) Multiplication : 4 times 4) Ladder diagram... - Page 225 Appendix A. Flag list........................A-1 A.1 Special relay (F/M) ..........................A-1 A.1.1 F relay............................... A-1 A.1.2 M relay..............................A-3 A.2 Special data register (D area) ......................A-4 A.2.1 Flags related to communication module................A-4 A.2.2 Flags related to the high speed link..................A-6 A.3 Link relay (L area) ..........................A-8 A.3.1 When Cnet module is mounted ....................
-
Page 226: Flag List
Appendix MASTER- A. Flag list A.1 Special relay (F/M) A.1.1 F relay Relay Function Description F0000 RUN mode Turns on when the CPU in the RUN mode. F0001 Program mode Turns on when the CPU in the Program mode F0002 Pause mode Turns on when the CPU in the Pause mode F0003... - Page 227 Appendix MASTER- (Continued) Relay Function Description F003A RTC data error Turns on when the RTC data setting error has occurred. F003B During program Turns on during program edit while running the program. edit Turns on when a program edit error has occurred while running F003C Program edit error the program.
-
Page 228: M Relay
Appendix MASTER- (Continued) Relay Function Description F0120 LT flag Turns on if S < S when using the CMP instruction. ≤ S F0121 LTE flag Turns on if S when using the CMP instruction. F0122 EQU flag Turns on if S when using the CMP instruction. -
Page 229: Special Data Register (D Area
Appendix MASTER- A.2 Special data register (D area) A.2.1 Flags related to communication module The following flags shows communication modules (Fnet/Cnet) mounted on the m ain base. Use can monitor those flags with the flag monitor function of KGL -WIN or use in sequence program. - Page 230 Appendix MASTER- (Continued) Keyword Address Name Description Indicates that the communications module can _CnINRING Dx510.E In-ring (IN_RING = 1) communicates with other station or not. Indicates that operation mode of Operation mode _CnLNKMOD Dx510.F communications module is in the normal (RUN=1) operation mode or test mode.
- Page 231 Appendix MASTER- A.2.2 Flags related to the high speed link The following table shows the flags when the m is 0. x : K200S/300S = 4, K1000S = 9 m : the number of high speed link setting Keyword Name Description Address Indicates that all stations are normally...
- Page 232 Appendix MASTER- Remark The ‘k’ indicates the number of block. The status of 16 block is stored in a word. Therefore, total 4 words are used for storing the status of 64 blocks (k: 0 ~ 63). For example, the status of mode status of block 55 is stored in the Dx608.7 bit.
-
Page 233: Link Relay (L Area
Appendix MASTER- A.3 Link relay (L area) The L area is used when the computer link module (Cnet) or data link module (Fnet) is mounted on the system. See the user’s manual of Cnet or Fnet for detail information. A.3.1 When Cnet module is mounted (When the Cnet module is mounted on the slot 0) Slot Protocol... -
Page 234: When The Fnet Module Is Mounted
Appendix MASTER- A.3.2 When the Fnet module is mounted x : slot number n : station number of other station Device number Key word Description This flag indicates that the other station on network are L0000 ~ L003F _NETx_LIV[n] active or not. (read only) This flag indicates tur ns on when the communication with L0040 ~ L007F _NETx_RST[n]... -
Page 235: Dimension
Appendix MASTER- A.4 Dimension Unit : mm A.4.1 CPU modules MK1000S MK300S K7P -30AS K4P -15AS STOP PAU/REM STOP STOP REMOTE MK200S K3P-07AS ① ② A-10... -
Page 236: I/O, Special Function Modules
Appendix MASTER- A.4.2 I/O, special function modules MK1000S MK300S G3I-D24A G4Q-TR2A MK200S A-11... -
Page 237: Power Modules
Appendix MASTER- A.4.3 Power modules MK1000S MK300S A.1.1 K A.1.2 MK200S POWER GM6 -PAFA A-12... - Page 238 Appendix MASTER- A.4.4 Main / expansion bases MK1000S MK300S Model Model GM4-B04M GM3-B04M GM4-B06M GM3-B06M GM4-B08M GM3-B08M GM4-B12M GM3-B04E GM4-B04E GM3-B06E GM4-B06E GM3-B08E GM4-B08E MK200S 4—ψ4.5 GM6-B04M 230.5 92.5 GM6-B06M 300.5 92.5 GM6-B08M 370.5 92.5 GM6-B12M 510.5 92.5 A-13...
Need help?
Do you have a question about the Master-K K200S and is the answer not in the manual?
Questions and answers