Table of Contents
Advertisement
Quick Links
Advertisement
Table of Contents

Subscribe to Our Youtube Channel
Related Manuals for Ecom ecom-LSG


Summary of Contents for Ecom ecom-LSG
- Page 1 Operating Instructions...
-
Page 2: Table Of Contents
8.4. Battery loading 8.5. Display damping 8.6. Pressure unit 8.7. Auto OFF function 8.8 Contrast 8.9 Light 9. Sensor setup 10. View service info 11. Data logger program „ecom DP Logger“ 12. Technical data ecom-DP 13. Maintenance tip Page 2 ecom-DP... - Page 3 Index Page ecom-LSG 1. Application 2. Instrument design 3. Power supply 4. Battery change 5. Operation 6. Leak detection 7. Zero point 8. Adjustments 9. Swtch off 10. Function control 11. Technical data 12. Maintenance tip ecom-DP Page 3...
-
Page 4: Application
1. Application The ecom-DP is designed to make easy pressure measurements and tightness checks at gas pipes and gas installations. Please respect the legal safety instructions by works at gas pipes! Page 4 ecom-DP... -
Page 5: Design Ecom-Dp
2. Design ecom-DP Pressure connection P1+ Pmax = 999,9 mbar Connection P1- IR interface (for IR printer) Backside Grafic Battery Magnetic display compartment fixation Function keys Connection (current function is loading unit shown on display) Cursor keys Confirmation key ON/OFF key... -
Page 6: Connection Of Components
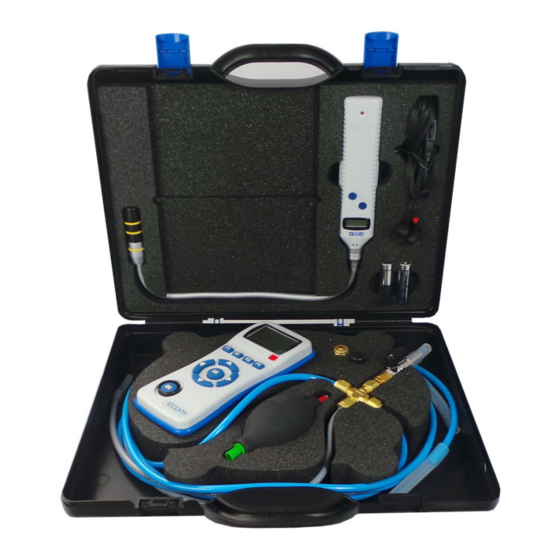
3. Connection of components Please connect the components as shown on below plan. Hose 1 Connection (Gas system – hose Cross piece) (ecom-DP – Cross piece) Connection hose 1 ecom-DP Swagelok- screw connec- tions Shut-off valve Compres- Connection sed-air ball... -
Page 7: Initialisation
TERY indicator will be shown on the LCD display. Once the battery is fully charged, the BATTERY indicator on the display will blink. It is possible to operate the ecom- DP on AC power during the charging procedure by pressing the <ON> button. -
Page 8: Clock Set
Press <ON> to switch on the ecom-DP. The instrument displays the following: Clock set Delete RAM Press OK to continue! - Press twice the <OK> key and the measurement value menu will be displayed. - Press <F2> (wrench symbol) to call up the menu „In- strument settings“. -
Page 9: Numerical Indication
- Press <F2> (Hold) to „freeze“ that measurement value displayed at the time the key is pressed (active function = Hold indication blinks). - Press again <F2> (Hold) to quit the „freezing“ and the current value will be displayed. ecom-DP Page 9... -
Page 10: Min. / Max. Measurement Values
Basing on the previous function seizure, the functions „LUMI“ and „Light“ are displayed after pressing <F1>. The graphic display of the ecom-DP can be adjusted to different visual conditions. The contrast can be adjusted in 5 steps (each key pressing = one step) while press- ing <F3>... -
Page 11: Pressure Check
With <F2> the result can be printed by an IR-printer (option). 7. If the „Pressure Check“ is selected again, so the re- sult can be called up with <F1> (as long as the ecom- DP is on) or a new measurement can be started with <OK>. -
Page 12: Set Clock
8.1. Key beep on/off switch - With the cursor keys <UP/DOWN> scroll until the menu point “Key beep”. - Activate with <OK>. - With the cursor keys <RIGHT/LEFT> modify the ad- justment (YES or NO). - Confirm with <OK>. Page 12 ecom-DP... -
Page 13: Pressure Auto -> 0 By Start
(YES = printer ecom-P or NO = printer HP 82240B). - Confirm the modification with <OK>. 8.4. Battery loading The ecom-DP is able to work with accus and AC power (option): - Scroll with the cursor keys <UP/DOWN> until the menu point “Battery loading”. -
Page 14: Pressure Unit
- Scroll with the cursor keys <UP/DOWN> until the menu point “Pressure unit”. - Press <OK> to activate. - Use the cursor keys <RIGHT/LEFT> to adjust the de- sired unit for the pressure sensor. - Press <OK> to confirm. Page 14 ecom-DP... -
Page 15: Auto Off Function
8.7. Auto OFF function The ecom-DP is able to switch off autonomously after 270 sec.: - Scroll with the cursor keys <UP/DOWN> until the menu point “Auto OFF function”. - Press <OK> to activate. - Use the cursor keys <RIGHT/LEFT> to modify the... -
Page 16: Sensor Setup
“Service”. - Press <OK> and an info window will be opened in which the address and phone number of the competent service centre as well as the instrument version (e.g. ECOM DP V3.1) will be displayed. Page 16 ecom-DP... -
Page 17: Data Logger Program „Ecom Dp Logger
11. Data logger program „ecom-DP Logger“ The measured value process of the ecom-DP can be logged with the help of the data logger program „ecom-DP Logger “. The program can be loaded free of charge from the download area of the ecom homepage www.ecom.de. To trans- fer the data a USB cable (kind becomes. -
Page 18: Technical Data Ecom-Dp
12. Technical Data ecom-DP Power supply: - Battery: 3 x 1,5 V AA (Mignon) - or accu: 3 x 1,2 V AA NiCd (nickel cadmium) - or accu: 3 x 1,2 V AA NiMh (metal hydride) - Internal loading unit - Connection via 1.3 mm hollow plug... -
Page 19: Maintenance Tip
13. Maintenance tip To secure the accuracy of your measuring instrument we recommend the annual check by an authorized ecom partner. In the case of strong demand (e.g. perma- nent several hours of measurement per day, rough conditions etc.) shorter inter- vals between checks should be selected - please contact your ecom partner. - Page 20 Operation Instructions Page 20 ecom-DP...
-
Page 21: Application
1. Application The gas leak detection head ecom-LSG is engineered for the quick and reliable detection of untight gas installations. Reverse to leak detection sprays which can rise and re-seal e.g. hemp sealings, the leakage detection with the ecom-LSG is made easy and without problems. -
Page 22: Power Supply
(e.g. in battery shops). 5. Operation Switch on the ecom-LSG in gas-free air. Hereto press the <I/O> key until a beep is given. The instrument starts a warm-up phase during which the sensor is set to operation temperature (running bar graph on display). -
Page 23: Leak Detection
(dragging announcement gets erased). pressed longer than 2 seconds. The change of the zero point is indicated by flashing of the first bar. If the <HOLD> key is kept pressed longer than 2 seconds, the original zero point gets back (no flashing of the first bar). ecom-DP Page 23... -
Page 24: Adjustments
If the sensor is correct, the bar line display shows a clear reaction. The sensor can be changed at switched off instrument (unscrew sensor head - re- place sensor element with a new sensor element - mount sensor head). Page 24 ecom-DP... -
Page 25: Technical Data
12. Maintenance tip To secure the accuracy of your measuring instrument we recommend the annual check by an authorized ecom partner. In the case of strong demand (e.g. perma- nent several hours of measurement per day, rough conditions etc.) shorter inter- vals between checks should be selected - please contact your ecom partner. - Page 26 Subject to technical changes 05.2019 ecom GmbH Am Großen Teich 2 D-58640 Iserlohn Telefon: 02371 - 945-5 Telefax: 02371 - 40305 Internet: http://www.ecom.de eMail: info@ecom.de Page 26 ecom-DP...
Need help?
Do you have a question about the ecom-LSG and is the answer not in the manual?
Questions and answers