Table of Contents
Advertisement
Advertisement
Table of Contents

Related Manuals for Inkbird IRF-4S


Summary of Contents for Inkbird IRF-4S
- Page 1 Rechargeable Wireless BBQ Thermometer Manual Model:IRF-4S...
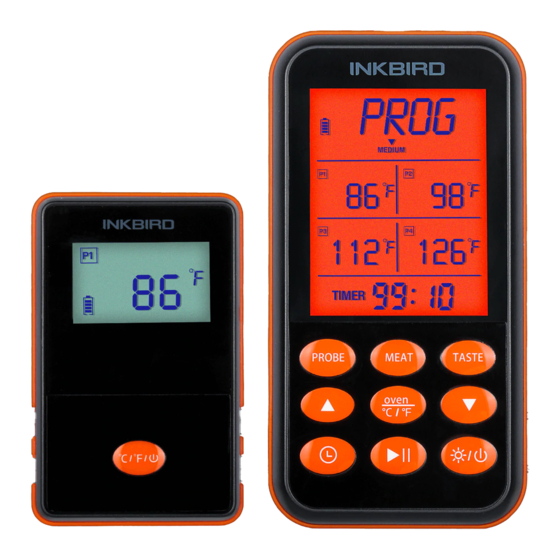
- Page 2 Catalogue 1 Receiver Feature 2 Button 3 Transmitter Feature 4 Button 5 Synchronous Transmitter and Receiver 6 Failure Connection Alarm of Transmitter and Receiver 7 Low Voltage Alarm and Charging Function of Transmitter 8 Auto Power Off Function and Receiver 9 Measure the Temperature of the Cooking Degree for Meat 10 Set the Temperature of Your Personal Taste 11 Set the mode of OVEN/SMOKER/BARBECUE...
- Page 3 . Receiver Feature DISPLAY ● LCD Screen(Liquid Crystal Display) - displays all icons, temperature and time ● Four probe temperature display ● Programmable alarm with preset temperature for specific foods ●Under the oven mode, the receiver will alternate display High Setting Temperature and Low Setting Temperature.
- Page 4 . Button ● PROBE - Short press to select probe 1, probe 2, probe 3 and probe 4 modes or which probe mode is currently in use. Press and hold for 2 seconds to enter pairing mode. ● MEAT-Short press to select the type of meat PROG(Program-User Self-Defined), GBEEF(Ground Beef), GPOUL(Ground Poultry), BEEF, VEAL,CHCKE (Chicken), PORK, POULT(Poultry), LAMB &...
- Page 5 - Press once to make the setting tempera- ● ture +1 long press for 2 seconds to make the setting temperature +1 at 0.1 second. In the clock setting mode, press 1 time, hour or minute, long press for 2 seconds, hour or minute at 0.1 second. - Press once to make the setting tempera- ●...
- Page 6 ●Probe temperature range: 0-300 C°/32° F ~ 572 ° F(Short-time measurement);0-250/ C°32° F~ 482 ° F (continuous monitoring) ●Range of Error: Range of Range of Fahrenheit Celsius Temperature Temperature Error Error (T)Celsius (T) Fahrenheit 0 °C <=T<20 °C ±2 °C 32 °F <=T<68 °F ±4 °F 20 °C <=T<200 °C...
- Page 7 .Synchronous Transmit- ter and Receiver Normally, there is no need to synchronize the transmitter and receiver, as we have already done this at the factory. It only need to turn on the transmitter and receiver and wait for a dozen seconds to see the real-time temperature displayed on the transmitter and receiver.
- Page 8 Note: When matching the code, the transmitter and receiver are required to be placed in short distance, which cannot exceed 30CM. . Failure Connection Alarm of Transmitter and Receiver The wireless product can reach 500meters/1500 feet in the exposed place. If the receiver exceeds the receiving range, the abnormal external interfer- ence or turn off the transmitter, the receiver can not receive the data from the transmitter.
- Page 9 battery symbol flashes, the current temperature displays “Lo”, all functions are turned off, and the user is warned that the transmitter cannot be used normally until the product is charged . When the receiver receives a low power alarm from the transmitter , indicates that battery power only has 1 bar left at the transmitter.
- Page 10 cancel auto off function . Measure the Tempera- ture of the Cooking Degree for Meat (1) Four probes (P1、P2、P3 and P4) can be used to measure temperature of four pieces of meat or different positions of a large piece of meat, press the“PROBE”button to select a P1, P2, P3 or P4.
- Page 11 last for one minute,and the backlight will be on. Press any button to stop the buzzer and turn off the backlight. . Set the Temperature of Your Personal Taste (1) Short press the“PROBE”button to select the P1, P2, P3 or P4 mode, the corresponding symbol SET TEMP of the selected probe lights up.
- Page 12 .Set the mode of OVEN /SMOKER/BARBE- (1) The customer can select P1, P2, P3 or P4 to test and monitor the temperature inside the oven, smoker or grill. (2) Short press “PROBE ”button to select P1, P2, P3 or P4 mode, and press “MEAT ”button to select “OVEN ”mode.
- Page 13 (5) Press OVEN/°C/°F again to confirm the“LO”tem- perature, it will stop flashing and exit the HI/LO setting temperature state. (6) Once the temperature of the P1, P2, P3 or P4 exceeds the temperature range of“HI”and“LO”, the current temperature and the“HI”or” LO”,The corresponding current temperature of the receiver flashes at 1 Hz, then the buzzer will sound 3 times in 0.5 second, after a pause of 0.5 second, it will...
- Page 14 effect to press (2) Press to enter the time setting state,at this time the screen of hour time flashes, then short press ▲ or ▼ to set the time of hour, long press ▲ or ▼ to quickly set the time of hour. Furthemore,short press to confirm the setting time of hour.
- Page 15 . Diagram of Meat Type and Taste: L C D WELL DONE ME AT RAER MED RARE MEDIUM D IS PL AY ) (MED WELL (WELL DONE) °F G round /71°C Beef G round °F Poultry /74°C °F °F °F °F °F Beef...
- Page 16 (3) If the probe shows that the reading is too high or t4. Control Function Instruction the temperature rises too fast, please check to make sure the probe does not poke on the food. It is recommended that the probe be inserted into the thickest part of the meat to avoid contacting with bones or fat.
-
Page 17: Technical Assistance
(not transferable), against defects caused by INKBIRD’s workmanship or materials. This warranty is limited to the repair or replacement, at INKBIRD’s discretion, of all or part of the controller. The original receipt is required for warranty purpos- -15-... - Page 18 INKBIRD TECH.C.L Support@ink-bird.com www.ink-bird.com +86-0755-25721303 Shenzhen,GD,518000,China made in china -16-...
Need help?
Do you have a question about the IRF-4S and is the answer not in the manual?
Questions and answers
What is LLL code
The LLL code on the Inkbird IRF-4S indicates that the probe temperature is too low or the probe is not properly connected. It may also mean the internal probe wire is damaged due to moisture or heat.
This answer is automatically generated