Table of Contents
Advertisement
Quick Links
Advertisement
Table of Contents

Related Manuals for Mamiya 645


Summary of Contents for Mamiya 645
- Page 1 50mm f/4 Shift C Lens English Instructions...
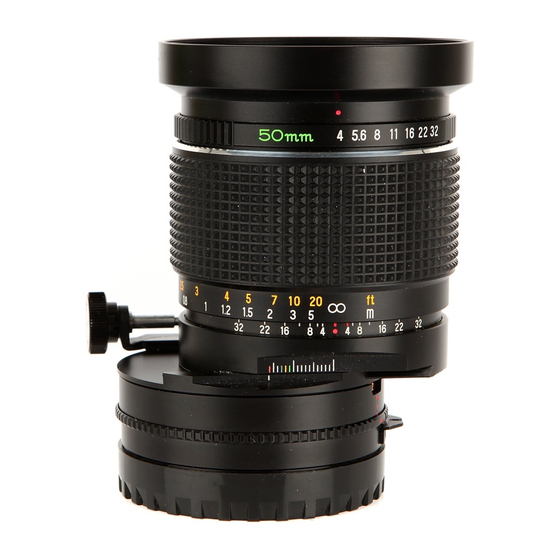
- Page 2 Names of Parts Shift Control Knob 2) Shift Scale Shift Index 4) Shift Limit Window 6) Focusing Ring Aperture Ring 7) Distance Scale 8) Depth-of-Field Scale 9) Alignment Dot 10) Exposure Meter Connecting Ring 11) Exposure Meter Coupler 12) Stop-down Metering Index Specifications Construction 10 elements in 8 groups...
- Page 3 Conversely, when photographing from high angle looking down, the sides building converge toward the bottom. order to correct for converging lines, do not tilt camera upward or downward. Keep the film plane parallel to the subject with the camera back perpendicular t o the ground.
- Page 4 However, the Sun Shield, an optional accessory for the Mamiya RB67, may be used to eliminate stray light from entering the lens, see Fig. 5. Attaching and Removing the Lens While aligning the Alignment Dots of the camera body and lens barrel, insert the lens into the...
- Page 5 by any part other than the Alignment Dot, the lens may rotate, preventing the lens from mounting properly. To remove the lens, grasp it by the part marked by the Alignment Dot, and while depressing the Lens Release Button, twist the lens counterclockwise until it stops. Focusing Focusing can be done before or after shifting the lens, and be sure to focus at t he maximum aperture of f/4.
- Page 6 Exposure Determination For a correct exposure when using an AE finder, stopped-down metering must be used. First, make sure that the lens is coupled to the exposure meter by rotating the Exposure Meter Coupler Ring of the lens until the Meter Coupler engages with the Coupling Pin of the finder, as shown in the above image.
Need help?
Do you have a question about the 645 and is the answer not in the manual?
Questions and answers