Advertisement
Quick Links
Advertisement

Subscribe to Our Youtube Channel
Related Manuals for NXP Semiconductors i.MX 8M Mini EVK


Summary of Contents for NXP Semiconductors i.MX 8M Mini EVK
- Page 1 Quick Start Guide i.MX 8M Mini EVK...
- Page 2 Quick Start Guide ABOUT THE i.MX 8M MINI EVK The i.MX 8M Mini applications processor is a member of the i.MX 8M family of products focused on delivering an excellent video and audio experience, combining media-specific features with high-performance processing optimized for low-power consumption.
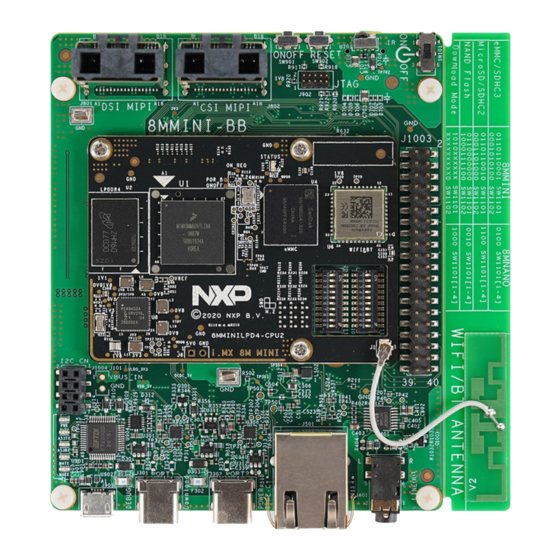
- Page 3 IR Receiver Display: MIPI-DSI Power Switch Camera: MIPI-CSI JTAG CPU Board Expansion Connector BOOT Switches C Connector USB MicroB Wi-Fi/BT Antenna Debug Port Type C Type C Ethernet Audio Port1 Port2 Lineout Figure 1: Top view i.MX 8M Mini EVK board...
- Page 4 Quick Start Guide GET TO KNOW THE i.MX 8M MINI EVK CONTINUED MicroSD Card Connector M2 Connector (PCIe) Audio Board Connector Figure 2: Back view i.MX 8M Mini EVK board...
- Page 5 www.nxp.com Mini SAS HDMI connector Connector Figure 3: MIPI-DSI to HDMI Adaptor Card (included in the EVK) Note: (Color of the adaptor card may differ)
-
Page 6: Getting Started
The i.MX 8M Mini EVK (8MMINILPD4-EVK) The following items in Table 2 are is shipped with the items listed in Table recommended to run the i.MX 8M Mini EVK. 1. Ensure the items are available in the Table 2 Customer EVK box. - Page 7 The following are available on the website: Table 3 Software and Tools ITEM DESCRIPTION • Schematics, layout and Gerber files • i.MX 8M Mini EVK Board Hardware User’s Guide Documentation • Quick Start Guide • Hardware Design Guide • Power Consumption Measurement...
-
Page 8: Setting Up The System
The following will describe how to run If the serial port is not recognized, the pre-loaded Android image on the download and install updated drivers as i.MX 8M Mini EVK. listed in the section Debug Serial Console below. Confirm Boot Open the terminal window (i.e., Hyper... - Page 9 www.nxp.com SETTING UP THE SYSTEM CONTINUED Connect HDMI Connect Display Mouse The MIPI-DSI to HDMI accessory card Connect the mouse to J301 (USB Type-C and mini SAS cable are needed for Port1) through the USB Type-C to A evaluating HDMI. adapter.
-
Page 10: Additional Information
Quick Start Guide ADDITIONAL INFORMATION Boot Switches SW1101, SW1102 are the boot configuration switches, the default boot device is eMMC/uSDHC3, as shown in Table 4. If you want to try other boot devices, you need to change the boot switches to corresponding values as listed in Table 4. Note: 1 = ON 0 = OFF Table 4 Boot Device settings BOOT DEVICE... -
Page 11: Warranty
www.nxp.com ADDITIONAL INFORMATION CONTINUED Do more with Accessory boards MX8-DSI-OLED1: MINISASTOCSI: MIPI MINI-SAS OLED DISPLAY MIPI-CSI CAMERA MODULE Use this camera MIPI-CSI camera module for machine Use this OLED display for touchscreen support. vision, video streaming and recording. SUPPORT WARRANTY Visit www.nxp.com/support for a list Visit www.nxp.com/warranty for of phone numbers within your region. - Page 12 This device complies with Part 15 of the FCC Rules. Operation is subject to the following two conditions: (1) This device may not cause harmful interference, and (2) This device must accept any interference received, including interference that may cause undesired operation. Attention that changes or modification not expressly approved by the party responsible for compliance could void the user’s authority to operate the equipment.
Need help?
Do you have a question about the i.MX 8M Mini EVK and is the answer not in the manual?
Questions and answers