NXP Semiconductors i.MX Quick Start Manual
Hide thumbs
Also See for i.MX:
- User manual (53 pages) ,
- Hardware user's manual (46 pages) ,
- Quick start manual (26 pages)
Table of Contents
Advertisement
Quick Links
Advertisement
Table of Contents

Related Manuals for NXP Semiconductors i.MX


Summary of Contents for NXP Semiconductors i.MX
- Page 1 Quick Start Guide i.MX Audio Board...
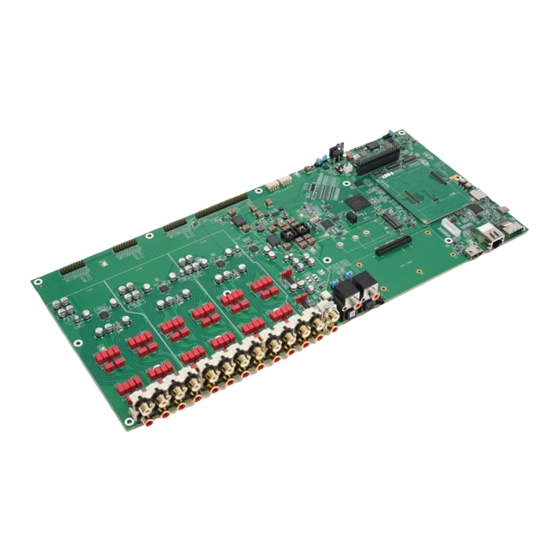
- Page 2 ABOUT THE i.MX AUDIO BOARD i.MX Audio Board (or MCIMX8M-AUD) is an excellent, configurable and functional audio processing platform. It supports multiple i.MX 8M series processors and HDMI card. A variety of audio input and output interfaces are integrated into the system, it supports HDMI input, HDMI eARC, S/PDIF I/O, 2-ch ADC line-in, 24-ch DAC line-out and so on.
- Page 3 GET TO KNOW THE i.MX AUDIO BOARD ADC 2-CH Ethernet HDMI Card S/PDIF RX DAC 24-CH mini-SAS HDMI 12V Trigger S/PDIF TX Only i.MX 8M Plus Button Board Connector USB Type-C S/PDIF Route Jumper USB Debug Micro-SD M.2 Connector...
-
Page 4: Getting Started
USB Type-A Male to Micro-B Male Cable Coaxial Cable RCA cable for line-in and line-out Fiber Cable Optical fiber cable for TOSLINK *Note: SOM Boards from their EVK Boards. For example, i.MX 8M Nano SOM Board from i.MX 8M Nano DDR4 EVK. - Page 5 • i.MX Audio Board Hardware User’s Guide • Quick Start Guide Software Development Linux BSPs, CPLD code Demo Images Copy of the latest Linux and Android BSP images that are available to program on to the micro-SD Card on i.MX Audio Board...
-
Page 6: Setting Up The System
Micro SOM ID Switches SD card for testing use. If target using i.MX 8M Mini or i.MX 8M Nano SOM board, the interposer board should be used. If target using i.MX 8M Plus SOM board, the interposer board should be removed and plug SOM board on the i.MX Audio Board directly. - Page 7 The boot switches should be set to boot mode is shown in the table below. from the micro-SD card. SW4[4:1] on the i.MX Audio Board are used for i.MX 8M SW2302 [4:1] SW2300 [4:1] Plus SOM. SW2[10:1] and SW3[10:1] on i.MX 8M Nano...
-
Page 8: Hdmi Cable
Connect the 12V 5A power brick to J2000, Open the terminal window (i.e., Hyper power up the board using rock switch on Terminal or Tera Term), choose the right the rear panel or SW2000 on the i.MX COM port number and apply the Audio Board. following configuration. -
Page 9: Additional Information
ADDITIONAL INFORMATION Boot Switches SW4 on the i.MX Audio Board is the i.MX 8M Plus boot configuration switch. SW2 and SW3 on the interposer board are the i.MX 8M Mini and i.MX 8M Nano boot configuration switches. If other device want to be selected for boot, please see below tables. the more detailed information, please see SOM evaluation board kit. - Page 10 Quick Start Guide ADDITIONAL INFORMATION CONTINUED i.MX 8M Nano Boot Device Settings Device eMMC/USDHC3 Micro-SD/USDHC2 NAND Flash USB Download Mode Note: 0 is off, 1 is on, x means don’t care Debug Serial Console Windows users may need to update the serial drivers on your computer. The drivers...
-
Page 11: Warranty
www.nxp.com ADDITIONAL INFORMATION CONTINUED Do more with Accessory boards IMX-MIPI-HDMI 8MIC-RPI-MX8 Use this module for MIPI-DSI to HDMI transformation, This is a digital mic phone board, there are 8 mics on the monitor can be tied to this interface for video the board, use this module for voice development and display. - Page 12 This device complies with Part 15 of the FCC Rules. Operation is subject to the following two conditions: (1) This device may not cause harmful interference, and (2) This device must accept any interference received, including interference that may cause undesired operation. Attention that changes or modification not expressly approved by the party responsible for compliance could void the user’...
Need help?
Do you have a question about the i.MX and is the answer not in the manual?
Questions and answers