R82 Panda Futura Manual
Hide thumbs
Also See for Panda Futura:
- Mounting instruction (11 pages) ,
- Mounting instruction (7 pages) ,
- Mounting instruction (17 pages)

Related Manuals for R82 Panda Futura


Summary of Contents for R82 Panda Futura
- Page 1 English manual © 2009 R82 A/S. All rights reserved. The R82 logo and the Panda Futura chairs are registered trademarks of R82 A/S. 2018-06 - rev. 10...
- Page 2 CONTENTS Panda Futura - Intended purpose........2 Declaration of Conformity ..........4 R82 Warranty ..............4 Safety ................4 Disposal ................4 Service information ............5 Washing ................5 Warewashing machine ............5 Disinfection ................ 5 Accessories and spare parts ..........5 Service interval ..............
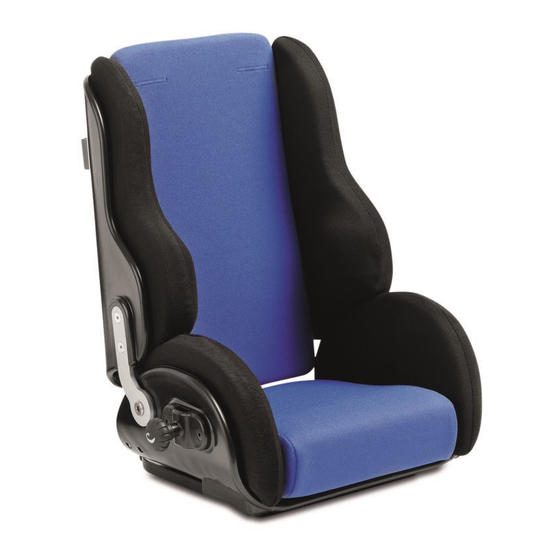
- Page 3 The Active seat is for the active children who need more freedom of movement. The Panda Futura is suitable for users needing an individual seating system and base, e.g. Children/youngsters with: • CP at GMFCS level III-V •...
-
Page 4: Declaration Of Conformity
• If there is any doubt as to the continued safe use of your R82 product or if any parts should fail, stop using the product immediately and contact your local dealer as Declaration of Conformity... -
Page 5: Service Information
Accessories and spare parts Maintenance of a medical device is wholly the responsibility The products from R82 can be supplied with a variety of of the owner of that device. Failure to maintain a device in accessories which comply with the needs of the individual accordance with the instructions may invalidate the device’s... - Page 6 DMR ver.: XXXX Max load: xxx kg IDENTIFIKATION Art. no.: XXXXXXX Product: XXXX - Size X Panda Futura standard and active seat (XX)XXXXXXXXXXXXXX(XX)XXXXXX(XX)XXXXXX A) Serial number The label is places in the seat under the cushion to the right. B) Manufacturer The label is placed in the seat under the cushion to the left.
-
Page 7: Symbols
Symbols For indoor and outdoor use Consult instructions The latest version of the instructions is always available on the R82 web- site and can be printed in larger sizes Warning This symbol appears in the User Guide along with a number referring to the instructions below. - Page 8 SEATS The Panda Futura seat is available as (A) STANDARD in 5 sizes and as (B) ACTIVE in 4 sizes. The ACTIVE seat is shaped to allow greater up- per extremity movement and is ideal for more active children. The STANDARD seat is shaped with sides, which give the child more support and less movement possibilities.
- Page 9 BACK RECLINE Loosen the handle (A) to recline the back. Firmly grab the back of the chair before loosening the handle to prevent sudden recline. When reclining the back, please be carefull not to get fingers caught between the back and the seat.
- Page 10 HEAD SUPPORT A) Lateral adjustment of the head support. B) Angling the head support. C) Angling the arm of the head support. D) Height adjustment. A, B, C and D have to be loose, to make correct head support adjustments. When the correct position is deter mined, tighten A, B, C and D.
- Page 11 PUSH BRACE / PUSH HANDLES Panda Standard: The fittings are mounted on the back using the Allen key (A). The push brace/push handles are mounted in their fit tings on the seat back. Fasten with the handle (C). Panda Active: Start by mounting the fittings in the back rest as shown (B).
- Page 12 SWING AWAY SHOULDER SUPPORTS A) The shoulder supports are mounted on the head support bar. Mount the head support bar in the fitting on the seat back. B) Pull out the release knob to swing the shoul- der supports up and away. C) Use a Allen key to heightadjust the shoulder supports.
- Page 13 SIDE SUPPORTS Remove the back cushion and mount the side supports in the slots in the seat back (A). SWING-AWAY SIDE SUPPORTS Remove the back cushion and mount the swing- away side supports in the slots (A) in the seat back.
- Page 14 SWING-AWAY KNEE SUPPORTS Attach the fitting (A) beneath the seat with the 4 mm Allen key. Insert the knee supports in the fitting and fasten with the 6 mm Allen key (B) * Loosen the screws (C) with the 6 mm Allen key to adjust the angle of the knee support bars.
- Page 15 FOOTREST/ FOOTBOARD A) Use the clamping handle to mount and depth adjust the footrest bar. B) Use the handle to angle the footrest bar. C) Use a 6 mm Allen key to height adjust the footrest. D) Use a 6 mm Allen key to angle the footrest. E) Use a 6 mm Allen key to height adjust the footbard.
- Page 16 MOUNTING FIXLOCKS Fixlocks can be installed on the Panda seat to easily and quickly fasten and adjust the strap tie- downs. The hip belts (85427-x), abduction belts (89112-x and 89108-x), 5-point belts (89665-x), chest harness (85428-x) and belt/cross vests (89625-x) can then be fastened quickly and in the correct position.
- Page 17 ARM RESTS AND TRAY A) Height adjustment of the arm rests. B) Adjustment of the tray, sideways. C) Depth adjustment of the tray. D) Angling the tray, by angling the arm rests. The tray can only be mounted on a Panda Futura equipped with arm rests.
- Page 18 Use this drawing together with the descriptions on the following pages.
- Page 19 VEST AND CROSS VEST Mount the fixlocks in the back. See page 18. The vest and cross vest can be opened and closed by using the buckles and the zipper. Follow the instructions below, with help from page 18. * Mount the shoulder straps in the belt fittings on the upper back.
- Page 20 5-POINT BELT Mount the fixlocks in the back. See page 18. The 5-point belt can be opened and closed by using the buckles. Follow the instructions below, with help from page 18. * Mount the straps (E) in the belt fittings in the seat or in the belt fittings (D).
- Page 21 HIP BELT Mount the fixlocks in the seat. See page 18. The hip belt can be opened and closed by using the buckles. Follow the instructions below, with help from page 18. * Mount the straps in the belt fittings under the seat (D).
- Page 22 PELVIS HARNESS Mount the fixlocks in the seat. See page 18. Follow the instructions below, with help from page 18. * Open the buckles (G). * Mount the straps (D) in the belt fittings under the seat (D). * Place the user on the harness and close the buckles (G) over the thighs.
- Page 23 FOOT STRAPS The foot straps can be opened and closed by using the velcro or the buckle (A). Follow the instructions below for mounting. * Open the straps and pull them (A) through the slides in the foot plates. * Close the straps around the users foot. Take care that all the fixations and adjust- ments are placed and fitted correctly and check it on a regular basis.
-
Page 24: Instructions
H-BELT Mount the fixlocks in the back. See page 16. The H-belt can be opened and closed by using the buckle. Follow the instructions below, with help from page 16. * Mount the shoulder straps in the belt fittings on the upper back. (A) * Mount the straps in the sides in the belt fittings on the back (B).
Need help?
Do you have a question about the Panda Futura and is the answer not in the manual?
Questions and answers