Trividia True Metrix Air Owner's Booklet
Hide thumbs
Also See for True Metrix Air:
- Instructions for use (1 page) ,
- Quick reference manual (2 pages)
Table of Contents
Advertisement
Advertisement
Table of Contents

Subscribe to Our Youtube Channel
Related Manuals for Trividia True Metrix Air


Summary of Contents for Trividia True Metrix Air
- Page 1 BLOOD GLUCOSE MONITORING SYSTEM Owner’s Booklet...
-
Page 2: Introduction And Important Information
INTRODUCTION: TRUE METRIX AIR Blood Glucose Monitoring System TRUE METRIX AIR is a simple, accurate way to test whole blood glucose (sugar) level, anytime, anywhere. Our goal is to provide quality healthcare products and dedicated customer service. Importance of Blood Glucose Monitoring... - Page 3 For the most accurate results using TRUE METRIX AIR: • Read all product instructions for use before testing. • Use of TRUE METRIX AIR in a manner not specified in this Owner’s Booklet is not recommended and may affect ability to determine true blood glucose levels.
- Page 4 FOR PATIENTS: • DO NOT use on more than one person. ALL parts of the TRUE METRIX AIR Blood Glucose Monitoring System could carry blood-borne pathogens after use, even after cleaning and disinfecting.
- Page 5 • If there are symptoms of low or high blood glucose, check blood glucose immediately. If the result does not match the way you feel, repeat the test. If the results still do not match the way you feel, contact a Doctor or Healthcare Professional immediately.
- Page 6 IMPORTANT INFORMATION (cont.): FOR HEALTHCARE PROFESSIONALS: • The TRUE METRIX AIR Blood Glucose Meter can be used on multiple patients. Healthcare Professionals always need to wear gloves and follow Cleaning/Disinfecting section and/or adhere to the infection control policies and procedures approved by their facility. The test strips and lancets are for single-use.
-
Page 7: Table Of Contents
TABLE OF CONTENTS Contact Information, Fast Test Guide, Expected Results..See Cover Introduction and Important Information .......1 Know Your System Meter ..................8 Test Strip ................11 Control Solution ...............13 Getting Started .............14 Quality Control Testing ...........16 Automatic Self Test ............16 Control Test ...............17 How to Test Control Solution .........18 Testing Blood Obtaining a Blood Sample ..........22... - Page 8 Meter Memory View Averages ..............37 View Memory ..............38 Pairing (Connecting) Meter with Mobile Device ....39 System Care Meter Care, Cleaning and Disinfecting ......43 Control Solution Care ............45 Test Strip Care ..............45 Lancing Device Care and Cleaning ........46 Changing Battery ..............48 Troubleshooting ..............50 Messages ................52 Performance Characteristics ........55...
-
Page 9: Know Your System Meter
Know Your System Meter Top of Meter ① “ ◀ ” Button Decrease numbers in Meter Set Up; add ALT Symbol; move backward by date/time when viewing results and Averages in Memory; scroll through Event Tags to mark results (if feature on). ②... - Page 10 Front of Meter Back of Meter ① Display Screen Shows results, messages, user prompts, information. ② Test Port Insert Test Strip here, contact blocks facing up. ③ Strip Release Button Releases test strip after testing for disposal. ④ Battery Door Use one non-rechargeable 3V lithium battery (#CR2032), positive (“+”) side up (see Changing Battery).
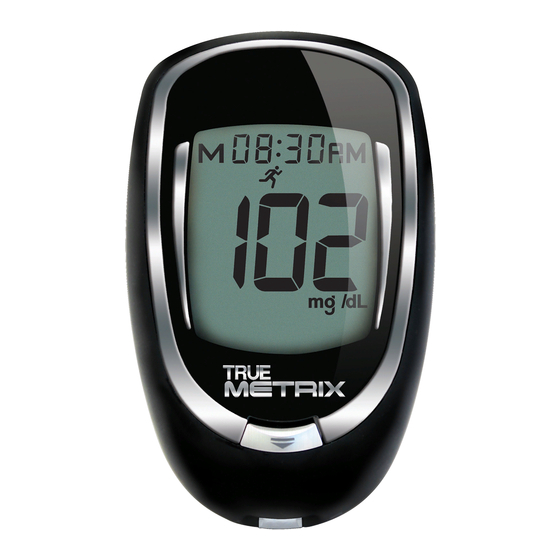
- Page 11 Full Display Screen 10 11 12 1. Result is from Memory 2. Time, Date 3. Time is AM/PM 4. Bluetooth Symbol and Event Tag Symbols 5. Result is 7, 14, 30, 60 or 90 day Average 6. Test Result 7. Control Symbol 8.
-
Page 12: Test Strip
Test Strip Top of Test Strip ① Contact End - Insert into Test Port with contact blocks facing up. ② Sample Tip - Bring Tip of test strip to top of sample drop (blood or control solution) after Drop Symbol appears in the Display. Note: Insert test strip into meter before touching Sample Tip to blood or control solution drop. - Page 13 Test Strip Vial Label May 30, 2018 ① Lot Number ( ) - Used for identification when calling for assistance. ② Use By Dates ( ) - Write date first opened on vial label. Discard vial and unused test strips if either the open vial Use By date or the date printed next to on vial label has passed, which- ever comes first.
-
Page 14: Control Solution
Control Solution Control Solution Bottle Label ① Lot Number ( ) - Used for identification when calling for assistance. ② Use By Dates ( ) - Write date first opened on bottle label. Discard bottle if either 3 months after first opening or date printed next to on bottle label has passed, whichever comes first. -
Page 15: Getting Started
Getting Started Meter comes with pre-set time and date, and Bluetooth Smart feature on. The Event Tag feature, Ketone Test Alert, and all Test Reminders are off. Before using the meter for the first time or after a battery change, check the time, date, Bluetooth Smart, Event Tags, Alert and Reminders, and update as needed (see Meter Set Up). - Page 16 Getting Started (cont.) Event Tags allow you to tag your blood glucose results to link to the following events: Before meal –test was taken just before a meal, After meal –test was taken after a meal, Exercise – test was taken during or after exercise, Medications –...
-
Page 17: Quality Control Testing
Quality Control Testing To assure you are getting accurate and reliable results, the System offers two kinds of quality Control Tests. These tests let you know that your System is working properly and your testing technique is good. Contact Blocks Face Up Automatic Self-Test An Automatic Self-Test is performed... -
Page 18: Control Test
Control Test We recommend performing Control Tests to check the performance of the system. Control Tests should be performed: • To practice before using the system for the first time, • For practice to ensure testing technique is good, • Occasionally when using a vial of test strips, •... -
Page 19: How To Test Control Solution
How to Test Control Solution Use ONLY TRUE METRIX Control Solution with the TRUE METRIX AIR Meter and TRUE METRIX Test Strips. 1. Check dates on control solution label and test strip vial label. Do not use control solution or test strips if either Use By Dates have passed. - Page 20 5. Insert test strip into Test Port. Meter turns on. Note: If test strip has been out of the vial too long before testing, an error message appears upon insertion of the test strip into the meter. Contact Blocks Face Up Release and discard old test strip.
- Page 21 9. With test strip still in meter, touch Sample Tip of test strip to top of drop of control solution. Allow drop to be drawn into test strip. Remove test strip from drop when meter beeps and begins testing. 10. Dashes appear across the Display to show meter is testing.
- Page 22 If Control Test result is outside range, test again. If result is still outside range, system should not be used for testing blood. Call for assistance (see Booklet cover for phone number). 12. After result is shown, Strip Release Button flashes. Hold meter with test strip pointing down.
-
Page 23: Testing Blood Obtaining A Blood Sample
TESTING BLOOD Obtaining a Blood Sample Refer to lancing device Instructions for Use for detailed instructions. The lancing device is for single patient use ONLY. For cleaning your lancing device see lancing device's Instructions for Use. Wash your hands thoroughly with soap and warm water after handling the meter, lancing device, or test strips. - Page 24 Tips for Forearm Sampling Important Notes Regarding Forearm Testing • Check with the Doctor or Diabetes Healthcare Professional to see if forearm testing is appropriate. • Results from the forearm are not always the same as results from the finger. •...
- Page 25 From Vein Venous whole blood drawn into only sodium heparin blood collection tubes must be used for testing. Mix well before use. DO NOT use venous whole blood collected in sodium fluoride blood collection tubes for testing. This may cause inaccurate results. Used lancets and test strips are considered biohazardous.
-
Page 26: How To Test Blood
How to Test Blood 1. Check dates on test strip vial being used. Do not use if either open vial Use By date (see test strip Instructions for Use) or date printed next to on vial label has passed, whichever comes first. 2. - Page 27 5. Lance fingertip or forearm. Allow drop to form (see Obtaining a Blood Sample). Apply 6. With test strip still in meter, touch Sample Sample Tip of test strip to top of blood drop and allow blood to be drawn into test strip. Remove Sample Tip from blood drop immediately after the meter beeps and dashes appear across the Display.
- Page 28 8. After the test is finished, result is displayed. The Strip Release Button flashes. To mark the result with an Event Tag, make sure that Event Tags are turned Test Result on (see Set Bluetooth Smart, Event Tags, Ketone Alert and Test Reminders). The Event Tag icons flash.
- Page 29 9. Hold meter with test strip pointing down. Press test strip Release Button to discard test strip in the appropriate container. Meter turns off. Result is stored in Memory with date and time. Note: Removing test strip before result displays cancels the test.
-
Page 30: System And Laboratory Testing
TRUE METRIX AIR blood tests should be performed within 30 minutes of a laboratory test. If you have recently eaten, fingerstick results from the TRUE METRIX AIR System can be up to 3.9 mmol/L higher than venous laboratory results. Diabetes experts have suggested that 95% of glucose meter results agree within 0.83 mmol/L of a laboratory system when the... -
Page 31: System Out Of Range Warning Messages
System Out of Range Warning Messages Meter reads blood glucose levels from 1.1 - 33.3 mmol/L. If blood test result is less than 1.1 mmol/L, “Lo” appears in meter Display. If blood test result is greater than 33.3 mmol/L, “Hi” appears in meter Display. ALWAYS repeat test to confirm Low (“Lo”) and High (“Hi”) results. -
Page 32: Meter Set Up
Meter Set Up Note: If the meter turns off at any time during Set Up, go back to Step #1 under Meter Set Up and begin again. 1. With meter off, press and hold “ • ” Button until the full Display is shown and a series of beeps sound (after about 10 seconds). - Page 33 4. The month (number) flashes. To change, press “ ▶ ” or “ ◀ ” Button to select the month. Press “ • ” Button to set. Set Month 5. The day (number) flashes. To change, press “ ▶ ” or “ ◀ ” Button to select the day.
-
Page 34: Test Reminders
Set Bluetooth Smart, Event Tags, Ketone Alert and Test Reminders Meter comes with Bluetooth Smart feature turned on. Event Tags, Ketone Test Alert and all Test Reminders are turned off. Note: If the meter turns off at any time during Set Up, go back to Step #1 under Meter Set Up and begin again. - Page 35 Event Tags Event Tags are used to mark a test result that was taken during a specific event. 1. After turning the Bluetooth Smart feature on or off, press “ ▶ ” or “ ◀ ” Top of Meter Button to turn Event Tags on or off. Press “...
- Page 36 Test Reminder Up to four Test Reminders per day may be set. Reminder sounds at set time for 10 seconds. Meter comes with all Test Reminders off. To set the Test Reminders: 1. After pressing “ • ” Button to set Ketone Test Alert, Display shows first Reminder setting (A-1).
- Page 37 4. Turn Reminders on and repeat setting the time for next 3 Reminders (if needed). Exit Set-Up Press and hold “ • ” Button until meter turns off. Meter also turns off after 2 minutes of non-use. Set Up choices are saved.
-
Page 38: Meter Memory View Averages
Meter Memory View Averages The Averages feature allows you to view the average of all your blood glucose results within a 7-, 14-, 30-, 60-, or 90-day period. Control Test results are not included in the Averages. You can review the average of your glucose results from the last 7-, 14-, 30-, 60-, or 90-days. -
Page 39: View Memory
View Memory Meter Memory stores 1000 results. When Memory is full, the oldest result is replaced with the newest result. 1. Press and release “ • ” Button. Meter displays 7-, 14-, 30-, Memory Symbol 60-, and 90-day Averages. Press and release “... -
Page 40: Pairing (Connecting) Meter With Mobile Device
Pairing (Connecting) Meter with Mobile Device Pairing enables meter to upload test results when requested by an App (application) on a mobile device. The meter must have the Bluetooth Smart feature turned on and mobile device must have an App that is able to receive the results. - Page 41 2. Press “ • ” Button on the meter. 3. Follow mobile device instructions in order to locate TRUE METRIX AIR meter (look for a device named NiproBGM). Enter the last 6 digits of the meter serial number (found on meter back label) into the mobile device.
- Page 42 • If you make any changes through the meter set up, turn the meter off and start at Step #2 in order to be able to pair. • Look for the Bluetooth icon on meter display to confirm it is turned on. You must first pair mobile device(s) with meter for test results to be uploaded.
- Page 43 WARNING! • To make sure that test results are secure, only let trusted people (doctor, family, etc.) download results to a computer program or connect to a mobile App. • Keep meter serial number private. • Allowing other people to download meter results to a computer or mobile App that is not yours could result in a loss of privacy of your data.
-
Page 44: System Care
System Care • Store system (meter, control solution, test strips) in carrying case to protect from liquids, dust and dirt. Do not keep system in an area where it may be crushed (i.e. back pocket, drawer, bottom of bag, etc.). •... - Page 45 To Clean the Meter: 1. Wash hands thoroughly with soap and water. 2. Make sure meter is off and a test strip is not inserted. Rub the entire outside of the meter with a cleaning/ disinfecting agent wipe with the active ingredients ammonium chloride with up to 0.25% of each quaternary ammonium compound...
-
Page 46: Control Solution Care
Stop using the Meter and use the contact information on the front cover for assistance if: • Meter display appears cloudy or any display segments are missing, • Markings on meter, including back meter label, are coming off or are missing, •... -
Page 47: Lancing Device Care And Cleaning
Lancing Device Care and Cleaning Cleaning removes blood and soil from the lancing device. Disinfecting removes most, but not all possible infectious agents (bacteria or virus) from the lancing device, including blood-borne pathogens. • Clean and disinfect immediately after getting any blood on the lancing device or if lancing device is dirty. - Page 48 4. Let lancing device air dry thoroughly before using to test. Replace End Cap. Gently pull back Arming Barrel and press the Trigger Button. A click will be heard if the lancing device is functioning properly. 5. Wash hands thoroughly again after handling the lancing device.
-
Page 49: Changing Battery
Changing Battery A low battery displays Battery Symbol while continuing to function. A dead battery displays Battery Symbol, beeps, and then turns off. To replace battery: Note: Use non-rechargeable 3V lithium battery (#CR2032). 1. Lift tab on Battery Door. 2. Turn meter over. While holding meter in one hand with Battery Battery Door facing down, tap meter... - Page 50 Note: If battery is out of meter or dead too long, meter may reset to original factory settings. Verify settings are correct after replacing battery by going into Meter Set Up and checking time, date, Ketone Testing Alert, and Testing Reminders. Change if needed. Results in Memory are not deleted and time and date on the results does not change if battery is dead or removed for any length of time.
-
Page 51: Troubleshooting
Troubleshooting 1. After inserting test strip, meter does not turn on. Reason Action Test strip inserted upside Remove test strip. down or backwards Re-insert correctly. Test strip not fully Remove test strip. Re-insert inserted test strip fully into meter. Test strip error Repeat with new test strip. - Page 52 Troubleshooting (cont.) 3. Meter Bluetooth Smart feature is enabled but test result was not received by mobile device. Reason Action Mobile Device Turn on the mobile device. containing App linked to the meter not turned on. Bluetooth Smart on the Turn on Bluetooth Smart on mobile device is turned the mobile device.
-
Page 53: Messages
Messages Display Reason Action Repeat with new test strip, using capillary whole blood from the finger, forearm or Invalid venous whole blood collected Haematocrit only in a sodium heparin blood collection tube. If error persists, contact for assistance. Move meter and test Temperature strips to area between error... - Page 54 Display Reason Action Meter Contact for error assistance. Retest with new test strip. Test strip error If error persists, contact for or very high assistance. If symptoms such as blood glucose fatigue, excess urination, thirst, result (higher or blurry vision are found, follow than Doctor or Healthcare Profession- 33.3 mmol/L)
- Page 55 Display Reason Action Do not use meter Broken for testing. Display Contact for assistance. Retest with new test Out of range strip. If result is still - High results “Hi” (High) > 33.3 mmol/L “Lo” (Low) - Low results contact Doctor <...
-
Page 56: Performance Characteristics
Performance Characteristics Precision: Precision describes the variation between results. There are two types of precision results measured, repeatability (using blood) and intermediate precision (using control solution). Repeatability: N=100 Mean (mmol/L) 2.4 11.3 17.8 SD (mmol/L) 0.09 1.16 0.24 0.39 0.49 Intermediate Precision: N=100 Mean (mmol/L) 2.1 18.4... - Page 57 For Healthcare Professionals 99.3% of TRUE METRIX AIR fingertip values performed by healthcare professionals (HCP) fell within 0.83 mmol/L of the YSI results at glucose levels < 5.55 mmol/L and within 15% at glucose levels > 5.55 mmol/L. Fingertip Samples (HCP vs. YSI) for glucose concentrations < 5.55 mmol/L...
- Page 58 Zone A of the Parkes Error Grid (PEG). For Consumers 99% of TRUE METRIX AIR fingertip values performed by users fell within 0.83 mmol/L of the YSI results at glucose levels < 5.55 mmol/L and within 15% at glucose levels > 5.55 mmol/L.
- Page 59 98% of TRUE METRIX AIR forearm values performed by users fell within 0.83 mmol/L of the YSI results at glucose levels < 5.55 mmol/L and within 15% at glucose levels > 5.55 mmol/L. Forearm Samples (User vs. YSI) for glucose concentrations < 5.55 mmol/L...
-
Page 60: System Specifications/Chemical Composition
System Specifications Result Range: 1.1 - 33.3 mmol/L Sample Size: 0.5 microlitre (0.5 µL) Sample: Fresh capillary whole blood, venous whole blood collected in sodium heparin blood collection tubes, or control solution Test Time: Results in as little as 4 seconds Result Value: Plasma values Assay Method: Amperometric Power Supply: One 3V lithium battery #CR2032 (non-rechargeable) -
Page 61: Electromagnetic Compatibility
System Safety Information Electromagnetic Compatibility This meter meets the electromagnetic compatibility requirements as per EN ISO 15197:2015 and EN 300 328. It meets the electromagnetic emissions requirements as per EN 61326 series and EN 301 489-1 and EN 301 489-17. Interference from the meter to other electronically driven equipment is not anticipated. -
Page 62: References
References Joslin Diabetes Center. Goals for Blood Glucose Control [Electronic Version]. Retrieved June 8, 2015 from http://www.joslin.org/info/Goals-for-Blood-Glucose-Control. html. FDA Public Health Notification: Use of Fingerstick Devices on More than One Person Poses Risk for Transmitting Blood Borne Pathogens: Initial Communication Update 11/29/2010 [Electronic Version]. -
Page 63: Notes
Notes:... - Page 64 Notes:...
- Page 65 Notes: REA4UKT03 Rev. 50...
- Page 66 BLOOD GLUCOSE MONITORING SYSTEM CODING CODING Distributed by: Trividia Health UK Limited 27 Old Gloucester Street London, United Kingdom WC1N 3AX UK: 0800 689 5035 © 08/2017 Trividia Health, Inc. REA4UKT03 Rev. 50...
Need help?
Do you have a question about the True Metrix Air and is the answer not in the manual?
Questions and answers