SOMFY Lighting Indoor RTS Operating And Installation Manual
Hide thumbs
Also See for Lighting Indoor RTS:
- User manual ,
- Instructions manual (20 pages) ,
- Instructions (3 pages)
Table of Contents
Advertisement
Quick Links
Advertisement
Table of Contents

Related Manuals for SOMFY Lighting Indoor RTS


Summary of Contents for SOMFY Lighting Indoor RTS
- Page 1 Lighting Indoor RTS Operating and installation guide...
-
Page 2: Table Of Contents
Lighting Indoor RTS Contents 1. Brief overview of the Lighting Indoor RTS 2. Safety - Important information 2.1 Installation and commissioning 2.2 Operating 2.3 Environment 3. Content of the kit and tools required 3.1 List of parts 3.2 Tools required 4. -
Page 3: Brief Overview Of The Lighting Indoor Rts
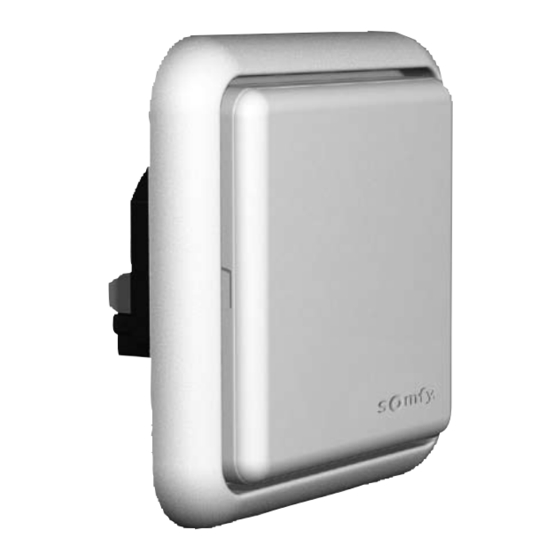
1. Brief overview of the Lighting Indoor RTS The Lighting Indoor RTS is used to control one or more incandescent or halogen bulbs from a single control point equipped with Radio Technology Somfy (RTS). -
Page 4: Operating
Lighting Indoor RTS Frame Screw Bracket To install the Lighting Indoor RTS on a surface, use only the Somfy housing for surface mounting designed for the Lighting Indoor RTS (not supplied). Caution: The frame (3) can only be used for recessed mounting. -
Page 5: Tools Required
Protection rating: Inside use, in a dry room - IP 30 Frequency: 433.42 MHz Range: 20 m through two concrete walls; 200 m in open space Power supply: 230 V; 50 Hz Fuse: 3.15 A Power: 500 W max. Copyright © 2008 Somfy SAS. All rights reserved. -
Page 6: Mounting The Lighting Indoor Rts
60 mm in diameter (minimum depth: 40 mm) or in a Somfy housing for surface mounting (not supplied). Caution! To install the Lighting Indoor RTS on the surface of a wall, only use the Somfy housing for surface mounting which is compatible with the Lighting Indoor RTS (not supplied). - Page 7 Lighting Indoor RTS flathead screws with a diameter of 3 Place the Lighting Indoor RTS (2) inside the frame (3). Wire the Lighting Indoor RTS according to the diagram opposite: • (a) / (b) = Output • (L) = Live •...
-
Page 8: Mounting And Assembly On A Surface
Somfy recommends fitting the Lighting Indoor RTS in place of the original switch. To install the Lighting Indoor RTS on a surface, only use the Somfy housing for surface mounting which is compatible with Lighting Indoor RTS (not supplied). -
Page 9: Programming The Control Point
"Programming the control point" before fitting the cover. 6. Programming the control point To commission the Lighting Indoor RTS, a RTS control point must be recorded in the Lighting Indoor RTS. This control point is used to switch bulbs connected to the Lighting Indoor RTS on or off. -
Page 10: Accessing The Lighting Indoor Rts Prog Button
6b) Telis 4 Soliris RTS remote control, see paragraph 6.8. 6.3 One-touch point 6.3.1 Identifying the model Check that the control point has an elongated button. Remove the front cover from the one-touch point: Copyright © 2008 Somfy SAS. All rights reserved. - Page 11 The indicator light comes on. ► The bulb connected to the Lighting ► Indoor RTS comes on and then goes off. Lighting Indoor ► PROG function is activated for approximately 2 minutes. Copyright © 2008 Somfy SAS. All rights reserved.
- Page 12 Press on the other side until it clicks, to fix the front cover in its bracket One-touch point with a white front cover: Refit the front cover on its bracket Copyright © 2008 Somfy SAS. All rights reserved.
- Page 13 If the bulb connected to the Lighting Indoor RTS lights up, the Lighting Indoor RTS works. If the bulb connected to the Lighting Indoor RTS does not light up, contact the Somfy assistance service. Copyright © 2008 Somfy SAS. All rights reserved.
-
Page 14: Point With Up/Stop/Down Buttons
Turn the front cover over: The PROG button is located next ► to the battery (b). Caution! If, after removing the front cover, no PROG button is found, this means Copyright © 2008 Somfy SAS. All rights reserved. - Page 15 If the bulb connected to the Lighting Indoor RTS does not light up, contact the Somfy assistance service. Refit the control point front cover: Insert the mounting lugs into their notches on one side of the front cover. Copyright © 2008 Somfy SAS. All rights reserved.
-
Page 16: Timer
Restore the mains power supply. Press and hold the PROG button (A) on the Lighting Indoor RTS: The indicator light comes on. ► The bulb connected to the Lighting ► Indoor RTS comes on and then Copyright © 2008 Somfy SAS. All rights reserved. - Page 17 Indoor RTS so that the Somfy logo can be seen in the bottom right- hand side. Press on the cover until a click is heard: the cover is correctly fitted onto the Lighting Indoor RTS. Copyright © 2008 Somfy SAS. All rights reserved.
-
Page 18: Situo Control Point
Indoor RTS comes on and then goes off. PROG The control point is programmed ► in the Lighting Indoor RTS. Press the Up button on the Situo: If the bulb connected to the Lighting Copyright © 2008 Somfy SAS. All rights reserved. -
Page 19: Telis 1 Rts/Telis Soliris Rts Remote Controls
2 indicator lights, refer to the section "Telis 4 RTS/Telis 4 Soliris RTS remote controls". 6.7.1 Accessing the PROG button on the Telis Turn the Telis over: The PROG button (e) is located on ► the rear panel. Copyright © 2008 Somfy SAS. All rights reserved. - Page 20 Indoor RTS so that the Somfy logo can be seen in the bottom right- hand side. Press on the cover until a click is heard: the cover is correctly fitted onto the Lighting Indoor RTS. Copyright © 2008 Somfy SAS. All rights reserved.
-
Page 21: Telis 4 Rts/Telis 4 Soliris Rts Remote Controls
The Lighting Indoor RTS indicator ► light flashes. The bulb connected to the Lighting ► PROG Indoor RTS comes on and then goes off. The control point is programmed ► Copyright © 2008 Somfy SAS. All rights reserved. -
Page 22: Replacing A Lost Or Broken Control Point
Lighting Indoor RTS. 7. Replacing a lost or broken control point If the control point programmed in the Lighting Indoor RTS is lost or broken, another RTS control point must be programmed in order to switch the bulb connected to the Lighting Indoor RTS on and off. -
Page 23: Maintenance
8.1.1 Operation using a One-touch point Press the button on the One-touch point to switch the bulb connected to the Lighting Indoor RTS on and off: On/Off/On/Off/On etc. ► 8.1.2 Operation using a Telis 4 RTS or Telis 4 Soliris RTS remote... -
Page 24: Problems With The Lighting Indoor Rts
Lighting Indoor RTS 9. Problems with the Lighting Indoor RTS? Problem Possible causes Solutions The Lighting Indoor The Lighting Indoor Switch off the power supply RTS indicator light RTS wiring is and check the wiring – see does not come on. -
Page 25: Changing The Fuse
Lever it and lift the cover upwards, without using force, to detach the mounting lugs from the cover. Remove the Lighting Indoor RTS (2) Copyright © 2008 Somfy SAS. All rights reserved. - Page 26 Otherwise refit the wires in the corresponding wires - see section 5 "Mounting the Lighting Indoor RTS". Insert the Lighting Indoor RTS into the bracket. Refit the Lighting Indoor RTS so that "PROG" can be read. Press the Lighting Indoor RTS until a click is heard: the Lighting Indoor Copyright ©...
- Page 27 Indoor RTS so that the Somfy logo can be seen in the bottom right- hand side. Press on the cover until a click is heard: the cover is correctly fitted onto the Lighting Indoor RTS. Copyright © 2008 Somfy SAS. All rights reserved.
- Page 28 Tel: +1 (0) 609 395 1300 Website: www.somfy.com/nam/index. cfm?language=en-us Somfy hereby declares that this product conforms to the essential requirements and other relevant provisions of Directive 1999/5/CE. A Declaration of Conformity is available at www.somfy.com/ce. For use in the European Union, the Swiss Confederation (Switzerland) and Norway.
Need help?
Do you have a question about the Lighting Indoor RTS and is the answer not in the manual?
Questions and answers